Monday, June 25, 2012

Make your own "bun" feet

Our cousin Tiffany came to visit last week with her husband who was coming on architect business. For a couple days, during the days while he was busy, she helped me with some slipcovers on my couches and wing back chairs.  One of the first things that we did on the couches was to change the feet.  These couches we got free from some people at Church and although the couches are in really good shape, they needed some updating, including the feet.  They also needed to be raised up some so that they didn't feel so much like low-rider couches. 


Before
80's color upholstery and blah! feet. 

If you've never changed the feet on your couch, buying new ones can be pricey.  We checked out Home Depot and theirs were in the price range of $2.50 to $10.26 apiece.  Times that by 8 and you could be getting up there.  And since we wanted some feet that were 8 inches long we were looking at the pricier side of things.


So enter our project


I really just wanted some square tapered feet--pretty straight forward, but not available in the length we needed.  So instead we bought a 4 x 4 length of lumber and had them cut it into the lengths we needed there at the store.  Hubby told me he could've done that too--and I know he could, but they'll do that for free for you at Home Depot.  So why not and save yourself a step.  And lugging an 8 foot piece of 4 x 4 is not any easy task.


We brought the pieces home and hubby helped shape them for us.  There was a bit extra, just in case....


We used our miter saw and he set it up to cut some angles and then went to town.  


Afterwards he measured and drilled the holes for the bolts and we put those in.  
One end of the hanger bolt is made to go into the wood (wood screw) and the other end 
is made to go into the bottom of the couch (metal screw) into the metal fitting.


Then I got to sand them up nicely using our orbital sander (below).  
You can do it by hand, it will take longer, or use a different sander, 
but this one works great and the work went quickly.


You can put down a little piece carpet padding on your work surface so that the feet 
don't move around while you are sanding.  Works slick!


Left sanded edges and right unsanded edges.
You just want to soften them up a bit so you don't hurt yourself if you happen to kick them.


Paint or stain as desired and then they're ready to go.
I'm pretty sure I am going to leave them natural and just seal them up.

After


Details:
  • 4" x 4" x 8' length of fir lumber ($8.83).  Make sure you find a good one with as few knots as possible and straight. **Don't buy pressure treated timbers. We should've bought the fir board ($10.16) as I think it would've already been dried out more and not so sappy.
  • 5/16" x 3" Hanger bolts (4 pkgs. @ $.98/pair) You'll need to determine the size and length you need for your couch by measuring the old ones.
Total price:
$1.59 each for custom square tapered feet.  Love it!

I'll show you the couch slipcover later in the week. I've got just a little more to do on it.

Thursday, June 21, 2012

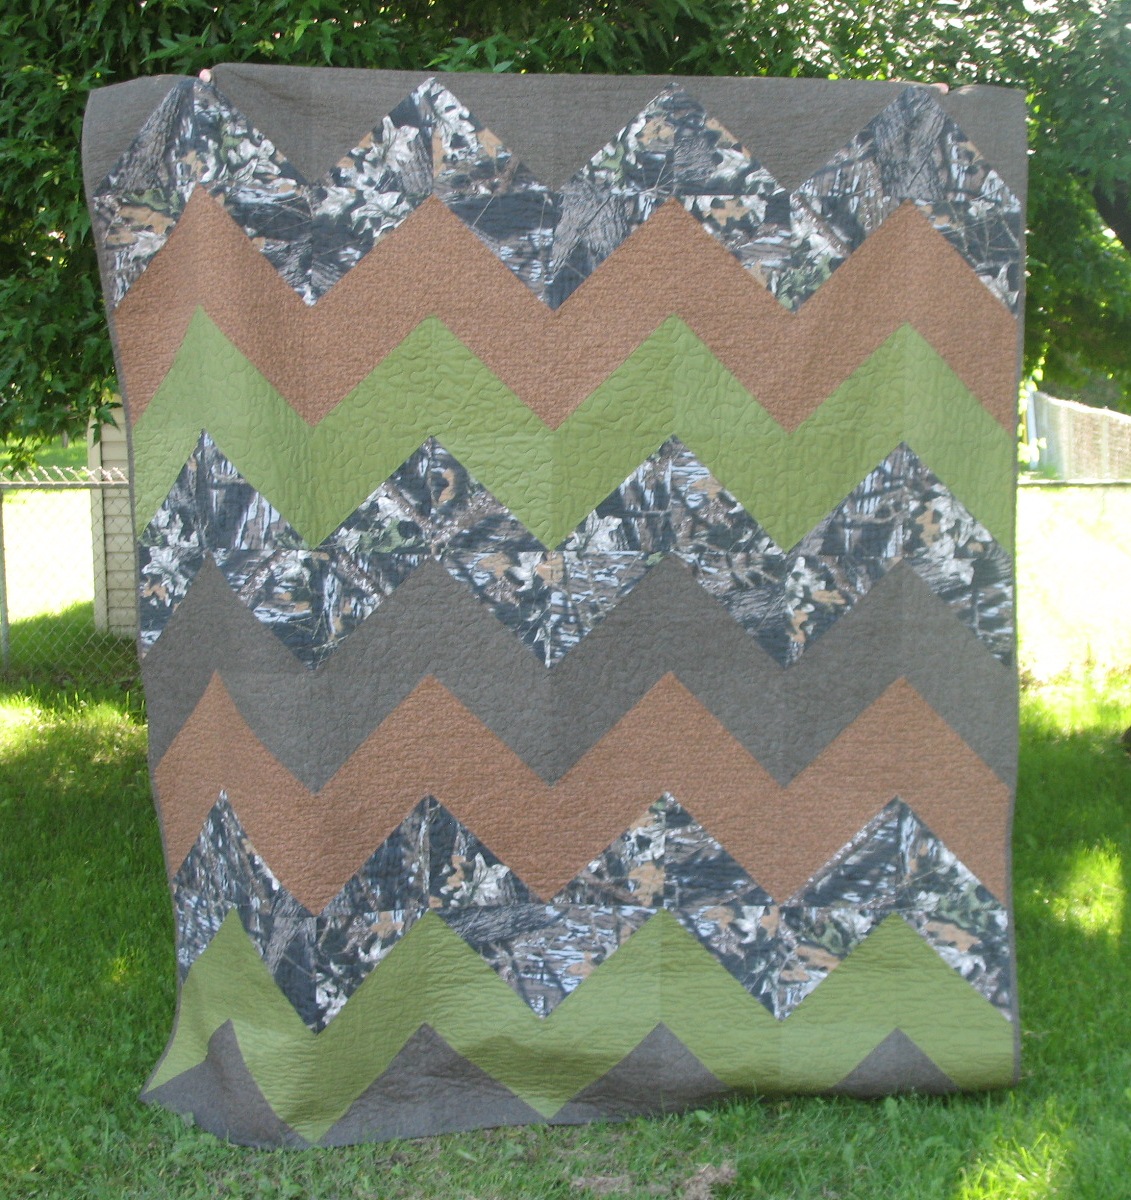
Camoflauge Zig Zag Quilt for my Hubby

Last year my hubby turned 40 and we, or I should say I, did nothing for him.  Yeah, I know, big time slacker wife.  As I was looking back and trying to figure out why this happened, it turned out that we were in the midst of a massive layoff which started a couple months before his birthday and continued on in a couple months afterward.  We didn't know if we'd have a job and for how long.  It was so stressful.  I had a hard time thinking about throwing a big bash or going away (which is what I really wanted to do) when we weren't sure what was going to happen the next day, literally.

So this quilt is to make up for that somewhat...I hope.

I may be actually making up for this for some time as he had some major surprises for me on my 40th.
And we still need to get away without the kids.

Emily sent me the inspiration link for this quilt--a large chevron pattern.  Cuts quickly and sews up quickly which is what I needed since I had to quickly assemble the top, send it to the quilter in order to get it back to me to be bound and all in time for Father's Day.


I added the green and lighter brown to pick up more of the color within the camoflauge.
I didn't get a chance to wash it before giving it to him, but I have since then and it has softened up nicely.
That Mossy Oak Break-Up fabric was a little stiff.  Like denim or lightweight canvas.


On the back I just pieced a couple strips.
They look "off" in this pic but the wind was blowing some.

Details:
  • Cut 10" squares and then cut into HST.
  • Sewed 8 blocks across and 9 blocks down.
  • No border
  • Machine bound with the dark print from the front.
  • Machine quilted by Lynn Peterson in meandering pattern.  She actually alternated the meander between zigzags so that you can subtly see the zigzag stripes on the back.
Finished size:
74 inches by 82 inches

Friday, June 8, 2012

Amish Buggy Update


Just a quick update for those that are participating in the block swap but are not regularly checking flickr.  Finished blocks are starting to pop up in the photo stream and they are looking awesome!!  As of today we have 14 participants.  (You can sign up anytime as the mail date isn't until July 15th)

There is also a discussion going on about what is a "true" Amish color.  From my research (google!), "true" Amish quilts use dark, muted colors (red, blue, black, purple) with pastels (pink, light blues, light greens, etc) only creeping in from the use of children's clothing (I don't think adults wear pastels).  The use of yellow and orange is avoided as these colors are considered "too flashy."  Since I am making a loose interpretation of an Amish quilt I don't mind yellow/orange.  But I guess you get to decide if you want a "true" quilt or a "loose interpretation."

By the way, I have yet to make a single block for this swap.  I've pulled fabrics, but no cutting.  Maybe tonight while my boys are camping and my girls are watching a girly movie I can get started.  Fingers crossed...

Here is a decidedly non-Amish quilt using the same blocks that is equally as cool as the original inspiration!!

Happy Sewing!
Emily

Wednesday, June 6, 2012

The 3 C's of a Modest Swimsuit

Today is our last day of school.  Hallelujah!!

Our pool pass is purchased and we're ready to go.
With all the FABULOUS weather we've had here over the last couple months
here in MN we started making swimsuits clear back in March.

More than a few weeks ago when I was having daughter #1 try on a tankini top that I had put together
we came up spontaneously with the 3 C's of Swimsuits (or modesty in general)

Cute, Comfortable, and Coverage

With all the swimsuits we make that is exactly what we are aiming for at our home. 
I might also have to add a 4th C:  constructed well.

We tried out this new pattern:  Kwik Sew 3672, which I have had in my stash for some time.  We love this skirt--used it earlier this Spring on all the Chevron skirts--but hadn't yet made the top.
K3672

Love it!  This is probably our new favorite tankini top.

It is probably the most comfortable tankini top ever.  Technically it is an "activewear" pattern--like a tennis top or for yoga, but I'm telling you it makes an awesome swim tankini. The coverage is so great and it sews together rather quickly too.  It is very similar to this Land's End tankini top, which I am going to use for inspiration on a couple alteration ideas including some color blocking on my next tankini.


I had to try it out on my daughter first to see if there were any kinks in the pattern that I would need to adjust before making this for a custom order I had.  The only changes we made were to add length (that is the norm around here) and then included bra cups along with the bra shelf.

I've already made 5 of these--one each for daughter #1 and #2, 2 for me and one for my custom order, who has already worn hers, loves it and wants another one.  This might just be our new go-to tankini pattern.

Hamming it up for the camera--showing off the swim bodies.

Here are what their swim short will be like that match the tops.
I didn't make them put them on for the "shoot".


And here is the top on a not-so-skinny-minnie: a.k.a. me.
We're wearing sunglasses to be incognito.

Ahhh! Summer...it's going to be a good one.

Monday, June 4, 2012

The End of the School Year

3 days left of school and I was able to get all 4 teachers' gifts completed.  One of my kids has 2 teachers who job share.  This is the second time we've had that situation and the kids seem to enjoy it.

Anyway, I made tote bags for all of them.  I feel like I haven't made bags in a long while.  And even longer since I've busted out my embroidery machine.


Glad they are all done, and glad that school is almost out.  Looking forward to sleeping in on Thursday morning....and Friday.  And then maybe the week after that we'll try to get ourselves on some sort of Summer schedule.

Enjoy!

Friday, June 1, 2012

Canning Ideas and Recipes

Here is a list of the canning recipes we have posted over the course of the last couple seasons.  Hopefully we've caught them all.  We will be adding to them as we post more recipes we've tried.


Pears and Peaches


Regular Raspberry Freezer Jam


Apple Pie Filling #2

Wednesday, May 30, 2012

Goals, Motivation, and Finishing What You Start!

I can't remember if I told you all (and I'm too lazy to go searching back) about the goal I set for myself at the beginning of the year.  It was that I couldn't start any new projects until I had my current projects list finished (or at the very least, under control!).  At the time my WIP list was hovering somewhere around 14 quilts. Ridiculous!  As you can imagine it was feeling daunting and overwhelming.  And my sewing room was out-of-control messy.

Blue/Green String Scraps Baby Quilt
Now that we are half way thru the year I thought it'd be fun to do a little progress report to show myself how I am doing.  

I am happy to say that I haven't started a single new project in 2012 (block swaps and bees don't count) that wasn't already in the works!  Can you believe it?  Neither can I!  

Baby "Children at Play"

Seems my normal mode of operation goes a little something like this:  Start a project off with a flurry of excitement and activity, get stuck on one thing (like finding a backing or making the last few blocks, etc...), only to put it aside for "later" and then start another new project. I figured out that my normal turn around time for any given quilt is between 6-9 months.  Seems a little crazy seeing how I sew every day.  Lots of sewing should = Fast turn around, right?

Leftovers from Ashlees' yellow and grey

I am happy to report that so far this year I have completed six bigger quilts (my finishes on the sidebar), with five little baby ones waiting for their bindings. (Yay, me!)  ALL of which where started LAST year.  (Boo, me!)   I still have three more bigger ones to go, but can finally see the light at the end of the tunnel.  As an added bonus, my sewing room is cleaner and my mind is less cluttered.  Go figure!

Now that my WIP list is under control I am dying to start some new projects.
I've got some ideas... But since I just got my copy of Sunday Morning Quilts I will probably start there.


Here's to finishing what you start!!!
Emily

Monday, May 28, 2012

Vera's Apron Surprise

I've been in cohoots with our friend Kevin for over a month now to surprise his wife, our sweet friend Vera, for her birthday last Saturday.  Kevin has guest posted on our blog previously and asked for some help to make an apron for Vera--because apparently the last one he tried to make for her didn't turn out as he had hoped.  As a trade for the many nice things he's done for us I told him I would make it.

This is me modeling, not Vera.


I'm so pleased with how it turned out.   Kevin picked out all the fun pretty fabric (love the combo) and then I went to work.  I added a few embellishments here and there: like the rick rack trim, bias tape edged hem and the pockets.  No apron should ever come without pockets.  And I have to say that I just love top-stitching.  I think that just makes the project so much polished and professional looking.


Happy (slightly belated) Birthday Vera! 
I am so glad we really were able to surprise you.


Notes:

  • Used a combination of Simplicity 3752 View A and "Summertime Blues", pg. 98 from A is for Apron.
  • 1 pkg. large rick rack--white.
  • 1 pkg. 1/4" double fold bias tape for the hem--white.
  • Remnant piece of 1/2" wide single fold bias tape--yellow.

Friday, May 25, 2012

Inroducing the Amish Buggy Block Swap


I have been intrigued with Amish Quilts for some time now.  They are beautiful in their simplicity, timeless in their design, and all out amazing in my book!

When I came across this quilt I knew I wanted to replicate it.  And what better way than with a block swap.  (You know I love a good block swap!)

So, I am happy to introduce our very first block swap! Yay!

 
Here's how it will work:

1. Everyone will use their own fabrics.  ~ The only stipulations on fabric are that it MUST be a true solid (NO print on print), NO white,  and nothing too thin (if you can see thru it, don't use it).  Other than that, use whatever you have on hand.  Just remember the golden rule of swapping: Don't swap what you wouldn't want in return!

2. Feel free to send in as many blocks as you want in groups of 5.  So if you want to make some potholders, send in 5 ~ a small wall hanging, send 10 ~ how about a small throw, send in 40.  Whatever number you feel comfortable making.  (I'm aiming for 40 for myself.)

Your blocks CAN ALL be made from the same 2 fabrics.  The variety will come when we swap those with what others have sent in.

3. When your blocks are finished you will mail them to me along with a Self Addressed Stamped Envelope.  Shipping Deadline will be July 15th. Please make sure you attach the correct amount of postage to both envelopes you are mailing.  Also please include a card with your name/address and # of blocks you sent so I can keep track of everyone.

4.  Once I receive everyone's blocks I will mix them up and send them back out.  You will get back the same amount of blocks as you sent in. 

Block Directions:  We will be using this tutorial, except that we will be using 2 1/2 inch strips, NOT 2 1/4".  Your block should measure 8.5 inches unfinished.

So, who's in?!
If you are active on flickr you can sign up here.
Not on flickr? Just sign up on this post.  Easy as that.


(I've read and re-read this post a million times, so I have no idea if it even makes sense anymore. Feel free to ask questions if you need clarification...)

*Pictures and directions used with permission from Karen Griska*

Wednesday, May 23, 2012

Red + White Progress

I'm so excited! 
My red and white blocks have started to trickle in for my quilt club ladies!!

(Can you guess which ones I've made??)


A little mock up shows how perfectly perfect I think this quilt is going to be!  :)


Monday, May 21, 2012

Scrappy Quilt Project Update

O.K. maybe this project isn't going to take me a year like I originally had thought.  I really like making these blocks and I can see where the number of rectangles I've cut may never end....especially as I add a few more here and there as I finish other projects.


I'm about halfway through the 90 blocks needed for this quilt.
Here is a peek at what it is going to look like.


After this scrappy project is complete I want to make Amanda Jean's "Checkerboard Quilt", pg. 128-131, from her book Sunday Morning Quilts.  I'll use 3" squares because I already have LOTS and LOTS of them cut and sorted for my class quilt projects that I've made in the past.

But first...this one.

Friday, May 18, 2012

Ashlee's Yellow and Grey

Ashlee's quilt is done!
And it didn't even take me another 9 months to complete.  Thank goodness!

Up Close
 Isn't it pretty?  Ashlee and I make a good team.


 The fabrics are a hodge podge of yellow and grey's she and I found at my LQS.  The main ones are from Joel Dewberry's Aviary line (...I think!)  

The yellow/grey color combo is super popular right now, as you might have noticed!
I have started collecting my own yellows and greys for myself a little quilt. :)


The backing is also by Joel Dewberry (Medallion maybe??), with a yellow gingham I can't remember, and a grey print from Aneela Hoey. How's that for sort of helpful?! :)


On a side rant note:  See how the medallion print design is not straight on the top and bottom edge?  What's up with that??  Seems it was not printed straight on the fabric. I have no idea if that was a mistake on the bolt I got or on all of them, but I was super annoyed and frustrated.  I tried to make it less noticeable and still keep it straight.  This was the best I could do.  So, fabric makers, just a note:  If you are printing such a huge design on fabric please make sure it is straight!  I can understand if a "cheap" print is off a bit, but this one should not have been.  Just saying...


Details:
Finished Size 60" by72".
Pattern from an Old Red Barn Quilt Along.
I have made it before. That one is living at our Mom's house.

Quilted by Lynn in an all over loopy design.
Linking up to Fabric Tuesday.

Thursday, May 17, 2012

Look who tried paper piecing...and Survived!

This paper pieced flying geese block has been one of my favorites for a long time.  (There are a million beautiful versions of it but this one and this one are personal favs!)  I've just been too busy too chicken to actually try it.  That is one of the great things about joining a virtual quilting bee, though. You are forced to step out of your comfort zone more often than not.  

I was a wee bit scared when Sheetal announced it as her pick for our May Bee Vintage Block.  But I dove in...and I'm happy to report there were no tears, no bad words, and only minimal amounts of seam ripping involved.  Not bad for a first attempt.


I actually made this red + white version as a tester to the vintage sheet one.  I am going to use it in my quilt club anniversary quilt.  I think I've mentioned that I'm asking for red and white blocks for that project.  Won't that be so pretty?  I think so...


Wednesday, May 16, 2012

Color Blocked T-shirt dress

Once again I've had this pattern (McCall's 4510) for awhile--trying to decide exactly how I wanted to make up this dress.  I was leaning towards a black and white version but then I found some thrifted knit sheets--$3 each for full size.  Brown and orange together--got the O.K. vote from my girls--and so I went for it.

And.....if it didn't turn out exactly how I liked then I wouldn't be out much money or effort.


The beauty of this dress--besides being made from t-shirt fabric and super comfy--is that it can be dressed up, like I did for Church with a pretty necklace and heels.  Or it can be dressed down with some sandals and worn on a summer day to the park with the kids  or out running errands.

I'm really happy with it.
The only change I made on it was to NOT put the little back neck loop/slit closure in.  Instead I just bound the neckline like a regular t-shirt and called it goo.

I REALLY wanted these earrings from Forever21 to go with this dress. 


But, alas, the orange ones were sold out.  Wahhh!
I'm still on the hunt for something similar to wear with this outfit.

Thursday, May 10, 2012

Peanut Butter Syrup

Last weekend the young women at church had a pancake breakfast fundraiser for girls' camp this summer.  We had quite the assortment of gourmet syrups and toppings.  This recipe was one of the biggest hits.  Most of my kids just put peanut butter on their pancakes anyway--so this was their favorite.  Our friend MaryAnn was more than willing to share her yummy recipe.

Peanut Butter Syrup
2 cups sugar (**half brown sugar and half white sugar is o.k. and even better if just making plain maple syrup)
1 cup water
1 tsp. maple extract

Combine above in a saucepan. 
Stir occasionally and bring to a boil. 
(This maple syrup is great on pancakes and waffles as is.)

Add 1 cup creamy peanut butter (MaryAnn uses Jif). ***I tried it with Peter Pan and the syrup separated.
Stir with a whisk until combined. 
Serve warm. (way better warm than not)

Enjoy your breakfast!
We sure have with this delicious syrup.


Tuesday, May 8, 2012

The Last of the Grandma Quilts

I FINALLY got my Grandma Quilt done over the weekend.  Yea!!
But since we've talked on and on about these quilts over the last year, I can't think of anything more to say about it.  I'll just leave you with a few pics and move on...


self-portrait


Quilts #1-3Renae'sSquares 
I thought it would be fun now that the Grandma Project is completely finished to show a collage with all the quilts we made.  Six in total.  All different and unique, but equally cool in their Grandma Awesomeness!  I'm sure (and I think my sisters would agree) that Grandma would be very happy that we recycled her shirts into such beautiful creations!


Details:
Hourglass Inspiration and Tutorial
Backing:  light blue/white striped thrifted sheet from my stash
Linking up to Fabric Tuesday 

Thursday, May 3, 2012

Quilt Club Blocks for May


For May it's Rochelle's turn to host club.  
She is a lover of blue, more specifically dark blue.
So here's what I came up with for her.
 
I was going for a sort of "trip around the world" look. 
 The ladies tend to use lots of dark sashing in their quilts, so I thought the white would pop nicely against all the dark.

For this block I was trying to do something different than my usual 2.5 square/postage stamp style block.  If you want to make your own, start with 3 7/8" squares and cut into HST.  Should come out to a 12.5" block like mine.

----------------------------------------------------------------------------------------

I also wanted to show you Kae's finished quilt top.
 
 As you might remember, in March she asked for red/white/blue blocks.  
Well, she was so excited to receive such lovely blocks from everyone that she showed us her finished top at our April meeting. (You can see that even my ugly block made the cut.)  We were all pretty excited to see that it turned out so great. (See? Dark sashing..) More importantly, Kae loved it!!


LinkWithin

Related Posts Plugin for WordPress, Blogger...