Showing posts with label Get Organized. Show all posts

Monday, July 1, 2013

Organizing swimsuit patterns

Well, we survived the storm of last week.  We finally got power on Tuesday evening.  I had left that morning with my 2 oldest to head out to Church girls' camp.  Then we survived that, with various problems and teen girl drama.  I don't have a lot to post because of all that and we're heading on vacation tomorrow too.  I was hoping to have a couple posts ready for while we are gone, but not sure that will actually happen.  If not, then...I'll just post when I get back.

Here is one little thing I did get done before all the craziness happen.

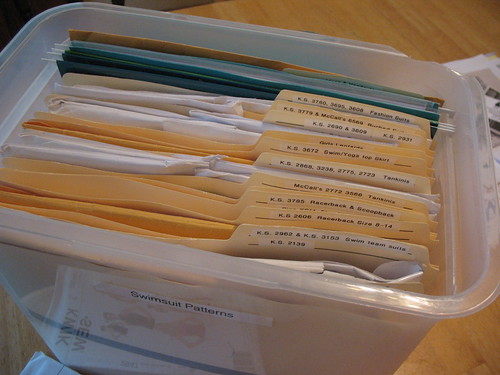
In the midst of sewing all of the swimsuits I better organized my stash of swimsuit patterns.  They were in this plastic file folder drawer.  It has a locking lid and a handle so I can haul it around easy.  I am still using it, but I changed out the hanging files and used pocket file folders instead.  It contains all the pattern pieces better.

Then I busted out my label maker.  Love that thing!


Now the patterns are categorized (by style mostly) and labeled and I can find which one I want so much easier.

Monday, March 1, 2010

Behind-the-door Organization

This is the "entry" to my 1960's built home. It is a 40" x 40" little cubby area.
Front door on the left. Closet door on the right.

When we first bought his home we had 1 small kid. It was a "big" house for us then. Not so much now with 5 kids. At times it feels like we are bursting at the seams. However, we aren't moving anytime soon (that's a whole 'nother pain in the rear). So instead we've had to adjust with the limited storage space that we do have available.

I'm not sure where I got this idea--I think our sister Shauna recommended this--or maybe we got it from Family Fun, but either way, I've been doing this for years and it has helped control the disaster/madness that usually occurs during Winter in our "entry". Enough time has gone by that a good portion of these pockets were ripped and unusable, after having been safety pinned for a time, too. I've needed a new one for at least a year now. Planned on sewing one (had a pattern in the stash) and adding another row of pockets. Never got around to it. Found a shoe organizer on clearance for $6 at Wal-Mart last week while looking for something else. Bought it. Now behind my door looks like this:

An additional 4 pockets help outs immensely!

Now after all that organization, and not counting the Winter accessories that are currently already on my children, I just need to find matches for these babies....

Yep, 13 gloves or mittens without a partner....
And those 2 center bottom that look like they are a pair....both righties.
Ugh!! Drives me nuts!

Monday, October 26, 2009

Library Book Storage Box

We love our local library here at home. We probably go at least every week or two to get new books, movies, or attend story time. However, with 5 kids, even if I limit them to only 4-5 books apiece we still end up with lots of books floating around our home. And really, they have a hard time limiting themselves to just a couple books. I'm not sure I want to limit them either--after all, we're talking about them being excited about books and reading.

Anyway, I used to have a basket sitting under one of my lamp tables in my living room to store all the books in one place. It has worked out really well, until recently when the basket has been so used and abused it is literally falling apart in front of us. I've tried to find another basket that I like and figured what I really needed was something more substantial since it will get so much abuse.

Years ago I saved this project sheet for some stacking totes (scroll to pg. 151 if viewing it online) out of the Reader's Digest magazine, Feb. '06, pg. 213. The pattern actually comes from the Reader's Digest Complete Do-It-Yourself Manual, check with your local library too--mine had some copies of this book.

I asked my favorite hubby if he could come up with a similar box--complete with handles and rolling casters so that we could have a new book box. Luckily in HIS shop he had some scrap wood that worked out just great for this project. He put it all together for me and then we attached the casters and I spray painted it to protect it somewhat.

It holds more books than the previous basket and I won't have to worry about it falling apart. The finished box measures 11" H x 15" W x 18" L, not including the height of the casters. Here's to reading!

Wednesday, January 21, 2009

The 6" Square and "Project: Kidz Quiltz"

When we were living in Missouri I briefly went to a quilting group at the Presbyterian Church across the street from my house.

One day on their marquee I noticed that they were working on their "Project: Kidz Quiltz" and were asking for volunteers to join them. I'm sure they were meaning for members of their own congregation to help, but what they got was me instead! They were all Grandma's, and then in walks a "20 something" me with my two little kids. They were very appreciative of the help and were so kind and patient with my kiddos, even telling me how much they enjoyed having them as a "distraction."

I learned SO MUCH from this crafty bunch of women. Their "Project: Kidz Quiltz" was a well oiled machine. They had a whole room in the basement of the church filled with donated fabrics, all color coordinated and sorted. They would go down and pick fabrics (some of which I thought were pretty ugly) and turn them into patchwork quilts to give to the local shelter. I think they give about 120 quilts every 6 months. And even the ugly fabrics somehow looked great when they'd put it into their quilts. Lesson learned: There is no such thing as ugly fabric.


Here is an example of a "Kidz Quilt":


They used a basic 6" square (15.2 cm) and added a double border of coordinating fabrics. The borders were usually a 3" (7.6 cm) outer border and a 2" (5.1 cm) inner border -- all measurements are before sewing. Their quilts were made with only 2 different fabrics to save themselves time. They would finish them off by tying them and doing a fold over binding (taking the extra fabric from the back and folding it over to the front).


I've made tons of these little quilts since spending time with those ladies. Now, for the past 3 years or so, I have been cutting up all the small scraps in my stash into 6" (15.2 cm) squares. I really don't like having small odd shaped scraps in my fabric stash so this helps me keep them organized. I sort them in Ziploc bags by color. Whenever I need some fillers I pull out my stash of squares. I cannot tell you how well this has worked for me.


This is my "go-to" present when I need something fast for a baby shower. The finished measurement of these quilts is approximately 45" (114.3 cm) square. It's a perfect size for babies!

The details: All you need to remember is the number SIX--Six squares across by six squares down with six different coordinating fabrics all cut into six inch squares. You can see in the above photos that I usually create 2 different 4-patch squares, which when laid out, creates a 9-patch design overall (look closely and you'll se it!)

EDITED: FINISHED QUILTS CAN BE SEEN HERE.

Tuesday, September 30, 2008

My Cheap Sewing Room Decor

I'm not really sure where this idea came from, but I like the idea of having a place on my sewing room wall to display some of my creations and to keep them from getting ruined while they are being finished. Remember, also, that since I am a visual person my projects get done lots faster if I can actually see them every time I go in my room!


Here is all I did: I bought a $9 wrought iron curtain rod (24"-48" long) and some decorative drapery rings (on clearance for $4) and had my darling husband hang them up.


Since I love fabric, I thought this would be a great way to display some pretty ones and also make my walls beautiful. I am pretty sure that I'm going to get a second rod on this same wall and use it to hang up clothing items I am working on.

Wednesday, September 17, 2008

Magnetic Bulletin Board

I originally saw the idea for a magnetic bulletin board from Martha Stewart. I had planned on making it as is, but my plans changed slightly. I also looked at the framed bulletin board project from Martha and sort of did a combination of the two bulletin boards for my own. Emily and I had a good chuckle today as it seems that we are on the same wavelength with a number of our projects. This project you can do if you cannot find a magnetic board already assembled as she did.

Awhile ago one of my children, who shall remain unnamed, kicked off a shoe towards the shoe bin and instead of it landing where it was intended it hit one of the pictures hanging above the bin and busted the glass. Thank you very much. And this was a child that really should know better than to do that. I finally decided this week to replace the glass. I was just going to buy the replacement glass alone at Michael's; however, this week their frames and glass were on sale ($4) and cheaper than buying only the glass (about $6-7).

So with the new frame, glass removed and put into the old picture frame, I decided to turn it into a bulletin board, for said child who broke the glass in the first place. Basically I followed the instructions about buying a piece of sheet metal and put it into the frame after I covered it with two cute pieces of scrapbook paper. You could also use a piece of cute fabric--but I couldn't find anything in my stash that I thought this kid would like so I went with the scrapbook paper.

Sheet metal--(galvanized panning is what they called it) bought at my local Home Depot store in the ductwork section for $5.49 for a 16" X 36" piece. Check to make sure it really is magnetic. Hubby informed me that not all galvanized material is magnetic. The 16" x 36" piece would make 3 - 11 X 14 size boards. We cut it to size using tin snips. Mark the size you need with a permanent marker and straight edge before cutting.

Here's a little trick to help you before you spray paint your frame. On the back side of your frame pound in slightly a nail at each corner.
Then when you flip it to the right side it is raised up off your work surface and you can easily paint the sides without having to get your hands dirty.
Cut to size your galvanized panning and scrapbook papers. I used Elmer's Craft Bond Spray Adhesive. I sprayed the back of the blue denim paper and then smoothed it directly onto the metal. Then repeated the process with the floral paper. I had borrowed a friend's scallop cutter beforehand to make a wave on the floral piece. I like how it turned out.
Here's a little tip about the spray adhesive. Sometimes it it isn't always easy to get the spray off your hands, if you've accidently sprayed yourself, with just soap and water. This trick we got from Grandma J.--she taught it to us when we were refinishing some furniture. It takes off wood stain slick as can be if you get it on your hands. I tried it today as I got my hands sprayed slightly and it works for this too. Rub your hands with margarine really well before washing with soap and water and the stickiness (or stain) will come right off.

Finished project--I have plans to make some fun magnet buttons and will include them with the board. I think I will be saving this for a Christmas present for the kid. Total cost--$6

For another idea--this would be a good size if you wanted to display "framed" any of your children's artwork. With some nice magnets you could put their art projects in the "frame" and then change it as needed.
I used the remaining galvanized panning to make myself a magnetic board too. I bought a clearance (goof-up custom order) frame--16" X 24" at Jo-Ann's today for $10, a piece of foam board--I cut it to the size of the back of frame and put it all together. Total cost for this board--around $15. I'll have to attach something to hang it also. I may spray my frame red, but for now I am leaving it as is. I also haven't decided yet if I will be using it as my own inspiration board, or a message center in my kitchen.
Tuesday, September 16, 2008

Inspiration Board

Another project that was started awhile back for me and recently finished: My Inspiration Board for my sewing room.

I bought this framed magnetic board from my local Roberts Craft store that measures 54" long by 30" high (on the outside edge). They are normally $60, but I used a 50% off coupon and only paid $30.

All I did was paint it black--EASY!
Then I had to get my sweet husband to hang it up for me--HARD!

After months of being propped up against my wall, my sweet husband finally hung it up!
Here it is on my sewing room wall!
I really, REALLY like it!
I am a visual person, so anytime I can see my ideas or inspirations I am a happy girl!

My favorite thing on the board would have to be these awesome magnets Leslie introduced me to. They are from a place called Amazing Magnets. Seriously, they are so cool!

The ones I bought are super tiny! You hardly notice them on the board, which is the main reason I love them. But, boy are they strong! But if you don't like tiny, they sell lots of different shapes and sizes!

Friday, May 30, 2008

Going Green...

....or blue, yellow, orange, or purple. I finally found a knitted mesh bag pattern, Everlasting bagstopper, that I liked so that I could make a couple of these shopping bags. I really don't mind plastic, but I thought I'd try harder to be a little more enviro-friendly. A year or more ago I bought a number of skeins of cotton yarn. I'm not really sure why, except that I really loved all the pretty colors. So now I am trying to use them up.This one is Sugar 'n Cream--color Sun Kissed Ombre. L. has her eye on this one. As she told me--it has two of her favorite colors: yellow and blue. Strap details--cut 27 inch length of cotton strap per side (1 1/2 yd. total length strap per bag). On the inside of the bag fold up end of strap 1/2 inch and then pin and sew the strap on with a box with an X pattern (around all 4 sides and then cross in the middle of the strap to secure).

**Here are a couple of the changes that I made on this pattern. Instead of making it with 116 stitches in the round I reduced it to 114 on the second bag. That way when you thread the drawstring it works out a little better. I don't like the two ends to be coming out of the same hole (call me crazy or anal!) I bought 1 yd. of drawstring elastic or drawstring cording. You may want to go up to 1 yd. and 1/8 to have enough "give" in the bag once you add the cord lock and knot the ends.

The first bag--blue/white combo (Lion Brand--color Wedgewood) I got carried away, wasn't paying as close attention as I should have and knitted more rows than suggested. I would definitely try and stick with the 10" suggested so that the bag doesn't hang down too low. I counted and that is about 25 eyelet holes high. I used this longer blue bag for water bottles and snacks while we were at the Omaha Zoo a couple weeks or so ago and it was hanging a bit longer than I would like it--and I'm tall. So I'm thinking that for a shorter person it would be WAY too long. However, I also washed it once we got home and it seemed to be a bit better.
When you bind off the last row I moved up to a size 8 needle, which worked just fine for me. I have read on other sites, though, that some have had to go clear up to a size 11 to make sure the binding off wasn't too tight. I think that size 8 is just fine.

For this orange version I decided to try a different method for the straps. I got the idea from this pattern, but also needed a little instruction on how to cast on additional stitches at the end of a row. That particular bag pattern didn't come with any instructions on how to do that. Once I figured that out it was pretty easy. Instead of knitting just one row and the bind off for the handles, I knit and then purl alternate rows for 5 total rows before binding off. I wanted a little sturdier handle than the pattern originally indicated.
I used Sugar 'n Cream--color Creamsicle with Peaches 'n Cream--color Sunburst for this version. M. will get this bag. She is all over orange.
I was playing around with a different edge--K3, P3 with Sunburst before making the handles.

The drawstring I thread at about eyelet row 8. This is so, if you want, you can bunch the bag up inside of itself and pull tight for storage. If you want you could put the drawstring up toward the top edge of the bag to use as a closure when you are toting things a round.

I think that my girls are going to end up using these for their own personal swim bags. B. is hoping I'll make her a pink version. Actually I am working on hers right now. I'll keep this purple combination (Sugar 'n Cream--color Jewels and Lion Brand--color Purple) for myself along with the blue/white combo.

Friday, April 11, 2008

Update on Covered Tin Cans

Yesterday I walked by my tin cans and discovered they were all peeling at the seam. So if you decide to try them on your own just add a very thin line of Elmer's glue at the seam (have to hold it together for a few seconds for it to bond). That way it won't peel up. Problem: Solved! Also I sprayed both the paper and the can surface with mounting adhesive. The instructions on the can said this would produce a "permanant" bond. Not so much. So hopefully this helps.

Thursday, April 10, 2008

More covered tin cans...

Here are some "boy" versions of the covered tin cans. Z. hasn't yet seen them, but I'm pretty sure he'll be happy to store his treasures in something fun like this. He tends to want to save some of the recycle containers anyway--this way at least they look better sitting up on his shelf.

Tuesday, April 8, 2008

Beautify your desk

Feeling blah today as it is very murky and rainy outside. Yuck! These picked me up a bit.

Covered Tin Cans found in this month's Good Housekeeping

Their version:


My version:


These are SO EASY! You could use them to hold pens and pencils, sewing supplies, or as little flower vases for a decorative table. I haven't decided what I am going to use them for yet...probably put on our desk.

*** I thought it would be fun to do a giveaway. Especially since this little project took me about 20 minutes max. Enter to win your own set of paper covered cans by commenting on this post. Winner will be selected at random on April 23rd. (Sorry contributors, you can comment, but won't be entered) Can sizes my vary slightly. It depends on what I make for dinner in the next few days.

LinkWithin

Related Posts Plugin for WordPress, Blogger...