Friday, April 29, 2016

Prom Inspiration

It is Prom season and daughter #2 got asked to go to Mormon Prom here in a couple weeks.
She is excited.
This will be her first one.

Originally she wanted this skirt
Jaw dropping tulle bridal gown with halter high neck alabaster and crystal bodice | 6413 - Dori from Hayley Paige:
Pinterest source

Which we did find a pattern for it.  McCalls 7124
It would need so MUCH fabric.
I know I could do it, but I wasn't sure I really wanted to.

However, then she saw this and decided this was more like what she wanted.

Sherri Hill 50261(Aside from the bare midriff and backless situation...):
Pinterest here


We'll make it more modest--no bare midriff or back, and she wants short, possibly elbow length sleeves.
The skirt is what sold her on it.

And here is the fabric we found.

Jo-Ann Stores Simply Silky Prints Cosmos Poppy Spray Peachskin

Find it here.

Then we all bought some red performance fabric (think leotard or swim fabric) to go with.  She just wants a plain top to go with the fun skirt.

This is going to be so pretty once we are all done.
I'm excited for her.
And really this is going to be easy to sew together.

Details:

Friday, April 22, 2016

Friday Finds

Sadly, since moving a year ago, I've not found any great thrift stores around my area.
I've checked out a couple, on more than one occasion, and they haven't done much for me.
I don't normally buy clothes at the thrift store, because of the tall issue at our house, so I am looking for other items.  It just doesn't seem like I can find anything that calls out to me.
Hubby is probably thrilled about that as I haven't bought much in that department.

The couple times I've been back in our old neighborhood area I've stopped by my favorite store and found a bargain or two.  I suppose I'll just have to find other ways to fill my bargaining need.

Therefore, my Friday Finds section might be few and very far between from now on.
Here are some of the things I have found, and probably not posted about in the last number of weeks or months or even in the last year.

"Slinky" clock
Love this thing.


This baby was a challenge.
Buying a thrifted clock is a gamble.
It may not work...even with fresh batteries.
Tried it.
Nothing.
I could hear it "ticking" but the hands weren't moving.
I bought and subsequently returned two different clock mechanisms because those were not the right size.
Finally, with nothing left to lose, I took the mechanism apart.
What I found was that the cogs were off slightly so they wouldn't connect with each other.
I carefully put the cogs back in their proper place, refreshed the batteries and it has been working great ever since. YES!!

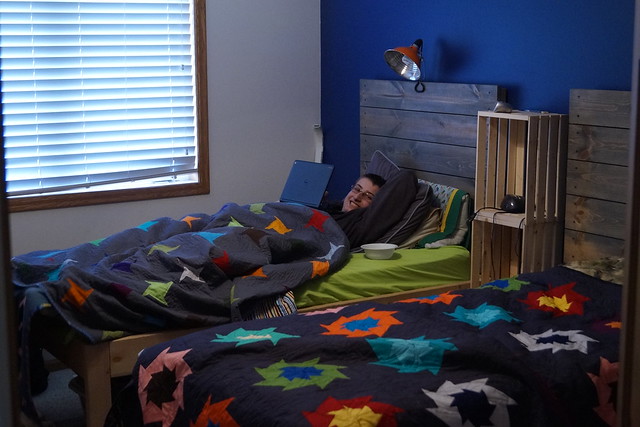
I had planned on using this in my boys' room, but decided I liked it more than they did and now it is hanging in our dining room.

8 Wood Shutters
This score makes me so HAPPY!  I happened to see this pile of shutters on the side of the road, in the drizzly rain, but didn't stop.  Then later the same day after running errands I was hoping and hoping they were still there.


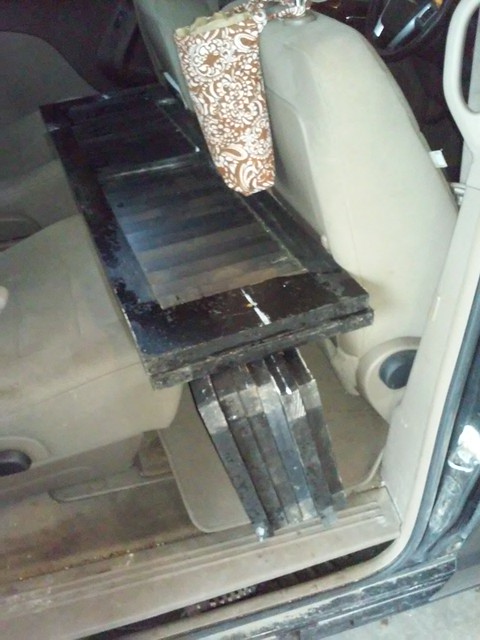
Yes, they were, and still in the drizzly rain I grabbed them all.
They measure 14 inches wide by 48 inches tall.
I mostly wanted them to make a headboard for my daughter's room.
I'll show what we came up with next week.
We were super excited with how it all turned out.

Adirondack Chairs
Found all of these last Fall and have been holding onto them in our screen porch until this Spring to do a makeover on them.


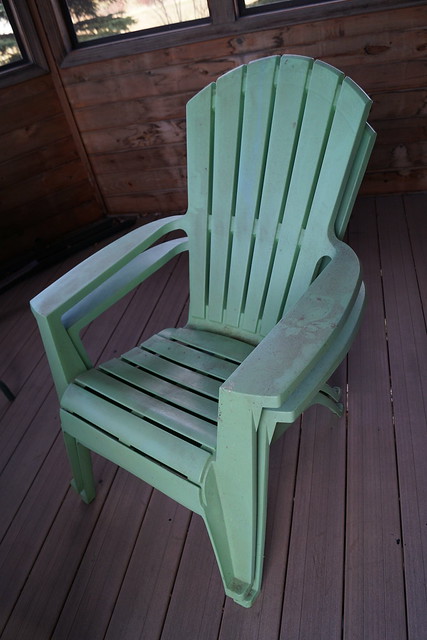
2 Adirondack chairs for $1.50 each at the thrift store.


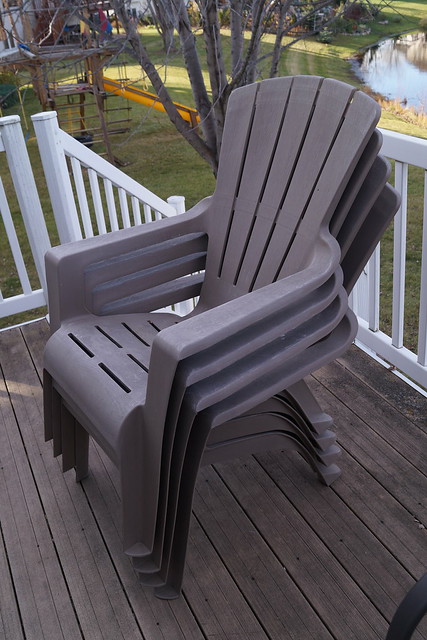
4 more Adirondack chairs free from the curb.  They have some broken spots that will need to be repaired, but I already figured out how to do that.  I plan on painting all of them once they are fixed up.  And then we can use them out by the fire pit that we don't yet have either. Minor detail......

Repair idea #1
Repair idea #2
Fixing paint oxidation on plastic chairs

Enjoy your weekend everyone!  It is looking fabulous here in Minnesota.

Monday, April 18, 2016

Dumpster Chair Rescue

I first saw this chair with its pretty claw feet sticking out of a dumpster in front of someone's house about a year and a half ago Fall.  I was hoping there was a pair of chairs but I could only find one.  Rats!!  It made the cut during our move last Spring and I finally decided to tackle this chair after I found a cute remnant piece of fabric at the thrift store.


Here it is before--on the backside there are actually pieces of plastic sticking out where there was once plastic covering the entire seat.


I took it apart, which just meant unscrewing the attached seat from underneath the chair.
Gave the chair a good cleaning.  Some of the wood was yucky.

And then headed outside and painted the chair (in August of 2015).


It sat some more while I tried to find the staple gun in our stuff, post move.  Once I found it I ripped off the old fabric and stapled back on the new piece and reattached the seat.  It looks real pretty sitting in our living room.


Details:

Thursday, April 14, 2016

I like Big Blocks and I cannot lie

While in St. George in February for our annual sewfest retreat I took some fabric that had been "aging" in my stash.  I'm not really sure how long I've had it.  Maybe 2 years!?  Anyway, I had a pattern picked out and thought this would be a good time to try and come up with something concrete.  More minds and opinions together to get my own creative juices flowing.

This was also another exercise in getting out of my comfort zone.
I've never made blocks this big, or with this big of a print fabric.
I was really nervous that I wouldn't even like it when it was all said and done.

I'm happy to report that "it's all good in the 'hood."
Mission accomplished: quilt  top completed and I really like it....a lot.


It took some finagling with the placement and discussion over the little corner blocks but in the end I am really please with how it turned out.

Next step: to find the perfect backing to go with it. I already know I don't have anything in my stash that will compliment this very well.

Details:
  • Fabric is Hand Drawn Garden by Anna Maria Horner
  • Pattern is a modification of  "Sweet Life", pgs. 74-79 from Simply Retro by Camille Roskelly.  
  • I made the blocks as she indicated, finishing at 18 inches square.
  • Cut 3 1/2 inch strips for both border and sashing out of white, and the center squares of solid color.
  • I also only did a 3 x 4 pattern instead of 4 x 4 as she did.  That was mainly because of what fabric I had in my stash.  Plus I do not love square quilts if I can avoid it.
  • Flickr group of this pattern book found HERE.
  • The finished top is 66 inches wide by 87 inches

Monday, April 11, 2016

Modern Solids Improv Quilt #1


This was an exercise in doing something out of your comfort zone.

I had a bunch of scraps left over from three different solids quilts that I had made and didn't feel like throwing them out or giving them away.  So I thought I would try my hand at some modern solid improv and this is what I ended up with.


Details:
  • Quilted by Lynn Peterson
  • Solids from the Omaha quilt, son #1 quilt, and son #2 quilt.
  • Some Kona cottons and then an assortment of scraps from wherever.
  • 6 inch white border (I wanted it bigger than it was)
  • Backing used a Ralph Lauren chambray sheet.
  • Binding is a combo from the scrappy solids also.
  • Finished dimensions: 56 inches by 69 inches.  The inner improv piece without the border is 45 x 57--definitely not big enough for our tall crew.

Thursday, April 7, 2016

Sawtooth Solids Quilt for #2 son

My youngest son was so happy when I came back from my sewing retreat in February because I brought back his quilt that was finally finished. He picked out the pattern and the majority of the colors.  And then I put them together.

Here is the "in the process" picture. Making all the blocks and hanging them up on my design board.


He is very happy with it (although it doesn't necessarily appear that way in the picture above)


He also picked out the C.R.A.Z.Y. backing fabric. 


I think I really like it though. I have to say I am impressed with myself how I lined up the fabric to sew it together. Unless you are really up close you can't even tell there is a seam right down the middle of the backing.


I just bound it with a black Swiss dot. 

Details:
Ahhh, Spring Break laziness.....

Monday, April 4, 2016

Parasol Ladies Vintage Quilt Story

This quilt top has quite the long and traveled story.
It was made by my great-grandma, Gertrude Cooper, back before my parents were married in 1965. 


Grandma Cooper gave it to my mom as an unfinished top and big enough to be a bedspread.
She never did anything with it and then somehow I ended up with it. It sat in my cedar chest unfinished, and I hauled it around for who knows how long, before my sisters, mom and I were trying to decide what to do with it. Here we had kept it for 50+ years as just a quilt top and nothing had been done.


We contemplated cutting it up into pieces and quilting it as individual wall hangings and still no one was thrilled about it.  As a bedspread, for sure no one wanted it.  Finally our mom decided that she would use it as a quilt in one of her spare bedrooms.


We cut off all the excess border that would be the bedspread and Emily found some cute vintage sheet material and had our favorite Lynn quilt it for us.


I think that Emily bound it up and off it went to our mom.


Detail of the quilting.


Some up close and personal pictures of the parasol ladies.


Since it is so old Lynn quilted it pretty densely everywhere.
Also, Grandma Cooper had just done a topstitch zigzag that wasn't too tight and pretty small.  We didn't want anything to come apart.


Close detail of her embroidery and applique.


I had actually started to re-applique the ladies, but after one I stopped because I didn't like how it was turning out.  Unfortunately I also couldn't pick it out without wrecking her applique.


I'm glad that we got this quilt top completely put together as an actual quilt.
It is a fun little piece of our ancestry and heritage and probably one of the few things that we have that belonged to great-grandma Cooper.

Friday, April 1, 2016

Makeover for Grover

Meet Grover.

He resides over our fireplace mantel.
Unfortunately he had a fatal accident with an automobile in the Fall of 2014 in the city of Maple Grove, MN (hence his name).  Hubby was on a call list for road kill, yes, I know it's a bit Redneck, but once we saw him we decided to give him a second chance to strut his stuff.


This is how he has been displayed for the past year or so in our living room.
I hadn't completely figured out what I wanted to do with this room, but I do like Grover right there greeting us as we come in the front door.


I finally decided that I wanted to frame Grover out and give him a more substantial place over the mantel.  I found this frame below that I felt would work.


I bought a piece of burlap fabric the width I needed and then cut it down to size and used spray adhesive to put it right over top of the picture that was in this frame.  (A somewhat ugly floral print)


With lipstick on the back hook of Grover I positioned him on the frame so that I would know where I wanted him to sit.

Then I took a large Forstner bit from my hubby's shop and attached it to the drill and drilled out a hole for the spot where Grove already hung from the wall.


Positioning the frame over the hook I found the spots to hang the frame and attached it then placed Grover over top of the frame on his previous spot.


As you can see the picture underneath sort of shows through.  I need to take it all down, and either flip the picture of spray paint over it so that the lighter flower outlines don't show through.  It's not super annoying....just slightly.  UPDATE: I did just that and now you can't tell there is anything underneath.  Just flipped the picture to the back.


Details:

LinkWithin

Related Posts Plugin for WordPress, Blogger...