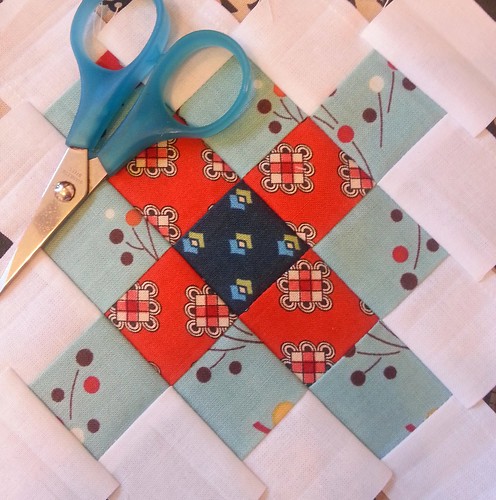
I joined another couple doll quilt swaps on Flickr. At this point you would be correct in assuming I am officially a doll quilt addict. For me they are surprisingly satisfying.
This particular block is for a round of the DS Quilts Doll Quilt Swap, where the only requirement is using any and all prints of Denyse Schmidt. For the record she would be my one and only fabric crush!
I am trying to stretch myself in all things creative, so for this project I am trying super tiny piecing. This block is, of course, the wildly popular granny square block from Blue Elephant Stitches. I chose to stay out of the granny square madness that was going on awhile back but now that it has died down a bit I'm ready to give it a go.
I started with 1.5 inch strips so this block finishes somewhere in the neighborhood of 5 inches. That means each square is 1 inch finished. Ridiculous, I know, but you have no idea how giddy it makes me to have such tiny blocks! Does that qualify me as a quilting nerd?? I think so. But I'm good with that. :)
I've got a few more blocks to make before I'm finished. Then it's back to brainstorming for the last doll quilt swap I joined. Wish me luck...
Wednesday, February 27, 2013
Tuesday, February 26, 2013
Oh, Happy Day!
First up, the winner of the giveaway yesterday is rmb.
Congrats! Your charms are on their way.
Now, on to today...
It was a happy day indeed when I received this beautiful hexie doll quilt from the lovely Melissa as part of DQS13. Isn't it beautiful?! I thought she did a very good job interpreting my crazy mosaic.

I love that she used some low volume prints, as well as bright cheery ones. Some of the fabrics are fussy cut so you have to look closely to see their awesomeness. (Did you manage to find the tic-tac-toe fabric?) I have yet to do anything with hexagon's so I'm happy she chose that design.
She obviously stalked me well since she added 2 vintage sheet FQ's as part of my swag along with the other goodies I received. Again, a very sweet surprise.
And lastly, a picture of the quilt hanging in it's natural habit amongst friends. :)
I think it looks Fantastic!!
Now if I can just get cranking on two more swap minis I have with looming deadlines...
I think it looks Fantastic!!
Now if I can just get cranking on two more swap minis I have with looming deadlines...
Monday, February 25, 2013
Because It's Monday
Updated:
This Giveaway is Closed!
It's Monday, and we are all pretty slow-moving this morning as we decompress and recuperate from the awesomeness that was our sewing weekend!! If you missed it you can find some sneak peeks of what we were working on @ instagram. I'm sure there will be a steady influx of finished projects popping up in the coming weeks here on the blog as we were able to accomplished quite a LOT. It will definitely be an annual event for us!
So, in honor of a lazy Monday morning and our awesome sewing weekend, let's have a little giveaway...

Recently I pulled out the leftover squares from my Boys at Play quilt.
The idea I had brewing in my mind for them is not going to work out, so I'm letting it go.
That means the squares are up for grabs!
Just leave a comment telling us why your weekend was awesome (or not-so awesome) and we'll pick a winner tomorrow.
Details:
Squares are 4.5 inches. I think there are somewhere in the neighborhood of 40-50 total charms. Not all fabrics have equal amounts, some as little as 3 squares some as many as 9. It's just what was left...
Thursday, February 21, 2013
The Last of the Red Blocks
I had a goal of getting all the red blocks for my Anniversary Quilt set in a top before my last club meeting in February. Buuut...That didn't happen.
After laying out my original 15 or so blocks from my ladies I felt like I needed to make a few more to increase the finished size a bit. I think I needed to make 6 more blocks for an even 20. That would give me a nice 4 x 5 layout, as well as being a nice big throw size.
Here are the last three blocks I made!!
(I'm definitely ready to tie this project up as it's been almost a year in the making.)
The whole feel of this quilt is going to be "scrappy sampler" so I tried to add a variety of blocks. I think these will go well with my others.
After all my tiny paper piecing madness on my doll quilt, I decided to enlarge the block pattern to make a 12.5 inch block. I really love it! My quilt club ladies wanted me to teach them some simple paper piecing techniques, so this is the block I taught them at our last meeting. :)
A little improv...
I still need lots of practice, but who doesn't love a little improv now and then?
And my personal fav: geese in a circle block.
I've made it at least three other times and am still not tired of it.
I've made it at least three other times and am still not tired of it.
So there your have it. By the time we get back from our sewing weekend these blocks will be in flimsy top form. Yeah!
I'll show you next week when I get back...
Emily
Wednesday, February 20, 2013
More Washi
While I'm frantically trying to pack my bags (and my fabric!) for our sewing weekend today, I'll leave you with a quick picture of my most recent Washi purchase.
For the record, I love this stuff!
But it wasn't all for me...
The blue chevron and the ruler tape washi were for my doll quilt swap partner.
The aqua/orange floral, aqua pluses, and film reel pieces were for Leslie for her birthday.
And, well...the top two were for me.
So, what are YOU doing today??
:)
Tuesday, February 19, 2013
Confession
I am running away from home tomorrow.
I'm not coming home until Monday night.
I might be a little too excited about it so that my family is getting a bit of a complex.
I had to go buy a larger suitcase for this trip so I could bring everything.
But seriously, I can't wait to get the heck out of Dodge.
Our cousin Tiffany has come to visit me a couple times here in MN thanks to her architect hubby and his Minneapolis conventions he attends. We've talked about me going there and now it is finally happening. She lives in St. George, UT. That means I'll be leaving -20 degree windchill weather tomorrow (and possible blizzard conditions Thurs./Fri.) to go to somewhere MUCH warmer. Their forecast doesn't look fantastic for St. George, but I'll take 50's over ours any day.
Emily and Leslie caught wind of my little adventure and invited themselves to come along too. So now we are having a mini sewing retreat with plans to sew our own projects for a couple days straight with no kids involved. It is going to be awesome. Hotel, continental breakfast, conference room, takeout, hot tub, no kids, ....yeah, we can't wait.
We'll be sure and post pics afterwards, but for now, here is part of my pile of sewing projects I'll be bringing..
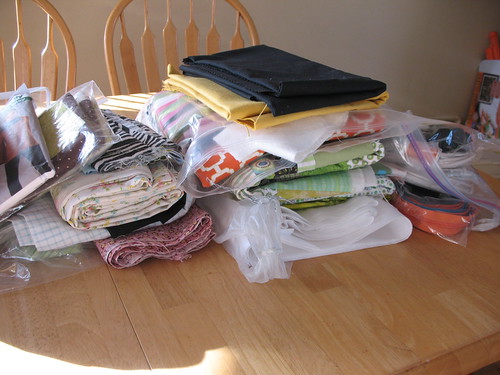
Now I'm off to pack it all and finish laundry so my family will at least start out with clean clothes while I'm gone. Enjoy your week everyone!
I'm not coming home until Monday night.
I might be a little too excited about it so that my family is getting a bit of a complex.
I had to go buy a larger suitcase for this trip so I could bring everything.
But seriously, I can't wait to get the heck out of Dodge.
Our cousin Tiffany has come to visit me a couple times here in MN thanks to her architect hubby and his Minneapolis conventions he attends. We've talked about me going there and now it is finally happening. She lives in St. George, UT. That means I'll be leaving -20 degree windchill weather tomorrow (and possible blizzard conditions Thurs./Fri.) to go to somewhere MUCH warmer. Their forecast doesn't look fantastic for St. George, but I'll take 50's over ours any day.
Emily and Leslie caught wind of my little adventure and invited themselves to come along too. So now we are having a mini sewing retreat with plans to sew our own projects for a couple days straight with no kids involved. It is going to be awesome. Hotel, continental breakfast, conference room, takeout, hot tub, no kids, ....yeah, we can't wait.
We'll be sure and post pics afterwards, but for now, here is part of my pile of sewing projects I'll be bringing..

Now I'm off to pack it all and finish laundry so my family will at least start out with clean clothes while I'm gone. Enjoy your week everyone!
Friday, February 15, 2013
Three Bestie Friends
My youngest daughter is best friends with our two little neighbor girls, who happen to be sisters. Most days the three of them are inseparable.
This little project started way back in the spring of last year with these photos. As a recap: I was letting the girls play with my scraps while I was sewing bee blocks. After they were done "creating" I decided to be a fun mom and sew up their little creations into real quilts that they could use for their favorite stuffed animals.
Well, a year later they are done!
For starting out as a little playtime distraction I sure think they turned into cutie little quilts.
To finish off their blocks I raided my vintage sheet stash.
The girls were wanting anything pink or purple, so I found some scraps and worked them into a basic doll quilt size. Each one has a little different flair, which I love.
Here are the girls' favorite stuffed animals: Spotty, Horsey, and Dog enjoying their blankets.
The girls have been swaddling and cuddled their animals many times over in these little quilts.
It's been fun watching them turn into little moms.
The girls have been swaddling and cuddled their animals many times over in these little quilts.
It's been fun watching them turn into little moms.
As a side note, look at the cool design Lynn was able to add to the quilting! Wouldn't that be cute in a big quilt as well?
Happy Friday!
Emily
Thursday, February 14, 2013
How To Cover a Paperback Like a Pro
Today we are sharing a great tutorial on how to cover paperback books.
This comes from our sister, a veracious reader, who has been covering her books for years.

If you are a lover of paperbacks then you know that they can get dog-eared and destroyed pretty quickly. Well-loved children's books can be trashed even faster. So, this little trick has been a life-saver to our family library.
To get started:
You will need contact paper and scissors.
Contact paper comes in a roll, and can be found in the kitchen section of your local big box grocer near the shelf liner paper. It comes in a shinier version and a non-glare version. I prefer the non-glare version.
Begin by:
Measuring and cutting your contact paper, adding a few extra inches to the top and bottom dimensions of your book. I prefer not to cut any off the width of the contact paper, if only because of pure laziness. For this particular set of books I cut my contact paper at 10 inches by the width of the contact paper.
Fold your contact paper a little off-center to accommodate for the spine. (The bigger the spine the more off-center it should be.)
Peel away half of the contact paper to the crease. It will be easier if you only do a half at a time.
Use the fold line as a marker to align the spine of the book to the center of the contact paper. Smooth out any air bubbles from the contact paper on the back of book. This might require you to reposition the contact paper a bit.
After smoothing, cut a slit a quarter inch (give or take) away from the spine on the top and bottom, as well as front and back of the book. Leave those "tabs" for now.
It will look like this.
Cut the corners out of the contact paper as shown above.
Fold and smooth the top and bottom flaps to the inside of the book,
making sure you crease the folds really well.
Fold and smooth the side flap to the inside of the book,
making sure you crease the fold really well.
making sure you crease the fold really well.
Repeat the above steps for the other half of the contact paper.
Peel, cut slits, cut corners, crease and fold.
When you are done you will have these little flaps left over near the spine.
Now is the time to cut those off.
Here is what the inside of the book will look like when you are done

Congrats!
Now go enjoy your book! :)
Emily
All my books were thrifted for around $0.75 a book. Score!
Tuesday, February 12, 2013
It's a "Baby" Mini
When I first started doing swaps I found it kind of difficult to send off all my hard work to a perfect stranger knowing full well I'd never see my project again. (Anyone else feel the same??) So early on I made a personal goal to make "copies" of my work to keep for myself. It makes for more work, for sure, but in the end makes it a whole lot easier for me to send off my work. Besides, why should someone else have ALL my best work?

In that spirit, here is the "baby" mini copy I made of my quilt from DQS13.
It measures a tiny 12" square.
Everything else is the same: fabrics, paper piecing, hand-stitching, backing, and binding.
I love it just as much as the original! Though I have to admit that the reason it's smaller is because I couldn't stand the thought of paper-piecing any more blocks. Twenty-five tiny blocks was enough!
Here is a little side-by-side comparison for your viewing pleasure.
I plan on hanging it on my mini quilt wall in my sewing room next to this and this. One day I hope to have a wall filled with beautiful mini's! These make for a good start, don't ya think?
Sincerely,
Emily (the Mini Quilt Lover)
-------------------------------------------------------------
See more mini quilt awesomeness on my Mini Love pinterest board as well as on the DQS flickr page.
Monday, February 11, 2013
Black and white pixel
Let's hear it for finishing really old projects that have been nagging you for waaaaaay too long.
Feels good.
Linking up to Show and Tell Tuesday and Fabric Tuesday
Friday, February 8, 2013
A Queen-Sized Preview
Besides doll quilting, most of my January was spent turning this lovely stack of fabrics
into this MONSTER of a quilt for my daughter's new room.
She is ecstatic about how it's turning out, which you know, as a mother is all that really matters. To top it off, in Math she has been learning about proportions and fractions via quilt blocks. Awesome, right?! My daughter was able to take in her quilt to show her class one day last week, which made her super happy. Her teacher was very sweet and made a huge deal about it, even letting her take it around to the other 5th grade classes for some show and tell.
Teachers can be so awesome... As can learning about fractions with quilts.
Emily
Teachers can be so awesome... As can learning about fractions with quilts.
Emily
Wednesday, February 6, 2013
DQS 13
Today I am putting the finishing touches on my doll quilt swap package with the hope that I might actually be able to get it in the mail by the end of the day.
I'm always a little anxious about sending out my work to a total stranger because you never really know how it will be received by the recipient. I'm crossing my fingers that I was able to capture all that my partner wanted in this little cutie. I really like it, so I hope she does too.
I decided to hand quilt again.
I really like the look of hand quilting, though it can be very time-consuming -- I'm a slow hand-quilter! But working on these smaller scale projects let's me get some practice time in as well as letting me get my hand-stitch "fix". Win-Win!
Call me crazy, but I still have a desire to hand quilt an entire large quilt... Someday!
This round I tried to be a little less boring and make a "fancy" label.
(Names are blacked out to protect the innocent :)
Some of the swap labels can be pretty amazing.
Mine never has been.
Mine never has been.
So now that it's done, I'm off to wrap it up with some goodies and send it on it's way to *undisclosed location* while I'm forced to wait impatiently patiently for my mini to arrive.
Oh, the anticipation!
Tuesday, February 5, 2013
Let's Go Swimming!
Yes, I know, it is only February, but I don't think it is ever too early to start thinking about swim season. Especially after we just survived a sub-zero week last week here in MN. It is 27 degrees outside this afternoon and we all feel like we are in a heat wave. I actually saw a little boy at the store with his mom and he wasn't wearing a coat. Yeah, we're crazy like that here in the frozen North.
I have two friends having baby girls here soon. And even though this tends to be my standard baby gift, and probably not much of a surprise to anyone who knows me, I don't really care. These little girlie girls will be ready for the pool come June.
I just used my basic baby tank pattern from Kwik Sew. (discontinued pattern 2512--oldie but goodie)
And then added some embellishments.
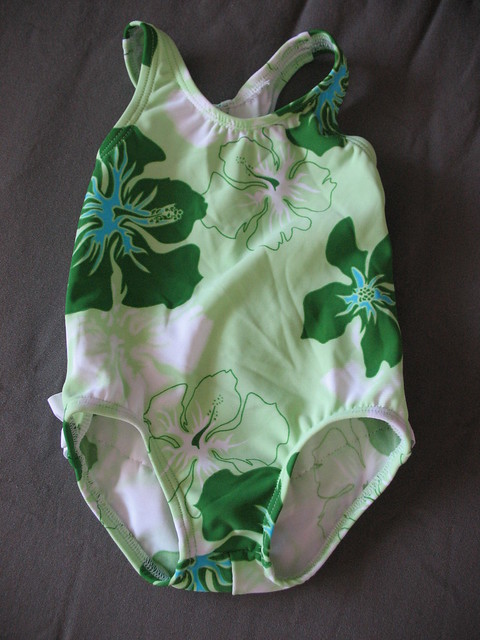
Front view (size 1T)

Back view--3 rows of ruffles topstitched onto the back.
I just love a little baby ruffle bum!

This one I just added a little flower in front. (size 2T)
Used this tutorial to make the flower.
First time I've done it on a swimsuit and I think I'll be doing it again.
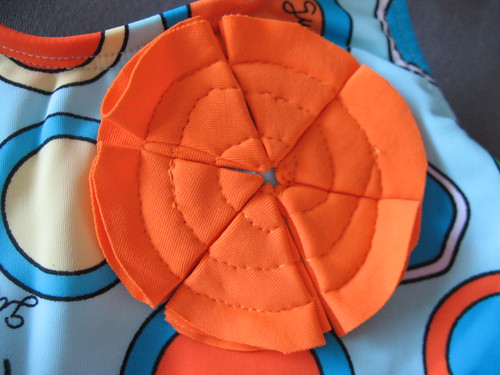
Then finally one more version--basic front with a turquoise ruffle bum.
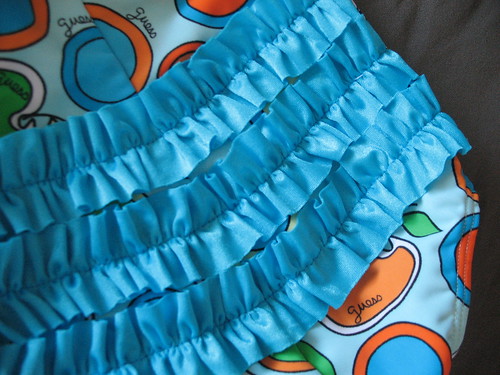
Can't wait to give them away this week at the baby showers. For one it is for her first and the other it is her 4th, but I think she'll be happy and surprised anyway because this baby is coming after twin boys.
I have two friends having baby girls here soon. And even though this tends to be my standard baby gift, and probably not much of a surprise to anyone who knows me, I don't really care. These little girlie girls will be ready for the pool come June.
I just used my basic baby tank pattern from Kwik Sew. (discontinued pattern 2512--oldie but goodie)
And then added some embellishments.

Front view (size 1T)

Back view--3 rows of ruffles topstitched onto the back.
I just love a little baby ruffle bum!

This one I just added a little flower in front. (size 2T)
Used this tutorial to make the flower.
First time I've done it on a swimsuit and I think I'll be doing it again.

Then finally one more version--basic front with a turquoise ruffle bum.

Can't wait to give them away this week at the baby showers. For one it is for her first and the other it is her 4th, but I think she'll be happy and surprised anyway because this baby is coming after twin boys.
Friday, February 1, 2013
Oliver + S Quilt
Well, I'm back after a very long sewing hiatus. Babies really do a number on me, but I'm living and creating again. It feels so good.
This quilt whipped up super fast.
This quilt whipped up super fast.
I used a city weekend charm pack.
I don't get groupie about much in the sewing world, except for Oliver + S.
(Our little miss is so close to crawling)
Subscribe to:
Comments (Atom)
