Showing posts with label Outside projects. Show all posts

Tuesday, June 6, 2017

Benches for the deck

I've been in the graduation party prep mode for the past week or so.
And what a great excuse to finally get some furniture for the deck.
This will only be our 3rd summer here in this house.
It is about time.

I've been perusing Pinterest for ideas and found a couple that I liked.

This bench is 48 inches wide.

This is a side by side of the 2 different styles of bench that I made.
I actually made the straight bench first and then decided that I wanted one with a backrest.


The straight bench is 54 inches long.

And then I made 2 side tables, just for good measure.

Bring on the grad girl!
She is SO READY to be DONE!
We're ready to party!


Details:
  • Backed bench and table patterns by Jay's Creations
  • I found that I needed to adjust the pocket holes for the backrest slats.  If there is a next time I would cut the pieces to 32 not 31 inches and then make the marks.  At 31 inches the piece didn't reach to the top of the top slat, which is what it showed in the pattern.  If you are not spacing the back slats apart you won't need to adjust anything.
The bottom pocket holes are the original ones.  You can see how close to the edge of the 2 x 4 they were.  By the time you reached the top slat (after spacing them out) there was almost no room to attach it.
  • Straight bench pattern by Ana White-- Providence Bench
  • For 2 of each bench and 2 tables it cost about $100
  • I used green-treated pine 2 x 4s from Menards

Monday, July 11, 2016

Painted the porch swing

 Last week I spray painted the porch swing.
It looks brand new and is so much fun.

I really wanted to paint the swing like this:

I so wanted to do this to our swing but the back slats are vertical not horizontal.  Rats!:

But alas my swing slats didn't go that direction.


I was slightly lazy about painting and probably should have taken the entire thing apart so that I didn't get any of the hardware painted.  That seemed like too much effort.  Besides, by keeping it hanging up I could just flip it over and spray the bottom without having to prop it up against anything else.  And the day I painted it was so warm that it dried super quick.

Instead of taking the swing apart I broke out the Glad Press 'n Seal Wrap and put it over the chain parts near where I was spraying and any of the bolts that I could get to. 

It felt pretty genius on my part.
Once it all dried I just pulled it off and threw it in the trash.


What our view looks like as you sit in the swing.
Lovely!

Details:

Monday, July 4, 2016

A-Frame Porch Swing Frame

I like a good porch swing. 
It reminds me of my Grandma Johnson. 
They always had a swing at their homes. 
Though the swing that Grandpa made at their Idaho Falls home was more like this glider.

When we moved last year we took the porch swing with us that had been hanging on our kids' swing set.  The new owners didn't want the swing set and we gave it away on Craigslist in about 2 hours after listing it, but the porch swing came with us.

On Saturday hubby and I made the A-frame for the porch swing.
I'm not going to show the entire process, but just a few to give you an idea.  We based it off of a couple plans we found.  I listed the links at the end.

 17 degree angle cut on the legs and markings of where the cross pieces will attach.

 Leg pieces

 We used a circular saw to cut the lap joints on the legs.
We could have just attached the 2 x 4 pieces with a butt joint but lap joints are stronger.
You just make a number of cuts between the markings down to the depth that you need.
Measure and adjust the blade as needed.

 Then hubby just used a chisel to bust out the cut pieces.


 Once the cut pieces are all out then you do a little clean-up with the chisel.


After you have all the cuts done we dry fit the pieces and take additional measurements of the cross pieces.  The larger piece on top is the beam placed there to determine the correct placement.

Then we just started assembling and screwing down pieces. 

The only cutting down of pieces were on the 2 x 4's.  We left all the 4 x 4's at 8 feet and the top 4 x 6 beam at 8 feet also.  We debated on cutting some of it down, but decided we liked it as is.  The bottom of the top beam ended up being 7 feet 4 inches from the ground once we were all done.


Porch swing is in place. 
It would've been nice to actually hang it on our front porch too;
however, there would not have been much room to actually do any swinging.

You can see the stump back left that we need to remove too. Here is the post on that tree. And then we plan on putting a garden back in that spot too now that it isn't covered entirely by shade.

 A little close-up of how hubby attached and stabilized the beam and frame.
We angled the legs out 10 degrees to prevent some rocking from side to side.
The little stabilizer block piece is cut 45 degrees on the right,
10 degrees on the left and is 6 inches long.

After some time decided to place the swing here so we could enjoy the view of the pond and sunsets. We eventually plan on putting in a permanent fire pit there in front of the swing.


I am really happy with how it turned out for us.
It already is a nice addition to our backyard.


Details:
  • (4) 4 x 4 x 8 ft. green treated beams for support legs --$7.65 each
  • Cut top of each leg piece at 17 degree angle.
  • (2) 2 x 4 x 8 ft. green treated boards for cross support --$3.75 each
  • (1) 4 x 6 x 8 ft. green treated beam for top post --$15.57 each
  • Total Lumber $53.67
  • Plans based off this frame and this frame.
  • How to cut half-lap joints here.
  • Swing hook kit hardware from Menards for about $9 for the pair.
  • Bench swing bought at thrift store a couple years ago ($30). It'll be painting it next.

Tuesday, October 20, 2015

Timber!

We live on a corner lot backed up to a pond.
Below is the view from our back deck towards the street and our large cottonwood tree.

As pretty as it is, I hate it!
It is extremely messy (think cotton fluff sticking to all your window screens) and hubby and some of our kids are allergic to it.  It also shades the "garden" area that we yanked out earlier in the summer.  Actually I paid my oldest son to get rid of it.  I didn't want to do it, and he wanted money.  Win-win for both of us.

The garden spot was a mess, raised bed with rotted wood, lots of weeds, landscape fabric poking out everywhere and horrible location, albeit probably the only realistic place to put a garden on the property. But really with the location of this tree there was just no way anything was ever going to grow there with constant shade.


So the decision was made that it would have to go.


Hubby and I have cut down trees before.
He does the climbing and cutting and I work the ground part hauling stuff out of the way, etc.


About halfway there.


All down on the ground. Big mess to clean up and even after all the wood we kept we had 3 van loads of other branches that we got rid of.


Hubby geared up for safety.  He straps in his safety harness when he gets up high.


So, what is the plan now that it is down?
Well, we are deciding whether or not to put a garden spot back in that same area, and/or we are going to put a fire pit area there.  We have all Fall and Winter to figure it out and tweak the plans.

We also put together a firewood storage station using this idea from Pinterest


and for kindling this one.


Can't split these yet until they dry out for awhile....like next Spring.


We'll see if this stump removal idea works for us.

We drilled all the holes and filled them with Epsom salt.  So here's hoping that this along with a Minnesota Winter will rot it out good so in the Spring we can get rid of it easily.

Thursday, July 9, 2015

Changing the screen on your screen door (or window)

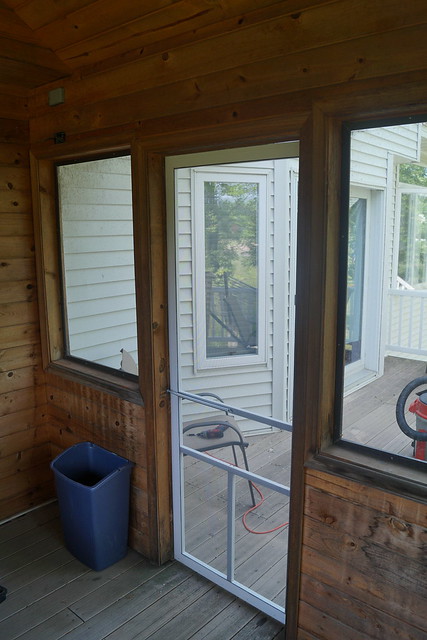
One of the fun things about this house is the screened in porch off the deck.
This has already been the sight of a birthday party, relaxing in the hammock, quilt photo shoots, and just plain getting outside without being bothered by bugs.

However, it does need some work.
I have some ideas for what I would like to do, including some paint, a drop leaf table/serving area.

Earlier in the week I cleaned up the ceiling fan, changed bulbs, added long enough pull chains.

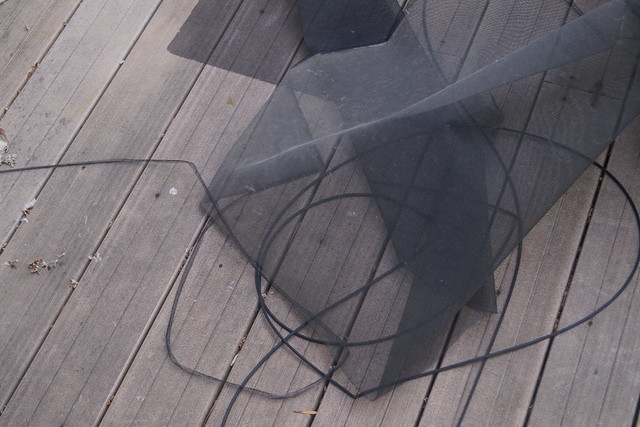
The one big project on my list for the porch was to replace the screen on the door.


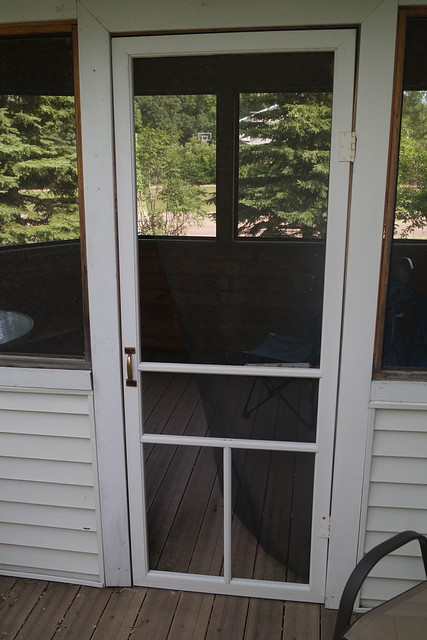
It is torn out in a couple places and since we've been here it has come off more.


If you haven't ever re-screened a door or a window it is really an easy process if you have the ONE right tool.  I re-screened a couple windows in our previous house before we sold it.  (Yes, children a fork will make holes in the aluminum screen.)  You will save yourself a bunch of money if you do it yourself.  I called my local Ace Hardware just this morning and they said to re-screen a full length porch door would cost around $45.  This probably cost me around $10 to do it myself and in about a half hour or less.  Seriously, you can do it yourself.  My 12 year old daughter even helped me.  It is that easy.

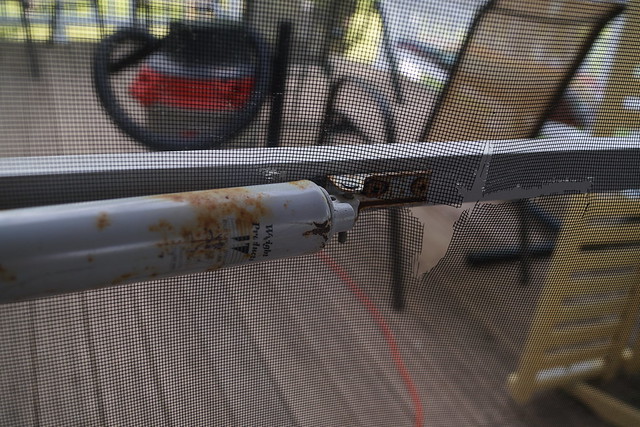
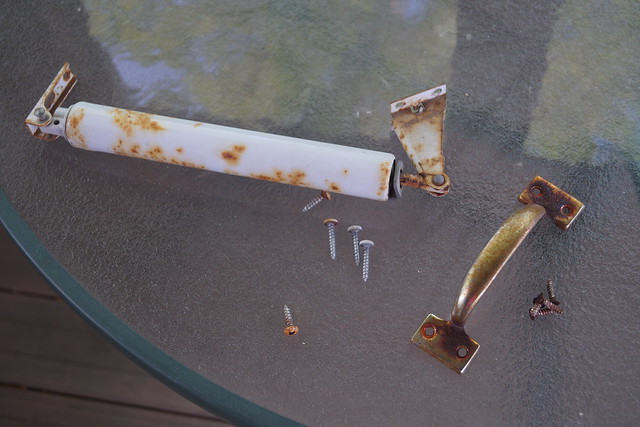
I started by removing the hardware.


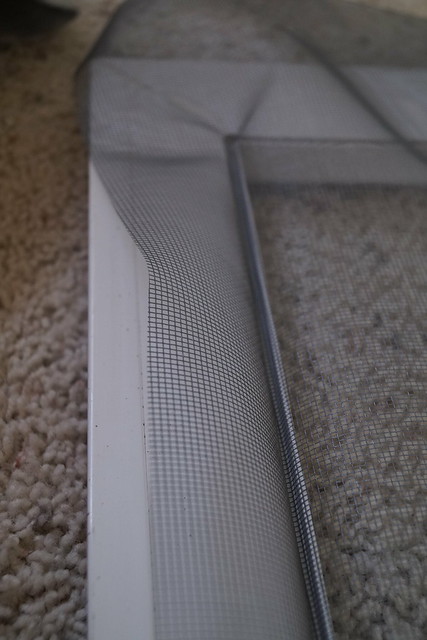
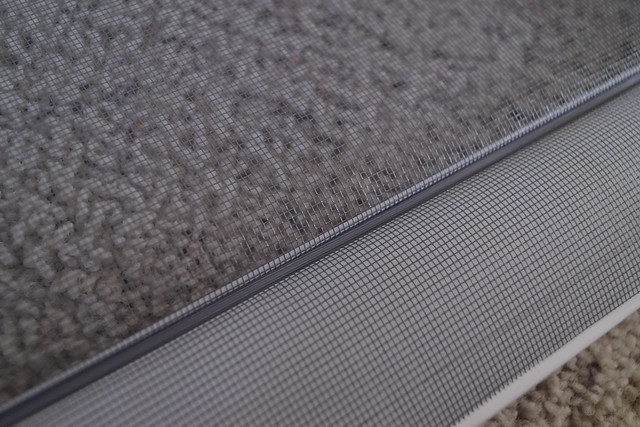
Then you start at a corner and pull out the spline (that is the tube like thing that holds the screen in place.)
Pull it all off and then pull off the screen.

If you wanted you could reuse the spline, I've done that before, but this time around I bought new.
Trash the screen unless you have a smaller screen project that you could reuse part of it.


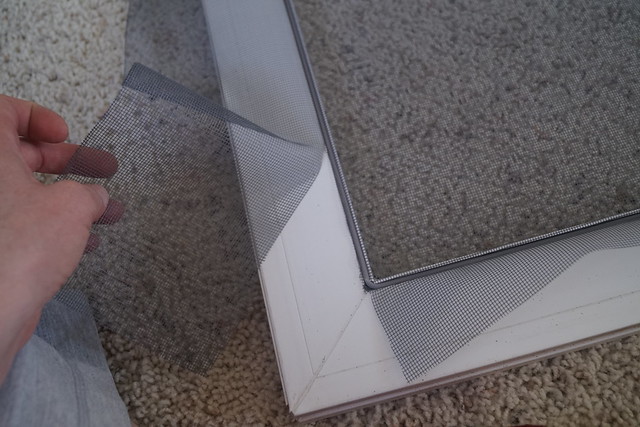
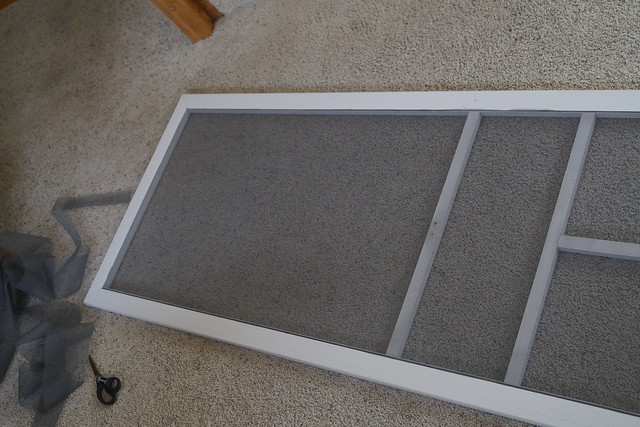
Next I took the door off the hinges, cleaned it up and brought it inside to do the screen.  I find it easier to lay it out flat somewhere.


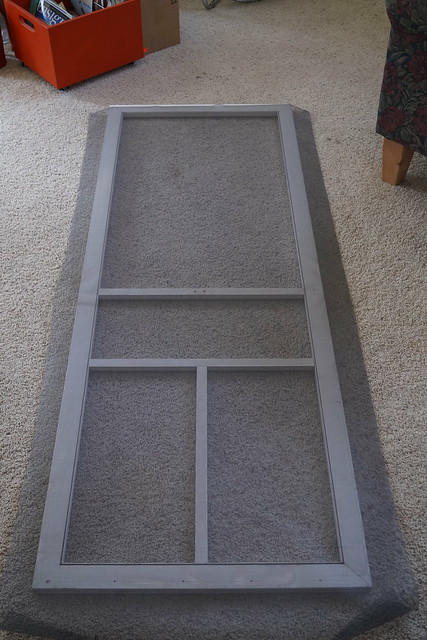
This is the door with the entire roll of screen laid out on top of it.
Extra is good.  Gives you more maneuver room.

Next you need that ONE special tool.


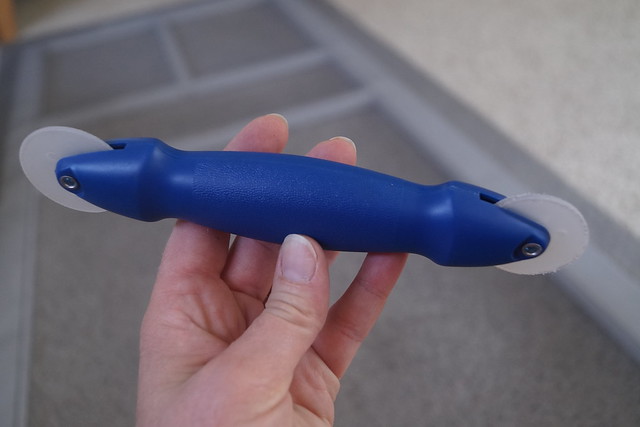
One end pushes the screen down into the groove of the door.


And the other has a concave edge that rolls along the spline to insert it down in the door groove and keep the screen in place.

 
I started at the top and then worked my way down one side, across the bottom, back up the other side and finished it off.  You just cut the spline off at the length you need once you get to the end.


Then you are ready to cut off the extra screen.  I just used a pair of scissors.  I also went back over the spline with my tool to make sure it was in tight.  Sometimes it gets moved a bit as you are cutting the excess.


You are now ready to hang the door back up and reattach any hardware.


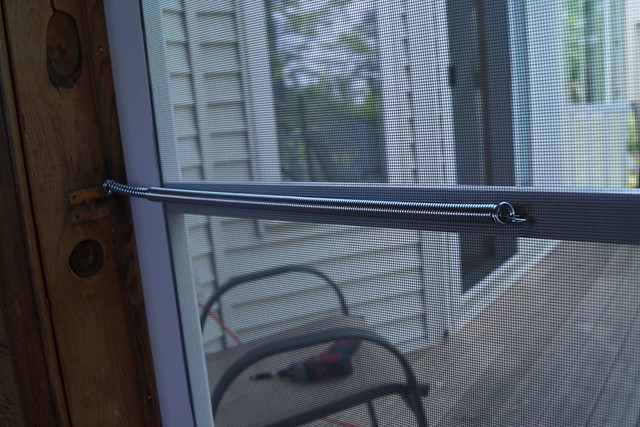
I replaced the spring with one that was more suited for this type of door. That previous spring was WAY more than this door needed.
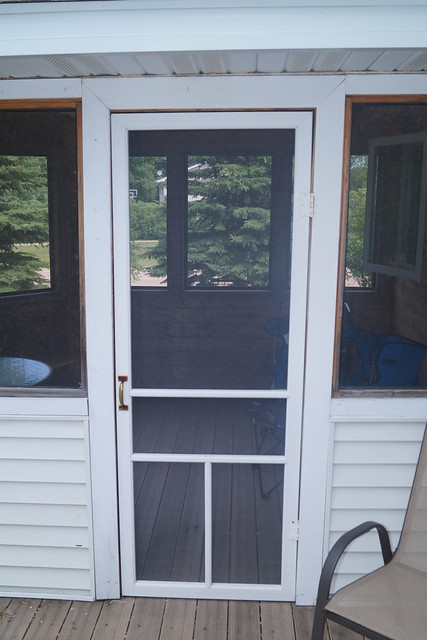


All done.
No more cottonwood tree fuzzies accumulating in the corners of the screen room.
Yuck!

Last thing I'll do on this door is to repaint the handle.
I didn't have the paint at the time I did everything else so that will be next week.

I'm so so happy this is all done!

Details:
  • Adjustable door spring--$2.98 at Home Depot.  They had 2 different sizes available.  I needed the shorter one which adjusted from 13" to 15 1/2".  The larger one was 16 1/2" long, not adjustable.
  • Roll of screen--I bought a 36" x 84" roll in Silver Grey for about $5.
  • Screening spline--I used .125" x 25' length in gray. It costs around $5 and I did not use the entire roll for the one door. 
  • Screen Spline tool for under $3. WELL worth the money!!
  • You can buy the whole kit: screen, screening spline and roller tool together, if you don't already own the tool for around $11. (Much better than $45)

LinkWithin

Related Posts Plugin for WordPress, Blogger...