Showing posts with label T-Shirt Series. Show all posts

Monday, March 4, 2013

Love this Knit Pattern

In December I picked up the book, "I Have Nothing to Wear" by Jill Martin & Dana Ravich at my library.  I've been mostly hating my wardrobe, or at least the body that has been going in it, and so I've been slowly revamping my closet.  Although I don't have a friend nearby that I can trust to give me good fashion opinions/advice (as suggested in the book) I feel like I pretty much know what works for me and what doesn't.  And definitely I know what style is me--and it's not bohemian surfer girl.

One of the suggestions in the book is to get rid of all clothes that don't make you look and feel like a "10".  That means anything stained, really worn, or just plain unflattering and not your personal style.  So some things have left my closet--especially items that I rarely wear, because I don't just LOVE them.

And then,of course, I needed some new pieces to replace some of those throw-aways.

Last pattern sale at Jo-Ann's I bought a couple new patterns.
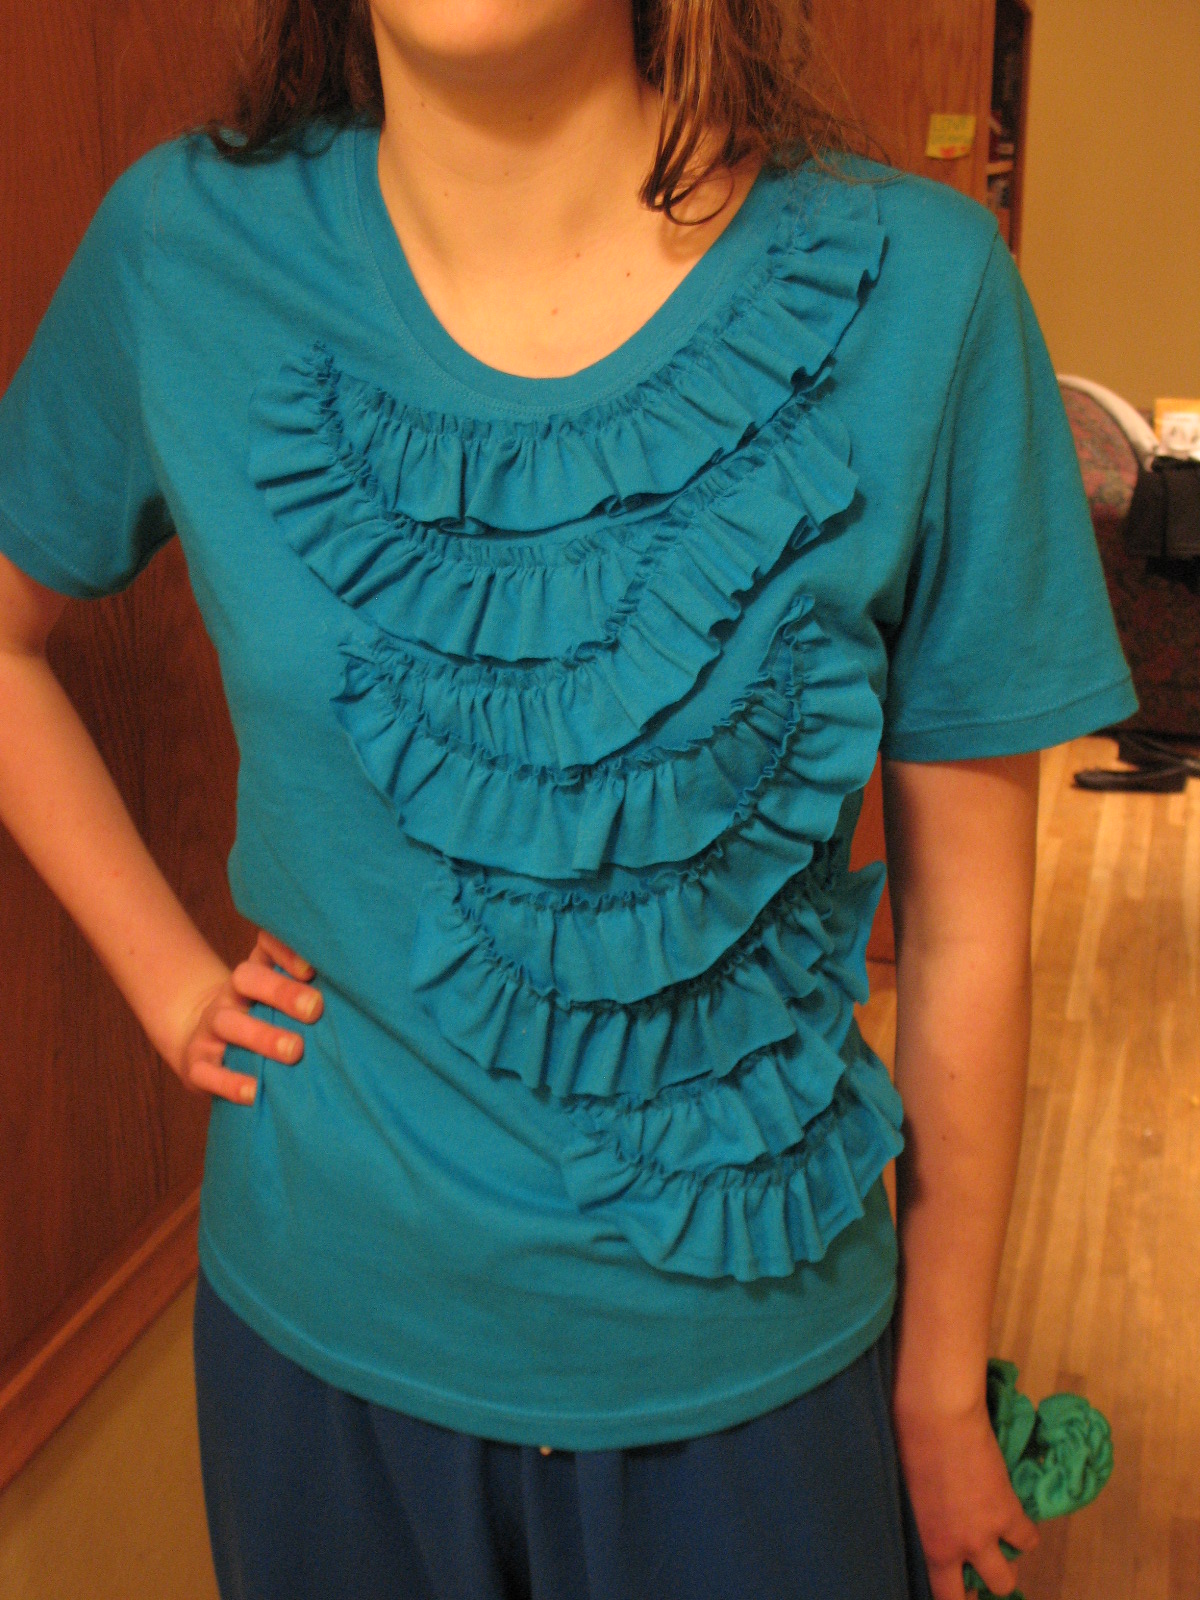
Love, love, love view ABC on this pattern: Simplicity 1716.


And for $.99/ea. it was a bargain to not have to figure out on my own how they did that funky twisty neckline.  And I have another shirt that someone gave us that is VERY similar to this pattern that we were going to try and duplicate.

I had a cream knit piece I had bought at my thrift store for about $1.50 and decided to use that as my "sample" to make sure I didn't need to make any adjustments on the pattern: i.e. raise the neckline some.  It does have a seam down the entire back, which I don't love, but I did it for this first shirt.  I know that they put it in to give the shirt a little more shape and fit to your body, but I find a seam down the back of a t-shirt a bit annoying.  Not sure I'll do it on the next one.

Really however, I just love this shirt.


Then I used it to make myself a new LBD--little black dress.  Oh yeah!!
I have to say that the fabric probably makes this dress more than anything.


Details:
  • Fabric--4 yds. of "fashion" knit at my fabric store for $1.59/yd. on sale with a coupon = $6.36 dress. Actually it would be less because there is enough to make another shirt and a tank top from this piece of fabric.  I actually made View B out of this black for me and then didn't like the flutter sleeves on me.  So daughter #1 has it--I just need to take it in a little for her.
  • This is another one of those awesome pieces of fabric that you can throw on the floor and leave it there for days and when you come back to it there are no wrinkles in sight.  LOVE it!
And here's daughter #2 with her version of this top--View C, with the ruched sleeves.


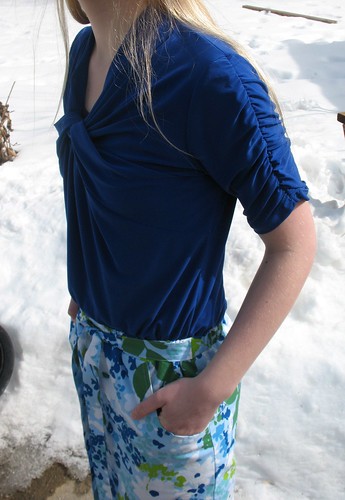
Skirt pattern: Simplicity 2258.
We'll be making this one again.  Super easy and super comfy--elastic waist, pockets.  I'm thinking chambray for me and we have a fun orange piece that will be great for her for Spring/Summer.

Monday, March 26, 2012

T-Shirt Series: Neckband #3 Facing


The third method you can use to finish off the neck opening of your t-shirt is by making an actual facing.  This method probably works best when making a boatneck style, V-neck or Square neck tee.  Tiffany's boatneck shirt below has been faced at the neck opening.

Usually facings are interfaced to give the piece a bit more body. 
There is interfacing you can buy that is specifically made for knit fabrics. 
We found ours at Jo-Ann's, on the bolt, buy by the yard, in their interfacing section. 

It's purpose: to add shape while maintaining drapability.

This is what it looks like.

Iron-on on one side.
But still able to stretch a bit.

Tiffany just introduced me to this and let me say it is AWESOME stuff.
I don't normally make faced necklines on t-shirts because using regular interfacing wasn't my fav.  I didn't love it. However, this knit interfacing works up beautifully and now after having tried it I will use it more and make more tees with different shaped necklines.

If ever you want a facing for some shirt that doesn't specifically require one, or doesn't have a pattern piece included, just trace the neck opening cutting line of both the front and back pattern pieces and then cut about 3 inches below that line again to form the facing.

As with all facings, after attaching the iron-on interfacing, pin right sides together and sew.
This shows  her square neck tee pinned together and ready to sew.
After sewing, clip curves and then turn and flip facing in towards the inside of the shirt.
Iron a little if you need to.  Just make sure your iron is on a cooler setting so you don't melt the fabric (depending on the polyester content of the fabric)
 Topstitch the facing in place.

Then trim the excess.

Below is Tiffany's finished facing, topstitched and trimmed from the inside of the shirt.
If you don't want to you don't have to finish the raw edge of the facing.
It won't ravel, so unless you have a serger, I wouldn't worry about it at all.
 Finished tank top below. 
Tiffany also faced the armhole openings using the same method.

And here is how she normally wears her tank tops. 
With a pretty little cardigan.
She lives in S. Utah where it gets extremely hot. 
But then going in and out of A/C buildings can make it chilly too. 
So their best bet is wearing layers.

This is her go-to pattern (discontinued) for the square neck tank top.

However, you can change the neckline yourself with any tank top pattern you have.
Or if you have a square neck t-shirt pattern and want a tank top instead, just eliminate the sleeves. 
You may need to adjust the opening of the armhole slightly for your own comfort level.

Depending on how you plan on wearing it you can either face the armhole openings, put a binding on the edge, or if you plan on only wearing it under something leave the armhole edge raw, unfinished. 
I've actually done this on a couple store bought shirts that I preferred as tank tops
to wear layered with other shirts. (I don't want the double layer of sleeves)
Just cut off the sleeves and called it good. The unfinished knit edge will not ravel.
________________
Note:
Besides this facing method you can also check out the binding method and  ribbing method to finish off the neck opening.

Monday, March 19, 2012

T-Shirt Series: Neckband #2 Binding


For years this method has been my go-to method for finishing off the neck opening.  However, don't use this on any boys' shirts.  This is more a feminine look.  For boys or men use ribbing on the neck.  This binding method can also easily be used to finish off sleeve hems for a different look.

Here's how I do this, which is also the same method I use to do contrasting binding on a swimsuit, minus encasing elastic into the binding.

I start out w/ 2 inch wide strips of fabric. 
I like to have plenty of fabric to work with.

 Figure out the size of the neck opening and cut your binding strip at least 1-1/2 inches shorter than that measurement.  I measure rather "accurately" by just folding the neck opening in half and laying out the binding piece and cutting it shorter as shown above.  Do what makes you most comfortable.

 I attach my binding to the shirt, right sides together, with a 3/8" seam.
Only stretch the binding just enough to fit it to the neck opening. 
You do NOT want to stretch the shirt at all.

 After sewing the binding onto the neck opening, trim away some of fabric to reduce the bulk. 
I do this at the neck binding seam as well as cut away a bit of the fabric at each shoulder seam.


Once this is done you will flip the binding strip back over the seam allowance towards the inside of the shirt.

Pin in place, below.

Then use whichever method you prefer to topstitch the binding in place.
Options: twin needle
single needle topstitch
stitch-in-the-ditch

 On this shirt we topstitched straddling the seam.
You could have also used 2 different threads if you wanted for this shirt:
white for the binding side and then black for the shirt side.

Here is what the inside of the shirt, using a twin needle, will look like.
The backside of a double needle topstitch is a zig-zag.

Then all that is left is to cut away the remainder of the strip.
Be very careful when you do this to NOT cut the shirt.
I always try to angle my scissors, shown below, so that I am less likely to nick my shirt fabric.


Here is another option below using this method--very contrast binding with a little ruffle embellishment like a tuxedo and then the binding also on the sleeve hems.


One more shirt that we made using this method, but with a pleated strip encased into the neck binding. This strip was about 1-1/2 inches wide and we only pleated the front half of the shirt from shoulder seam to shoulder seam.

Clearly pleased with how it turned out.

The only drawback to this pleated style is that after every wash we are going to have to iron the pleats again. 
It may only be the fabric that is the issue, but even still I'm not really into ironing, if I can help it. 
However, she loves it, and so she can do the ironing.

Thursday, March 15, 2012

T-Shirt Series: Neckband #1 Ribbing

We'll ultimately be showing 3 different methods to finish your neck opening.  This first one is probably the most common and what you normally think of when talking tees: Ribbing made from either the same fabric as the shirt itself or a contrast piece.

Tiffany and I think that the one thing on a t-shirt that will make or break your project is the neckband.  The biggest beef we have about neckbands is making sure they lie flat against your body when you are wearing the shirt.  Nothing screams "homemade" (in a bad way) more than a neckband that looks like it is standing straight up or sticking out. 

Here is an example of what I am talking about:

This is NOT what you want your neckband to do.

This shows the original difference in lengths on the neckband piece and the neck opening
for what I used in the above picture.  It is a difference of about 1 1/2 inches. 

Below is what it looks like once I took the neckband off, and took in another inch on the neckband seam and then re-attached it.
So MUCH better-- see how it lies flat against my body
This is what you are aiming for.
Once you have your neckband looking nice you can add the topstitching.
On this shirt I used size 2,5 double needle.

So, how do we get there.

Let's give you a general rule about ribbing neckbands.
The stretchier the fabric used, the greater the difference
between the neck opening and the attached band.

For Example:
Using actual ribbing fabric you would probably make the neckband anywhere from 2-1/2 to 3 inches smaller than the neck opening.
 
For moderate stretch knits maybe only 1-1/2 to 2 inches. 

Honestly, I start with around 1-1/2 inches smaller in diameter than the neck opening and then adjust from there.
  • For the neckband on this turquoise shirt I cut a 1-1/2" wide strip.
  • Seam it into a continuous circle the size needed for the neckband (approx. 2-1/2 inches smaller than neck opening for this shirt).
  • Then fold it in half, matching raw edges, and attach it w/ a 3/8" seam.  Pin as much or as little as you need.  And ONLY stretch the band as much as you need to get it to the size of the neck opening.  Do NOT stretch the shirt itself if you can help it.
  • That leaves you with about 1/2" wide ribbing neckband, which is a really nice finished size for the neckband.
I just need to say that I went browsing at the Land's End outlet a week or so ago to check out their detailing on some items.  When it comes to topstitching just about anything goes. 
  • Topstitch using either the 2,5 or 4,0 twin needle. 
  • Topstitch the neckband down on the shirt like the picture above. 
  • Straddle the seam with your twin needle so that one line of stitching is on the shirt and one line on the neckband. 
  • Use only a single topstitch.  I would only use this if the neck opening of your shirt isn't one where you need to stretch it open to get it over your head.
  • You can also leave it and do nothing.
Look at some t-shirts next time you're in the store and you can see what little details they are using on the neck openings.  Mostly it is some variation with a twin needle.

 Then when your neckband is finished you can try some embellishments if you want.
I made mine with rows of ruffles down the front.
  
  The picture above on the left shows how the topstitching looks with the ruffles sewn in with the neckband and not just added and topstitched free on the front of the shirt like the turquoise option on the right.  I'm not sure if I have a preference for one option over the other.  It does seem a little trickier to work with the neckband when you add the ruffles into that neck seam.  I think it just depends on what you prefer.

Although I am pretty sure I pre-washed this fabric (a thrifted knit sheet), here is what the shirt ruffles on the turquoise version look like post wash/dry for the first time.


Hmmm......
I might have placed them closer together had I known this is what would've happened. 
Oh well, it still works and I'm certainly not removing them and reattaching them.

 
Ruffle Details:
  • Cut 1-1/2" wide strips of fabric (I don't think it particularly matters which way the stretch goes on the decorative strips).
  • Fold over each end about 1/4 inch (unless you are incorporating the neck end into the neckband itself and then just do it on one end) and run a gather stitch.
  • We did 5 strips and varied the lengths.
  • Gather as much or as little as you want and then after pinning them in place sew them down right over top of the gather stitch.
Here is another great tutorial for embellishing the front of your t-shirt.
Zig-zag ruffles from Tea Rose Home


My oldest daughter wanted her shirt to have this look. 
Doing it exactly like the tutorial does require that your fabric look exactly the same on both sides.   

On this turquoise piece there was a definite front and back so we had to cut smaller pieces to gather then overlap them to get the same type look.

We also had to check the placement of some of the ruffles before sewing it down.  Once or twice the ruffle ended at a weird spot and we moved it around some.  She was so funny the day she wore this shirt to school for the first time.  A couple of the HS girls recognized this look from Pinterest and commented it to her. They were impressed we had made it. That made her happy!

Next time:
Neckbands made by binding the edge.

Tuesday, March 6, 2012

T-Shirt Series: Ruched Sleeves


Of my three girls, my middle daughter (age 12) is the fashion girl. 
She wanted this shirt (short sleeve version in white)...BAD! 
It was because of the sleeves.
I've seen these sleeves on clothing in Target for both little girls and not so little girls.


They are fairly easily to replicate.


If you want to ruche the sleeves on one of your favorite patterns here is what you do.
Cut the cap of your sleeve pattern about 5 inches higher than normal.


This shows the ruched piece with a regular inset sleeve piece on top so you can compare how they look.  The ruched pattern piece will also be gathered into the armhole, whereas the regular sleeve could just be eased in for a flat appearance.


Using 1/4" (or 1/8") elastic sewn into the sleeve on the wrong side of the fabric is what gives it the ruching.

On this pattern I used a 10 1/2" piece of elastic for the sleeve portion which measured 17" from cap to hem.  That's about 65% of the length.  So if you have your own pattern that you are adapting just keep that in mind.  You could definitely ruche it up more and then just cut your elastic a little shorter still.

Line up the elastic about 1/2" from the cap of the sleeve down to about 1" shy of the hem.
I just sewed a straight stitch right down the middle of the elastic.

It can be a little awkward stretching the elastic to fit into the sleeve.  Use as many pins as you need to hold it in place.  And really, if it isn't a perfectly straight line it shouldn't show.  It'll all be ruched up in the sleeve.

Some other changes just on the shirt itself:
We cut the front neckline slightly lower--maybe 1 inch, AND adjusted the shoulder seam so that it was not so boatneck style.  Extended the shoulder seam about 1 inch also.
'Cuz the fashion girl is particular about those things.


You can see my lines in blue showing where to cut and how I altered the pattern (size small).
Don't forget to extend the shoulders on both the front and back pieces.  Or you'll be really unhappy and end up cutting out another back piece.


______________________
I'm also loving the long sleeve green version with the draping/shawl collar. 
Daughter #1 is partial to that one too, in green.

I hope to show that one sometime soon, too.

LinkWithin

Related Posts Plugin for WordPress, Blogger...