Showing posts with label Kitchen. Show all posts

Wednesday, November 18, 2015

Some Fall Canning

With this new house I  have a new set-up for canning.


My kitchen stove has a flat glass top which is lovely most of the time, except for when you're doing canning.  I have used it for some pressure canning for short amounts of time--i.e. peaches (6 min. at 10# of pressure).  However, I have been nervous about using it for any meats or beans which take up to 90 minutes for quarts.  I've heard stories of broken glass tops with the canner heated for so long.


Plus, let's be honest, I need to do more than one canner at a time if possible.


Earlier, in late summer, I was looking for a camp stove at my local Fleet Farm store. Which for those of you in Minnesota, Wisconsin, or Iowa you know how much fun this store can be.


I was looking for a 2 burner stove which runs around $80-100.  My sister, a cousin, and one of my good friends all swear by their camp stove canning set-up.  However, instead of a 2 burner I found a 3 burner stove, on sale for $100.  Regular price $200!  Hubby thought I was a little nuts to get one this big.  However, he did help me set it all up and hook up the propane.
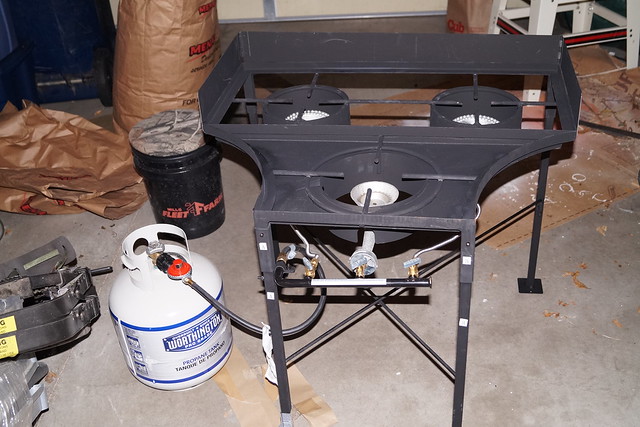


When you own 3 pressure canners like I do, a 3 burner camp stove is perfect.  The short story of the pressure canners is I bought one after we got married, inherited one when Hubby's grandmother passed away (that is the heavy double stacker), and then found another one at the thrift store for about $8 and I just had to replace the rubber ring and overflow plug (another $9). 
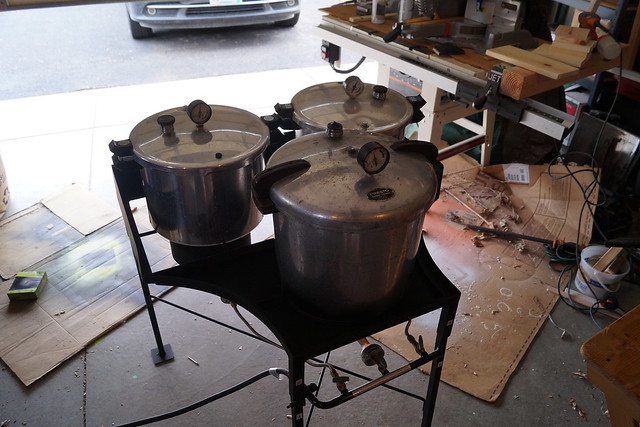


Here is the set-up all running out in my garage. 
With 3 canners I am able to can 32 pints in one sitting.  That beats 8 at a time, or even 16 with the double stacker.  This just worked out so slick.


Besides beans I have also recently canned Apple Pie Filling (recipe from the Ball Blue Book)
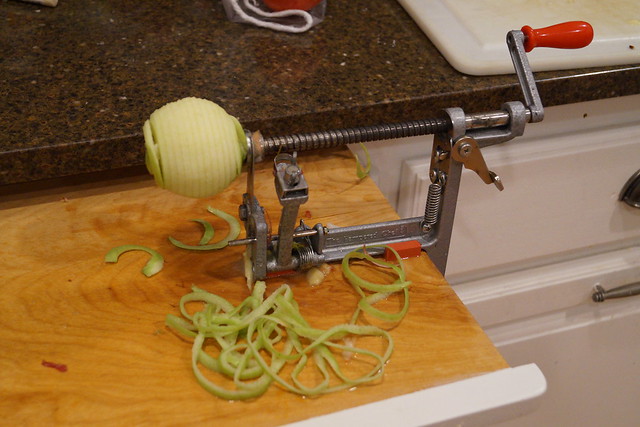


This is my favorite little contraption to help out with pie filling.
It peels, cuts and quarters all at the same time. 
This one is from Pampered Chef, but I've seen them at Target and other stores too.
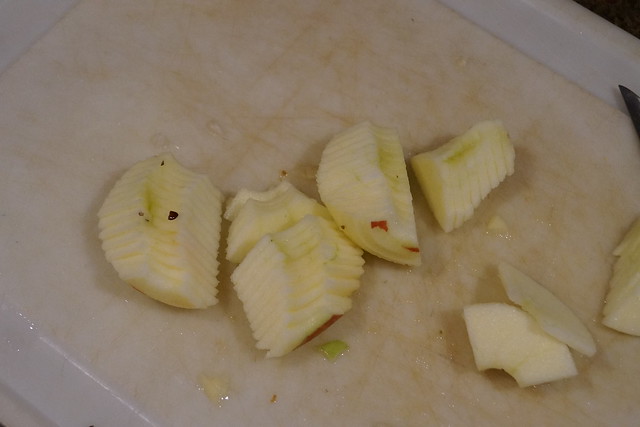


Just quarter cut the slices and add them to some salt water to keep from browning.
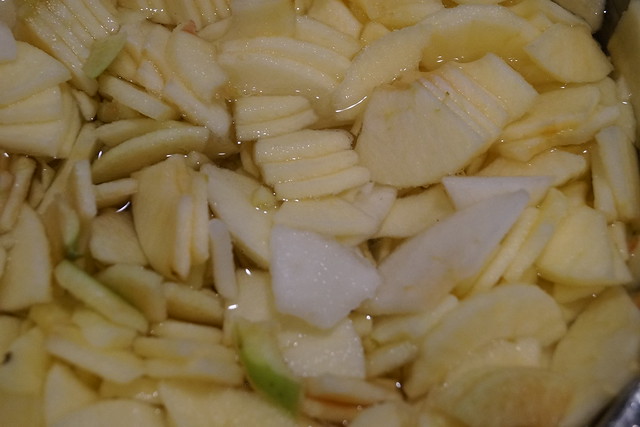


This year I got apples from Fall Harvest Orchard and tried their pie mix bags.
You can see that different apple varieties produce different colors of apples.  Some are more white inside than others.
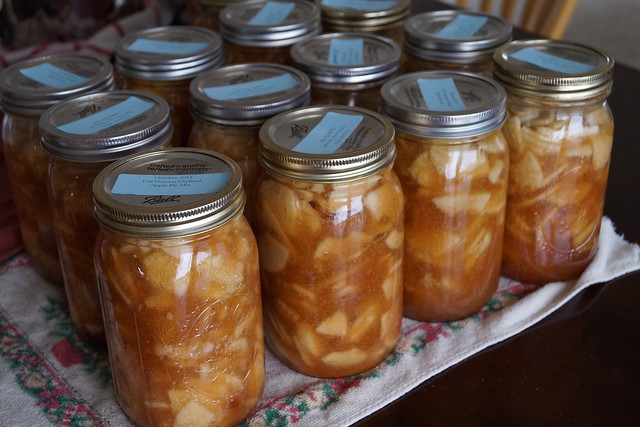


Delicious looking!
We made some crisp with the amount leftover that I didn't have room for and it was yummy!
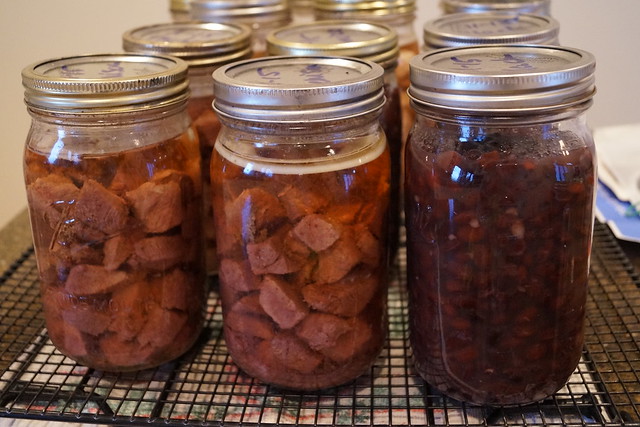


Just last week I canned meats.
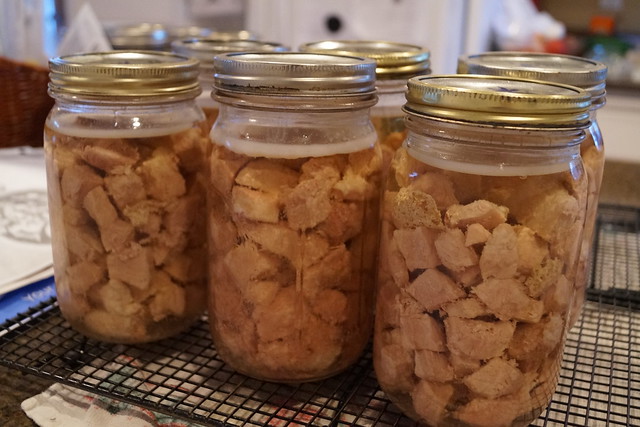
Above are jars of venison and black beans (they can the same amount of time) and below some pork chunks.  With beef as expensive as it is around here we've been eating a lot of pork.


I bought a pork loin at Sam's Club for $1.88/lb.  It was 10.21 lbs. for $19.19 and I was able to can 6 1/2 quarts worth of pork chunks.  I think I will go get another one and do it again.


I'm so excited to get our food storage back up to speed.  Canning does take work, but I like being able to just open jars later in the winter and basically have dinners ready to go.

Thursday, July 10, 2014

Today is the Day and Kitchen Counter Update

Today our house goes on the market.
Hallelujah!
It's only 2 months after I had originally wanted to have it ready to go, but.....such is life around here.
Now the kicker will be to see if we can get moved before school starts after Labor Day.
Keep the fingers crossed.

I thought I'd show one of the projects we did to get ready.  I'll show a couple more in the next few days too.

First up the kitchen counter and backsplash.


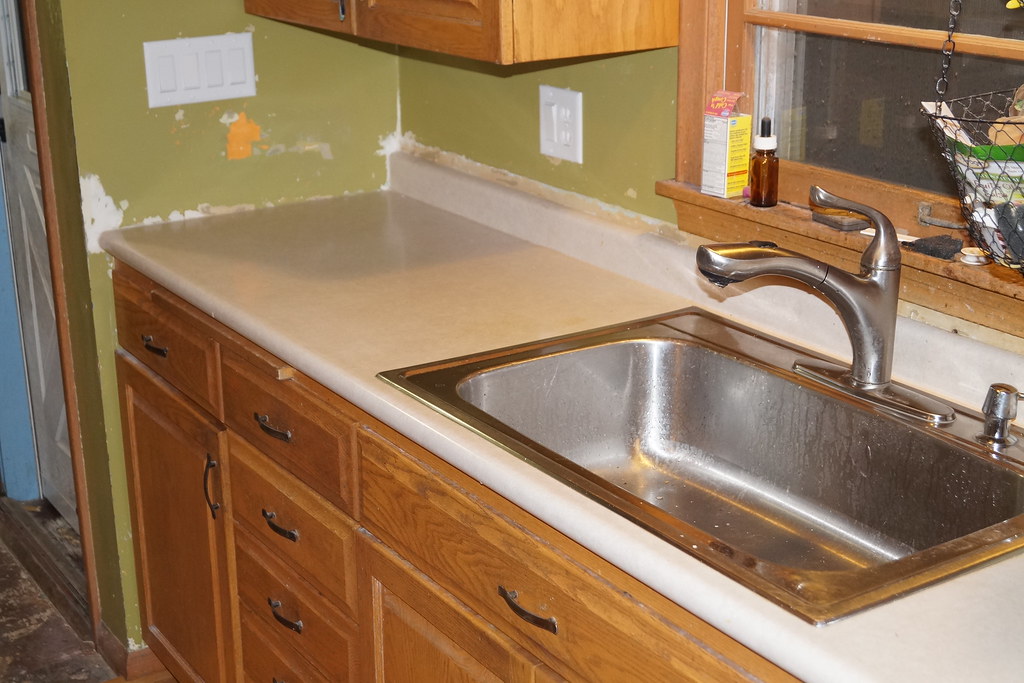
Old counter top before we took it out and before we repainted and tiled the walls.
We had a cream-ish paint over that green but had to get it all off because it was peeling and gross.
I'll tell you more later about those nasty avocado green painted walls from hell.

Our friend Paul told us about their kitchen remodel and how they used laminate sheet to redo the counters.
We really don't have much counter space in our kitchen and so this sounded like a straight forward fix for us.


The color we picked---Gold Flake


Roll on the laminate sheet onto your counter board with contact cement.
Install it in place.


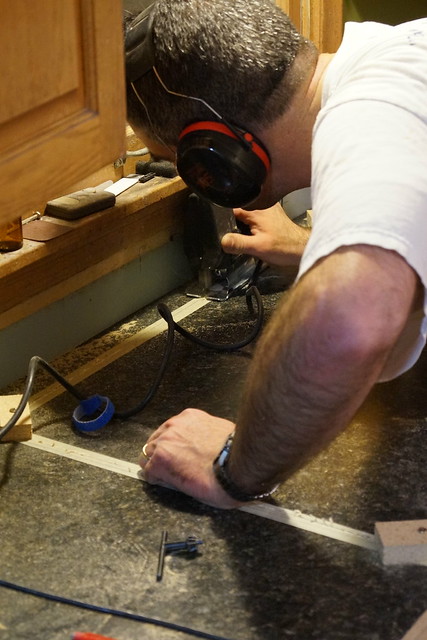
Cut out the sink opening with masking tape and a jigsaw.

Hubby cut the facing trim from some solid oak.
It turned out great.

Once the counter was completed we put up the subway tile (3x6 pieces)
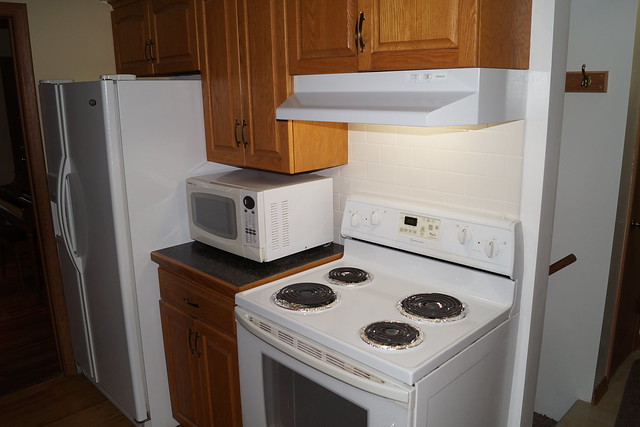
We had the section along the sink wall and then a little bit behind the stove towards the fridge.


I am really happy with how both turned out.
Even though we didn't do anything with the cabinets (we'll let the new owners decide if they want to do that or not) the changes we did make really give a nice feel to the kitchen.
And not having our house ready when I wanted I have been able to enjoy the kitchen a bit before leaving.


Details:
Laminate sheet bought at Menard's
Oak trim and facing custom made by hubby
Subway tile from The Home Depot
Changed the overhead light and vent.

Friday, October 25, 2013

Canning Split Pea Soup

Two weekends ago it decided to cool down here in Minnesota.  We had been enjoying unseasonably warmer weather for Fall, which was fine with me.  But now that we are cooling down it is time to can some soups.

I am pretty much the only one in my family who will eat split pea soup.
I don't care.
I like it.
Even if it does look "gross" per the kids.
I'll give them that much
But when I can it in pint jars it is just about the perfect amount for one serving--ME, for lunch.


I just canned some more Chili this week too.
Stocking up for the cold months ahead.
Now we just need a deer or two from our hunters and I'll can some venison chunks for stews.

Notes:
  • I used the recipe from the Ball Blue Book, pg. 65, "Split Pea Soup".  I doubled the recipe and got 11 pints.
  • I don't thicken mine any more than the recipe indicates when cooking it before canning because it thickens up quite a bit once it is all pressure canned.
  • This recipe has split peas, ham chunks, carrots and allspice.
  • Canning Homemade also has a recipe for a slightly different version of split pea soup.
  • 1 - 1 pound bag of dried split peas is equal to 2 cups dry uncooked for those of you who prefer to buy in bulk (which is usually cheaper).
  • If you need some good soup recipes to can--those you can dump and heat up--try The Amish Canning Cookbook.  I checked it out from my local library and found some yummy recipes.

Monday, July 15, 2013

Gardener's Sugar Scrub

Well, I'm back in town.
Whew!
Arrived yesterday evening and today I am trying to recover while doing laundry, sorting 2 weeks worth of mail, grocery shopping since the fridge and cupboards were bare, and generally just pick up and put away all our stuff.

So in the meantime, here is a quick post about an easy gift idea or try for yourself idea.

Last Christmas my sister-in-law Ashlee sent me a little jar of this gardener's scrub.
It sat for awhile until a month or so ago when I had been out in the garden and my hands were a mess.  I remembered her little gift and used some to clean up.

Wow!
Got the dirt off easy-peasy and made my hands so soft.

The kids got wind of it and have since used it for dirty summer feet and greasy bike chain hands with equally awesome results.  Once they found the jar it got used up quickly.

While stopping off in Wyoming last week on our way back home Ashlee was nice enough to give me 3 more jars....and the link to the recipe.  I'm so excited.

Hand scrub --rec'd this as a gift from my SIL and LOVE IT!!  Works great!
pic from onegoodthingbyjillee.com

Seriously, make some up and try it.
Your dirty hands and feet will be so happy!

Gardener's Sugar Scrub

Thursday, April 25, 2013

Working on the Kitchen

If you have followed our blog for awhile you know that we've slowly done some work on our kitchen.

Removing the half wall.
Removed the rest of the wall between dining and kitchen.
New flooring

Figuring out what to do with the remaining wall--double oven mock-up.

In the meantime it has looked like this.

An open utility shelf that was/is a disaster to say the least.
Please don't judge.
Older homes just don't come with enough storage.
And least of all when you have 7 people living in it.

Finally, since hubby has a new job, he commutes more and doesn't have as much time and we might move down the road, I decided we have to do something different.  We still might build in a double oven and cupboards, but until then I bought this.


Bought it on Craigslist for $100.
It was ready to use immediately, unlike some other entertainment units I had looked at that would've needed some shelves built in first. And when and if we do build something in this spot permanently I plan on moving this to my sewing room for fabric storage. (I will need to stain the bottom knobs to match them up.)

And for the moment here is sort of what I am doing with it.

Cookbooks
Small appliances
Markers and crafty supplies
Big bowls in the drawers
In the bottom drawer I put in baskets and fruit

Anything to get stuff off the counters and out of sight.
Still a work in progress, but much improved.

Monday, December 17, 2012

Lemon-Honey Jelly {Gift for the Teachers)

I don't know about you but sometimes we are good about giving the kids' teachers a nice gift for Christmas and sometimes we're not.  Usually I just wait until the end of the year to thank them for dealing with having my kids during the year.

This year I am little more inspired for the two elementary teachers.  I've been perusing some canning books from my local library to get a feel for anything new I might want to try.  Found a fun book from BH&G called Can It!.  I decided to try the recipe for Lemon-Honey Jelly.  I am a huge honey fan, especially on homemade bread.  So I thought the combo of these 2 would be so yummy and fun to give to the teachers for a little Christmas gift.


Some other recipes from this book that I want to try are:
  • Tangerine Marmalade, pg. 77
  • Lime-Kiwi Freezer Jam, pg. 123 (already made this and it is FABULOUS!)
  • Spiced Peaches (next summer), pg. 141
  • Farmer's Market Corn Salsa, pg. 159
Notes:
  • I used a zester instead of a vegetable peeler to remove the peel.
  • Scooped out the cooked zest and foam with a mesh colander instead of a spoon since the zest was so tiny.
  • I was able to can 6 half-pints and not 5.
  • And after licking the spoon when I was all done I am REALLY looking forward to eating some of this myself with homemade bread.  It is delicious!  The recipe says to wait 2 weeks before eating to let it set up good.

Thursday, May 10, 2012

Peanut Butter Syrup

Last weekend the young women at church had a pancake breakfast fundraiser for girls' camp this summer.  We had quite the assortment of gourmet syrups and toppings.  This recipe was one of the biggest hits.  Most of my kids just put peanut butter on their pancakes anyway--so this was their favorite.  Our friend MaryAnn was more than willing to share her yummy recipe.

Peanut Butter Syrup
2 cups sugar (**half brown sugar and half white sugar is o.k. and even better if just making plain maple syrup)
1 cup water
1 tsp. maple extract

Combine above in a saucepan. 
Stir occasionally and bring to a boil. 
(This maple syrup is great on pancakes and waffles as is.)

Add 1 cup creamy peanut butter (MaryAnn uses Jif). ***I tried it with Peter Pan and the syrup separated.
Stir with a whisk until combined. 
Serve warm. (way better warm than not)

Enjoy your breakfast!
We sure have with this delicious syrup.


Monday, November 21, 2011

Mincemeat Cookies

You know how as moms we disguise food so that our children will eat certain items--usually veggies.  i.e. broccoli pureed and put into spaghetti sauce for example.  This is our longest running family food secret to date.  I'm sure of it.

Our youngest brother is turning 30 this week. 
Mom, it's time to let Nate know the truth.
I think he can handle it.
He's married and has 2 kids.
He really is a big boy now.

For years, our Mom swore the remaining 5 of us siblings to secrecy about these cookies. 
Nate loves them! 
Probably one of his favs. 
But she never told him what was in them.
She always called them "spice" cookies.
Well, it is true, there are spices in them.
But that's not all....

___________________________________
Mincemeat Cookies
Cream together:
  • 3/4 c. butter, softened
  • 1 c. brown sugar
Add:
  • 1 beaten egg
Sift together and then add to above:
  • 2 1/2 c. sifted flour
  • 1/2 tsp. salt
  • 1/2 tsp. baking soda
  • 1 tsp. cinnamon
Add:
  • 1/2 c. mincemeat
  • 1/2 c. chopped nuts (optional)  Oh how I wish I could put nuts in mine, but about half my family complain about them.  Bummer!
Blend together thoroughly.  Drop by spoonful on greased cookie sheet.
I also usually take a glass w/ flour on the bottom and flatten out the spoonful a bit so it ends up being more round, not mounded.
Bake at 350 degrees F for 15 minutes.

Let cool slightly then drizzle glaze over top of each cookie.

Glaze:
1 c. powdered sugar
2 tsp. melted butter
1 tsp. vanilla
2 Tbs. milk

___________________________________

Then watch your youngest brother eat them all up and smile to yourself because you know the truth. 
Happy B-day Nate!

***And by the way, my kids know what's in them, and they LOVE them besides the fact they know what's in them...i.e. green tomatoes and raisins.

Wednesday, November 9, 2011

Green Tomato Mincemeat to Can

With all the green tomatoes that I picked off my plants a week or so ago I went ahead and made up some mincemeat to can.  Unfortunately it doesn't use up as many tomatoes as I'd like, but the rest of them I've put into paper bags to ripen them up and then can those just as tomatoes.

______________________
Green Tomato Mincemeat

6 c. chopped apples, seeded
4 c. chopped green tomatoes
5 c. raisins
3 c. sugar
1/2 c. vinegar or lemon juice
2 tsp. cinnamon
1 tsp. allspice
1 tsp. salt

Boil all together until cooked through (it will be brown). 
I cooked mine about 1 hr.


Ladle into hot, clean jars.
Hot water bath for 25 minutes.

_______________________________
Notes:
  • This recipe makes 6 pints. 
  • This time around I canned it in 1/2 pints because that is the amount I need for my Mincemeat cookie recipe.  Thanks, Tiffany, for that heads up.
  • 2x recipe need 1 - 5# bag of apples.
  • Raisins -- a 24 oz. bag = 4 1/2 c.

Wednesday, October 26, 2011

It's going to freeze tonight...again...

...and I've decided I'm done covering up my tomatoes.  I cover them about 2 or 3 times before I decide that I'll just pick whatever I have left hanging on and figure out what to do with them.


I had a lot hanging on. 
Now I get to figure out what to do with it all.
I did give some to my neighbor and she told me how she fries up her green tomatoes.  I am so going to try that.
You can also use green tomatoes in the Tomatillo Green Salsa recipe.

Or you can make mincemeat using green tomatoes.
I am down to my last 2 jars, so I'm pretty sure I'll be doing some of this.
But not this week yet.
After Halloween and class parties are done.
Then I'll be up for some canning.

Tuesday, July 12, 2011

Double Oven Mock Up

Well, now that the flooring is done in our kitchen it is on to the next step.
For a couple of years now we've had a double oven sitting in our garage--given to us by some friends who were replacing theirs before a move.  The current one still worked they just upgraded to stainless steel.  Hubby helped them replace it and so they gave him the old one.

Now it is time to really figure out where and how that will be going into our kitchen.


But first a little mock up of it so that we can make sure it will really fit where we want it AND it won't cause problems with flow, etc.  The fridge is on the right of the doorway along with the current stove and fridge and cabinets.  To the left of this is the dining area and into the living room.

We've had it set up like this for a week or so and it appears it is going to be AWESOME!!
Double oven on the left with cupboards above and below 2 drawers for pans.  On the right side will be a cupboard above and drawers below--basically a little counter space for the phone.

Can't wait!  Hubby has a bunch of the wood already, so maybe it'll start coming together here in the next couple of weeks.  Maybe...

Monday, June 13, 2011

Kitchen Update

This is what has been consuming my life for the past week or so. 
We're moving slow as we started this a few days before grandparents arrived
for our daughter's baptism. 
Not the best timing on our part, but it was time and we got a great deal on bamboo flooring. 
I can't wait!!! 

But first up, removing the remaining wall between our kitchen and dining. 

 Hubby and oldest daughter taking out the last of the wall.

It's gone. 

Our kids all commented on how "big" it seems now.  That is for sure--I love it.
We had to move electrical from one wall to another, ripped up the remaining linoleum, and added 6" to the existing wall in order to support the soffit between the dining and LR.

Tonight we are hoping to get the floor all laid out. 
Then we can move on to constructing the build-ins for the double oven and cabinets.
With all the stress of it I need to go hibernate in my sewing room for an hour or so.

Monday, June 6, 2011

Wedding Gifts

We had 3 weddings here last month and sometimes that can get interesting when you're trying to come up with gifts.  Hubby always likes to give a portable tool set for 2 reasons.  #1 because out of all the gifts we received when we got married 16 years ago that is the present we have used the most. Seriously.  We love that item. In fact, we just had to replace ours last year.  And #2 because he feels the groom gets ripped off in the gift department. Probably true.  

However, if we don't really know the groom then I'd prefer to give something off their gift registry.  That may be a little boring, but I do try to personalize it a little bit.  This year I bought some kitchen items off 2 different registries and then added a handmade apron.

This is how I wrapped the latest of those gifts for the reception for a girl from our Church. 


Bundt pan, hotpad, and towel, wrapped it in an apron and then wrapped all in cellophane and a pretty ribbon.  I try to not use wrapping paper when possible because I think it is a waste.  But I still like it too look fun and pretty.

After finishing putting it all together I remembered I had found this tutorial for making covers for bowls--for taking to a potluck or such.  It might have been fun to have added one to use w/ the bundt pan.  Maybe next wedding reception....

Friday, November 5, 2010

Squash {Part 2}

So in Squash {Part 1} we gave you some info on winter squashes and how to can them, along with a couple recipes for Squash soup. It seems that Tiffany and I are not the only squash obsessed people around based on some of the responses we received.

Here are a few more ways to use your squash once you've got it canned (or cooked and pureed).
______________________
Mayan Hot Chocolate
1 sm. Butternut squash or (1 pint bottled squash, drained)
2 ½ C. milk divided
6 oz. semi-sweet chocolate
½ tsp.Cinnamon
Large pinch of Nutmeg
Large pinch of Cardamon

If using bottled squash, puree squash with ½ C. milk until smooth.
If using fresh, cook squash 'til soft.
In large sauce pan mix remaining 2 C. milk, chocolate & spices.
Stir 'til melted and creamy, add squash.

Heat through.
Serves 4
______________________
Pumpkin Smoothie
from Better Homes & Gardens Nov. 2010

In a blender combine:
1/4 c. canned pumpkin
Low-fat vanilla yogurt
1 Banana
A spoonful of peanut butter
Handful of ice cubes
Milk to thin as desired
Top with a little whip cream and cinnamon.

**Update Nov. 11, 2010
Tried the above recipe and it tasted like a peanut butter smoothie---eh, so-so.
Therefore, if you are looking for a pumpkin pie smoothie this won't be it. To adjust it and get that flavor, don't add the peanut butter (but maybe add more pumpkin) and instead add either pumpkin pie spice to taste, or a combo of nutmeg, cinnamon and ginger to taste to get that pumpkin pie flavor.
_______________________________________

I also went to my local library and found a couple books that had some recipes that I would actually try. I am not a fancy cook. So recipes with things like goat cheese, or other things that I don't even know what they are or where to even look for them, I don't make. It's not that I wouldn't be game to try, because really I'll try anything. It's just that my family is not as daring as I am, AND I don't want to be stuck with ingredients I can't use again.

These books had some good basic recipes that you could make using almost any kind of winter squash. Some I've tried and others are on my list to try. But I feel these are realistic recipes for my family. Both books have summer and winter squash recipes, but I just listed some of the winter squash recipes.

Zucchini, Pumpkins & Squash by Kathleen Desmond Stang

  • Pumpkin Ice Cream Sundaes pg. 59
  • Spaghetti Squash Hashbrowns pg. 22 (My kids love spaghetti squash and normally just eat it cooked with Parmesan cheese over it--like noodles--but I think they would love this recipe)
  • Creamy Winter Squash Soup with Spices pg. 28
  • Golden Pumpkin-Orange Pancakes with Orange Butter pg. 23
  • Two-Way Pumpkin Yeast Dough pg. 18

So I just have to make a comment about making pancakes and adding squash. I experimented on my family recently and added cooked Acorn squash to our waffle recipe (Krusteaz--you know the bag of mix you can pick up at Sam's club). I doubled the waffle recipe and added about 1/2 c. cooked, smashed butternut squash. Not one person noticed or said anything. I couldn't tell, and I knew. You don't necessarily need a recipe for this. Make up pancakes as you always do and add about 1/2 c. of squash puree.

James McNair's Squash Cookbook

  • Golden Yeast Rolls pg. 79--these were delicious!! And once again nobody knew I had added anything.
  • Creamy Winter Squash Soup pg. 63
  • Fried Winter Squash Chips pg. 60
  • Squash Pancakes pg. 81
  • Winter Squash Ice Cream pg. 88
  • Spiced Squash Cake with Caramel Icing pg. 91

I'm seriously thinking that Squash Ice Cream needs to be added to the Thanksgiving menu this year.

I have not yet tried a Squash soup recipe. My kids caught wind of that and declared it "disgusting" already. However, I made a crockpot Cheesy Potato Soup the other night and did about 1/3 of the potatoes as butternut squash. They didn't know otherwise. (insert evil laugh) My food science friend Kevin said that any recipe that calls for mashed potatoes in it can be substituted with smashed squash, i.e. potato rolls.

So go ahead and experiment and enjoy. If we come up with anything else fabulously squash we'll let you know.

Note: This site has good info about picking squash, squash equivalents, and pics of all varieties of squashes along with a list of squash recipes.

Thursday, October 28, 2010

Squash {Part 1}

Our cousin Tiffany and I have been slightly obsessed recently with all things squash. Winter squashes, unlike summer squashes, can be stored almost indefinitely in a cool, dry spot, like your basement. This is just fine, unless you have a squash like the one in the picture below.
This is Tiffany with one of TWELVE 3-4' long banana squashes that were grown in her parents' garden. Where are you going to store 12 of those babies?!

Cutting one into workable pieces requires a hubby with strong muscles and a machete or chain saw....seriously. And unless you want to eat banana squash for about a week straight for every meal (and that is just 1 banana squash), or feed your entire neighborhood for a couple days, you have to figure out something to do with once you cut into it.
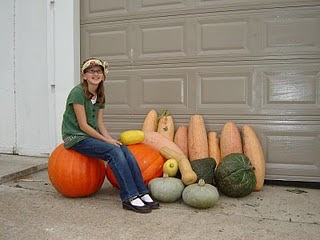
Here are more of the famous banana squash along with the other varieties they grew (and Tiff's cute daughter).

My husband brought home about 10 butternut squash for us, from work, that someone had just left in a bin outside the back door hoping people would take them. I told him to bring as many as he could.

So, if you don't have lots of freezer space to store cooked puree, you could can it. However, you MUST use a pressure canner. I canned half of my squash for now.

Per the Ball Blue Book:
Basically, remove peel and seeds, and then chunk up the squash into 1" pieces. Add to clean jars, plus 1/2 tsp. salt for pints and 1 tsp. salt for quarts. Fill with hot water. Adjust 2 piece lids.

Can pints for 55 minutes at 10 lbs. of pressure.
Quarts for 90 minutes at 10 lbs. of pressure.
(adjust as needed for your altitude)


So then the question is: What do you do with canned winter squash?

Well...for starters just about any winter squash can be interchanged with each other in any recipe that you have. Any recipe that calls for pumpkin (including pumpkin pie) can be substituted with winter squash. We've used butternut squash for pumpkin pies for years. The "pumpkin pie" flavor is all in the spices.

Here's a couple soup recipes to try:
Simplest Butternut Squash Soup from Parade Magazine
Butternut Squash Soup from Woman's Day Magazine
____________________________

Tiff's Pumpkin/Squash Soup Recipe:

  • 1 Butternut squash- peeled, seeded and cubed (I think you could use acorn, pumpkin or banana squash and be just fine)
  • 1 apple--peeled and cubed (any variety--though a lot of recipes say use a tart one)
  • 1/2 onion (large) quartered ( I used white, you could use yellow or purple)

Put these 3 ingredients in stock pot, cover with chicken or turkey broth bring to a boil and cook until tender.

  • Add salt and pepper to taste
  • 1 C. heavy cream (I used plain yogurt cause that's what I had)

Using an immersion blender, regular blender or food processor, blend everything to a smooth texture. Top with parmesan cheese for savory flavor or brown sugar for a sweeter flavor.

Some variations to this:
heavy cream--you may use plain yogurt, sour cream, or coconut milk
additional seasonings--I love curry, so I dumped 1/2 tsp. in mine
If you want a cheesier soup add a few Tbs. of cream cheese, very rich and makes the soup thicker.

____________________________

Tiffany and I have been experimenting with some other ideas and recipes. We'll post more in a couple days. (see Squash {Part 2})

Friday, July 30, 2010

Reduced Sugar Raspberry-Peach Freezer Jam

Well, I think that I have picked the last of my raspberries for the summer season. Bummer! However, we've probably had the most (32 pints worth of jam) and the biggest raspberries that we've ever had this year. Mental note: water lots in June next year. We had something like 15 of the first 18 days of June with some measureable amount of rain.
We love Raspberry Freezer jam. For my first batch of raspberries this year I made reduced sugar freezer jam for the first time. It came highly recommended from a friend's sister. One year I tried NO sugar jam and it didn't go over well...with anyone. For reduced sugar jam you have to make sure you buy the correct box of pectin: labeled for reduced or no sugar recipes. You cannot substitute or change ingredient amounts or your jams will not set correctly. I don't think I'll go back to regular jams--I'll stick with reduced sugar recipes.

Sure-Jell® for Less or No Sugar Needed Recipes is in the PINK box. (about $2.50/box) Recipes and instructions come inside each box.

Original Sure-Jell® is in the YELLOW box. (slightly cheaper price than the pink box)

The recipe from the box for the low sugar Red Raspberry Freezer Jam uses 4 c. crushed raspberries and 3 1/2 c. sugar, whereas the original recipe uses 5 c. crushed raspberries and 7 c. sugar. Click HERE for original Sure-Jell® freezer jam. That is a big difference--but really, even cutting the sugar in half you don't notice any difference in taste.

After making a batch of that jam I noticed on the instructions insert a recipe for low sugar Raspberry-Peach Freezer Jam. O.K. I had to try that too. I bought a couple peaches at the store and my kids about died, or so they thought, because I wouldn't let them eat them.

This was YUMMY jam! Most of my kids refused to even try it--why, I don't know. They love both peaches and raspberries, but that's fine. I'll eat all this jam myself. It'll be a sacrifice, but I think I can do it.

Hope everyone is enjoying their summers and go enjoy some homemade freezer jam--it is probably one of the easiest things you could "can" for yourself and your families.

Thursday, July 8, 2010

Homemade Bisquick® Substitute

You all know about Bisquick® from Betty Crocker--pancakes, strawberry shortcake cakes, easy cooking, etc.

Here is a recipe for homemade Bisquick®.

Our mom gave me this recipe I don't know how long ago--probably when I first got married and then I've come across it again in this really OLD (published 1978) book called "Make-a-Mix Cookery" by Karine Eliason, which I happened to find and purchase at some thrift store a couple years ago.

In the book they call it Quick Mix

8 1/2 c. All-purpose flour
1 Tbs. Baking powder
1 Tbs. Salt
2 tsp. Cream of Tartar
1 tsp. Baking soda
1 1/2 c. Instant nonfat dry milk
2 1/4 c. Vegetable shortening

In a large bowl, sift together all dry ingredients. Blend well. With pastry blender, cut in shortening until evenly distributed. Mixture will resemble cornmeal in texture. Put in a large airtight container. Label. Store in a cool, dry place. Use within 10-12 weeks. Makes about 13 cups of Quick Mix.

Note: I don't use this amount in 10-12 weeks, so I store mine in a 5 qt. ice cream bucket in the freezer so that it will last longer.

A slightly different version of Bisquick® substitute called Master Mix found HERE.

One more HERE. There are apparently a number of different versions out there online. You can find the one that works best for you.

Here is a family recipe we use for an easy bacon and cheese quiche that uses Bisquick®. I'm sure it is based off of this recipe from Bisquick®. You can easily substitute the bacon for browned sausage, or cooked ham chunks. It is one of my kids' favs.

Friday, June 11, 2010

Ruffle Apron {Bridal Gift}

This is the first time I've made this pattern (Leslie's fav) for anyone. I was in need of quick gift for a bridal shower tonight (I made the apron earlier this week) and had some leftover fabric from this quilt that I thought would work great.

I like how it turned out--rather fun and sassy. The bride-to-be is pretty fun and sassy herself, and really girly...so I'm pretty sure she'll like it. Congratulations, Cheyenne! We wish you all the best!

Monday, March 8, 2010

Recycled Cake Stand

Last Fall I went to a craft show at one of our local high schools. It is an annual event that I have never attended in all the years that we've lived in this area. I was mostly going to scope out the competition and determine if I might want to get involved this year and try my hand at selling some items.

It was a HUGE event! And I'm glad to report that I didn't see any items like those I have been thinking about doing. One of the coolest things I did see however--and there was a line of people waiting to buy--was a booth of recycled cake stands. This woman was a genius. Minimal cost, minimal effort and apparently a great return on her investment judging by those waiting in line to buy.

What she had done was to buy some mismatched decorative plates at a thrift store of varying shapes and colors and then glued those to various bowls, candy dishes, etc. to make a "new" cake stand. And she was only selling them for $5 apiece.

Well, I decided to try my own hand at it. I went shopping at a local thrift shop and came up with this beauty.

I had actually found a matching candy bowl to go with the plate. (The lady at the craft show didn't have any that appeared to match per se, but those she had made sure looked great.)

So then the next step was to decide which way to attach the two together. ...like the above pic, or the one below.....
I chose this option.

You just need to make sure you use an Epoxy adhesive when putting one together. I used one from Super Glue®.

Now that "cake season" is starting at our house--the first birthdays of the year at our house are in April--we'll be ready in style.

Wednesday, February 3, 2010

Now you see it....

....now you don't.

This little half wall was located between our kitchen and dining room. It used to have wooden slats attached to it going up to the ceiling to make it feel more like a "wall" without actually being one. Those slats got removed a couple of years ago and since then we've been talking about removing the half wall--and then ultimately the remainder of the wall as we do some remodeling in the kitchen.
Mr. C and I had a fun time taking it all down. He told me more than once, "This is so cool!" Every 4 yr. old boy should get the opportunity to do some demolition. He loved pounding with his little hammer and playing with the hole that was revealed once we got things off.
I hadn't told Hubby that I was going to do this on this particular day. I just decided in the afternoon and started. His reaction was what I thought it would be...exact words, "Oh Crap!" Good thing he does love me.

But he was great, really wasn't upset, and completed the section when he got home and filled in the hole that gave us "access" down to the laundry room. And then later that night admitted, "We should have done this a long time ago." (Don't you just love those "I told you so moments"? Savor those when they happen.)
I can't tell you how happy removing just this much has made me feel. This little bit has made the kitchen feel so much bigger (and it didn't hurt that the dog kennel for our chocolate lab got moved outta there too.)

LinkWithin

Related Posts Plugin for WordPress, Blogger...