Monday, November 23, 2015

Rambling Cable Scarf turned infinity

Daughter #2 has wanted to knit herself a scarf ever since she crocheted her first afghan.
Last Christmas she got some yarn for a gift.


Since then she has been working on this scarf off and on as she needed a break from homework or felt more motivated to get it done. And also in between the craziness of moving earlier this Spring.

As the weather has been cooling off here in MN she pulled it out and we realized that the only thing it needed to be completed was to sew the edges together to make it an infinity style scarf, and then block it.  Both of which turned out to be my job.


This scarf pattern is intended to make randomly placed cables through the 3 columns for a "wonky" type look.  No reading of cable diagrams to follow.  I have to say that daughter #2 is not at all random.  She decided that she wanted each column to cable at the same time. So by the time she was finished her project it appeared that she had followed a pattern.


"To each his own" as my mom would always say.


I still think this is one of the best scarf patterns to start learning cables.

Details:

  • Pattern here.
  • First version I knitted of this scarf pattern.
  • 2 skeins of Loops & Threads Impeccable in either Aran or Heather. We threw away the yarn label.  Her next project she wants to make a scarf in Burgundy.  She has the yarn ready to go.  Just needs to decide the pattern and style.
  • Finished dimensions 6 inches wide by 100 inches long. (She can wrap it 3 times shown in the picture immediately above).


Friday, November 20, 2015

Modern Solid Scraps


I tried my hand at a scrappy solids quilt this year.
I've been working on it for a few months here in the new house.
I like it.
A lot.
I might just have to start another one.


Details:
  • Inspiration from CrazyMomQuilts and this quilt.
  • Used leftovers from this quilt and the stash.
  • Added the white sashing to make the quilt bigger for us tall folk.  I may cut it down some.  Not sure yet.
  • Won't get quilted for awhile since Lynn isn't taking any new quilting projects 'til after Christmas.  Bummer!

Wednesday, November 18, 2015

Some Fall Canning

With this new house I  have a new set-up for canning.


My kitchen stove has a flat glass top which is lovely most of the time, except for when you're doing canning.  I have used it for some pressure canning for short amounts of time--i.e. peaches (6 min. at 10# of pressure).  However, I have been nervous about using it for any meats or beans which take up to 90 minutes for quarts.  I've heard stories of broken glass tops with the canner heated for so long.


Plus, let's be honest, I need to do more than one canner at a time if possible.


Earlier, in late summer, I was looking for a camp stove at my local Fleet Farm store. Which for those of you in Minnesota, Wisconsin, or Iowa you know how much fun this store can be.


I was looking for a 2 burner stove which runs around $80-100.  My sister, a cousin, and one of my good friends all swear by their camp stove canning set-up.  However, instead of a 2 burner I found a 3 burner stove, on sale for $100.  Regular price $200!  Hubby thought I was a little nuts to get one this big.  However, he did help me set it all up and hook up the propane.


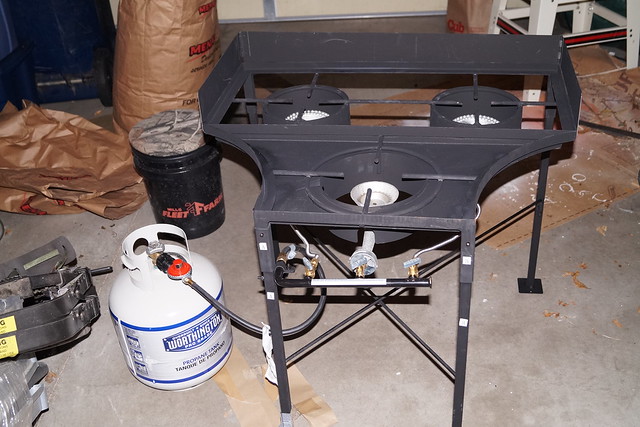
When you own 3 pressure canners like I do, a 3 burner camp stove is perfect.  The short story of the pressure canners is I bought one after we got married, inherited one when Hubby's grandmother passed away (that is the heavy double stacker), and then found another one at the thrift store for about $8 and I just had to replace the rubber ring and overflow plug (another $9). 


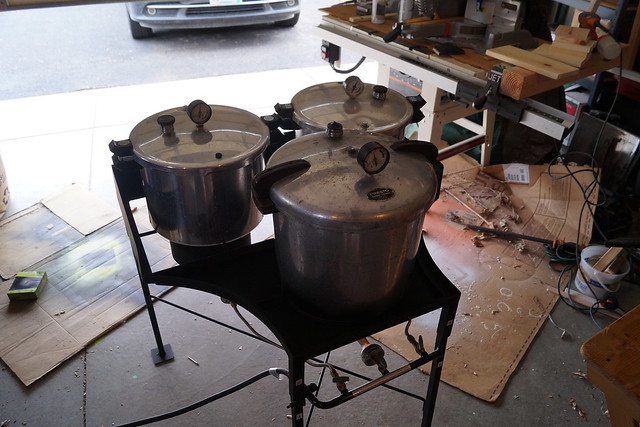
Here is the set-up all running out in my garage. 
With 3 canners I am able to can 32 pints in one sitting.  That beats 8 at a time, or even 16 with the double stacker.  This just worked out so slick.


Besides beans I have also recently canned 
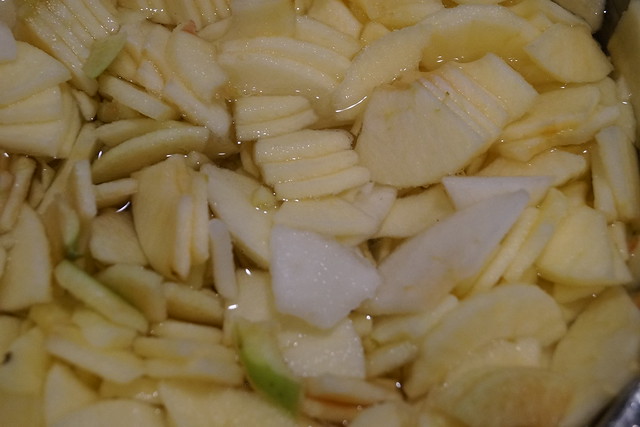
Apple Pie Filling (recipe from the Ball Blue Book)


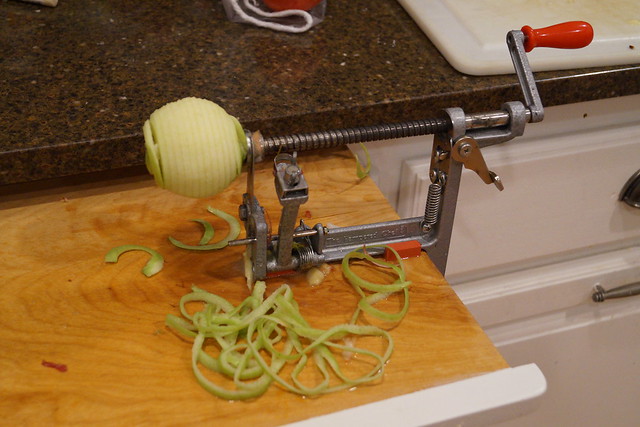
This is my favorite little contraption to help out with pie filling.
It peels, cuts and quarters all at the same time. 
This one is from Pampered Chef, but I've seen them at Target and other stores too.


Just quarter cut the slices and add them to some salt water to keep from browning.


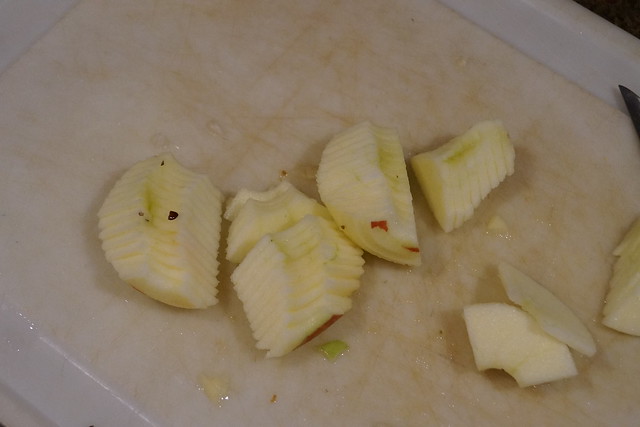
This year I got apples from Fall Harvest Orchard and tried their pie mix bags.
You can see that different apple varieties produce different colors of apples.  Some are more white inside than others.
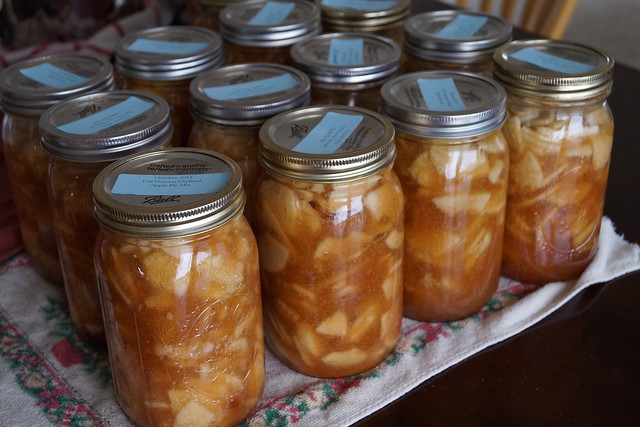


Delicious looking!
We made some crisp with the amount leftover that I didn't have room for and it was yummy!


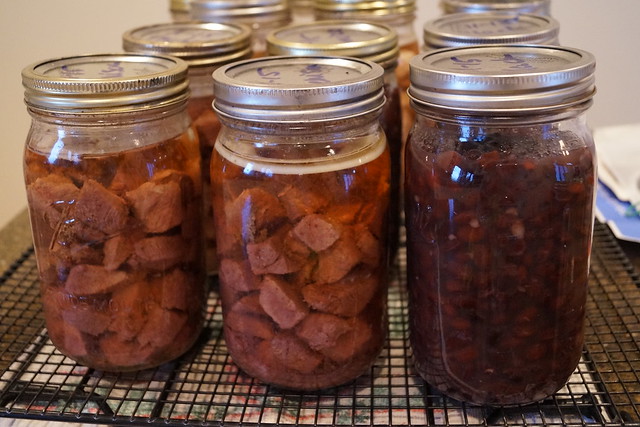
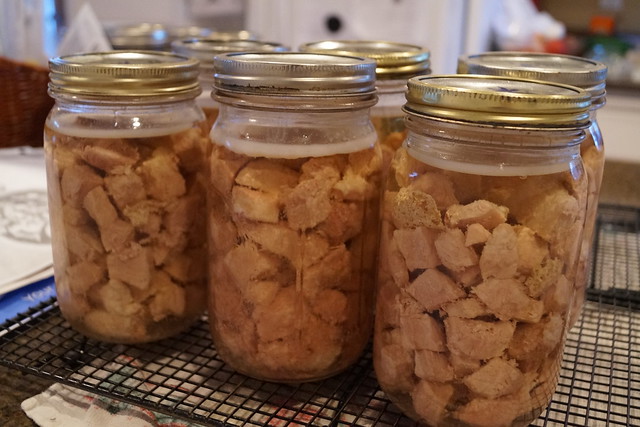
Just last week I canned meats.
Above are jars of venison and black beans (they can the same amount of time) and below some pork chunks.  With beef as expensive as it is around here we've been eating a lot of pork.


I bought a pork loin at Sam's Club for $1.88/lb.  It was 10.21 lbs. for $19.19 and I was able to can 6 1/2 quarts worth of pork chunks.  I think I will go get another one and do it again.


I'm so excited to get our food storage back up to speed.  Canning does take work, but I like being able to just open jars later in the winter and basically have dinners ready to go.

Monday, November 16, 2015

Scarf for Ashlee

My sister-n-law Ashlee and I made a trade this year.
Actually I initiated the trade.
She made this fun porch sign for me for our new house.


And in return she wanted a knitted infinity scarf.

I love trades.
It makes me happy to give something that I love to make in return for something someone else loves to make.
It's a Win-Win all the way around.

I just sent it off last week.
Sorry, Ashlee that it took me so long.
It's not that it was difficult.  I just kept getting sidetracked.

Here you go!


Ahhh, my helpful model (daughter #1)
And yes, she wanted me to actually take these goofy pictures.


Details:
  • Pattern is Meringue Hand Knitted Cowl (before the updated version) from My Little City Girl.  I have to say the first version pattern was a little difficult to read and follow.  Hopefully the second version really is easier.
  • Yarn is Red Heart Soft in navy. 
  • Porch sign idea from HERE.
  • I think you can find some of Ashlee's stuff here. Check it out if you live in the Casper, WY area.

Thursday, November 12, 2015

A round of baby swimsuits

I haven't made any little baby swimsuits for what seems like years.
Honestly, I don't think it has been that long, but it seems like everyone was having boys for the longest time. And while I'm not opposed to making little swimsuits for boys, not everyone (or every dad) can appreciate a Speedo on their little guy. (Mostly I make them for a fun reaction!)

However, we might be back in baby girl mode now.
I recently made 4 sets of baby swimsuits and it was so fun.
My girls are done with any pink.  I may be the only one of us who ever wears any pink anymore.

Anyway, I had a fun time sewing up these teeny little suits for my friends and family and the new babies.


Size 2T suits.


Close-up of the texture of these BRIGHT pink suits.
No more embellishment needed.


Nothing like a good little skirted suit for the princesses.


I photograph these suits on my hand so you can get the ide of how little they are.
This is a 1T size suit.


Size 24-36 months


Love, love, love a good ruffle bum swimsuit for little girls!!

I have to say my friend Jenny, who received this purple suit, was dying!!.  She is having her first girl after 2 boys and she couldn't be more happy.  She told me she wished this suit was smaller so that she could bring her new daughter home from the hospital in it.  She's due the end of December and lives in MN--even if it did fit that might not be the best idea Jenny.

Details:

  • Purple suit pattern is Kwik Sew 3606.
  • Other 2 suit styles are Kwik Sew 2512. I've had this pattern for years! It appears that Kwik Sew no longer makes any baby swimsuit patterns. 
  • Swimsuit fabric from the stash.  Bought from the thrift store when I find it.
  • Used a 2.5 Stretch Twin Needle for the topstitching.


Monday, November 9, 2015

Can you be a sweat shop when sewing for your own family?

My youngest 2 children do NOT like to wear jeans.
I'm not sure how they are related to me.
I love a good pair of jeans.
Either way, they have to wear long pants some time, especially living in Minnesota.
Daughter #3 is currently 12 and absolutely won't wear jeans.
It is leggings or nothing for her. No lie.
At least my youngest son will unhappily wear jeans if all else is dirty.
But if he has a choice, sweat pants are preferred.

So a week or so ago I de-stashed and sewed all at the same time.
It was like a mass production site in my basement.
It felt great to sew.  I haven't really sat down and done a lot for a few months.
But then I did get to thinking, can you be a sweat shop when sewing for your own family?

Anyway....
After all was said and done I made for her
  • 1 pair black sweats
  • 2 pair black leggings
  • 1 pair red leggings
  • 1 pair green leggings
  • 1 pair orange leggings 
  • 3 pair of blue leggings
Seriously, if she even remotely complains about not having any pants to wear I might have to hurt her.


Another set she wore for her "Anabeth" costume for Halloween.
She is currently super-obsessed with the Percy Jackson series.

My son got 2 pairs of black sweatpants and so he is super happy.  Almost all his other sweats have been turned into shorts because he had either wrecked the knees or they were turning into capris for him.  Not a good look for 9/10 yr. old boys.

Details:
  • Favorite girls' legging pattern is Kwik Sew 1591.  It is out of print, so you could try KS 3476 or KS 3958.  The thing I like about this pattern is that there is no side seam.  Front and back are cut together.  Sews up super fast!  Also, the leggings aren't super skin tight.  I don't love that on girls.
  • All the knit fabric I used for her was from my stash. However, I can't decide if I actually made a dent in my knit supply or not.  Sad!
  • The sweat pant pattern I use most often for the kids is Kwik Sew 2617. I use this pattern for flannel pajamas as well.  It is, of course, out of print as well, but it appears that 3786 is their updated pattern version.
  • Black sweat pant fabric from Jo-Ann's.  Use a 50% off coupon as it is a little pricey, but it washes up really nice.

Tuesday, October 20, 2015

Timber!

We live on a corner lot backed up to a pond.
Below is the view from our back deck towards the street and our large cottonwood tree.

As pretty as it is, I hate it!
It is extremely messy (think cotton fluff sticking to all your window screens) and hubby and some of our kids are allergic to it.  It also shades the "garden" area that we yanked out earlier in the summer.  Actually I paid my oldest son to get rid of it.  I didn't want to do it, and he wanted money.  Win-win for both of us.

The garden spot was a mess, raised bed with rotted wood, lots of weeds, landscape fabric poking out everywhere and horrible location, albeit probably the only realistic place to put a garden on the property. But really with the location of this tree there was just no way anything was ever going to grow there with constant shade.


So the decision was made that it would have to go.


Hubby and I have cut down trees before.
He does the climbing and cutting and I work the ground part hauling stuff out of the way, etc.


About halfway there.


All down on the ground. Big mess to clean up and even after all the wood we kept we had 3 van loads of other branches that we got rid of.


Hubby geared up for safety.  He straps in his safety harness when he gets up high.


So, what is the plan now that it is down?
Well, we are deciding whether or not to put a garden spot back in that same area, and/or we are going to put a fire pit area there.  We have all Fall and Winter to figure it out and tweak the plans.

We also put together a firewood storage station using this idea from Pinterest


and for kindling this one.


Can't split these yet until they dry out for awhile....like next Spring.


We'll see if this stump removal idea works for us.

We drilled all the holes and filled them with Epsom salt.  So here's hoping that this along with a Minnesota Winter will rot it out good so in the Spring we can get rid of it easily.

Thursday, July 30, 2015

Boys' Headboards

After our weekend of making the boys' bed frames we next tackled their headboards.

These are the 2 pins I found that most resembled the kind of headboards I wanted for their room.

DIY twin beds using 2x4's.  Like the headboard.
Source

How to Build a Rustic, Wooden Headboard with an attached light fixture. Headboard Tutorial by Chic on a Shoestring Decorating.
Source

I don't have detailed instructions for what we did, because we made them to match the bed frames we had already made, but hopefully you can get the idea.

We attached the 1 x 6s to the 2 x 4s using clamps and screws.
Hubby measured 1 1/2 inches from each side and about 2 inches from the edge of the board.


We decided to space the boards apart slightly and just put in a jointer biscuit between each to give it just a small gap.

Pre-drill your holes and countersink slightly so that when you attach the screws they will be flush or deeper than the board.


Sand off your markings and smooth it up a bit.


Then you're ready for stain.
I wanted it to look weathered and imperfect.  (The boys didn't care)
I tried to pick out the boards with some interesting knots and cuts in order to add to the look.


Pine is interesting to stain.  If you want an even stain you will need to apply some conditioning agent beforehand.  I wasn't interested in perfect so I just stained right onto the raw wood.


I am happy with how this turned out.

Details:
  • Headboard based on this Pinterest headboard.
  • Bought 6 - 8 foot long pine 1 x 6s and cut them to length (about 42 inches) of the width of the boys' beds.
  • Attached with pine 2 x 4s cut to length (ours were about 53" tall--measuring from the floor to just shy of the top board of the headboard.)
  • Cost around $25 for materials for the two headboards (not including stain)
  • Minwax Wood Stain in Classic Gray. We bought the larger size can since we were working on 2 headboards.  I think we could've gotten away with the small can if we had just been making one twin headboard.
  • After stain we used Rustoleum UltraCover 2X Clear Spray matte to protect it a bit.

Tuesday, July 28, 2015

Quilt in progress

I don't need any other projects right now, but I started another one anyway.
My youngest daughter started a scrappy quilt project and since I had a TON of blues we are now both using those scraps right now.


This is on pause for a couple weeks while I take care of some other things....like go retrieve our daughter from college.  It'll probably have to be 'til school starts up again before I get back to this.  There really are other projects that need more attention than this one.


Details:
  • Based on the pattern "Rainbow Stash Buster" from Modern Quilts from the Blogging Universe, pg. 60-63
  • As of now if I even out the sides it will measure 62 inches square.  I cut 6 inch squares instead of 5 1/2 inch squares like the pattern indicates.  I am going to add at least one more row all the way around to make it larger for us tall folk.

LinkWithin

Related Posts Plugin for WordPress, Blogger...