Showing posts with label Paper Crafts. Show all posts

Wednesday, November 26, 2014

Names of Christ Ornaments

Last year I made ornaments for my Mom's "Christ"-mas tree which she loved.  I made a couple for me too, but I still need some more before I do a complete Christ centered theme tree.

I had also made some wooden plaque ornaments of Christ's names that apparently I never posted about. Just recently I made another set (28 total) that will eventually be gifted out.
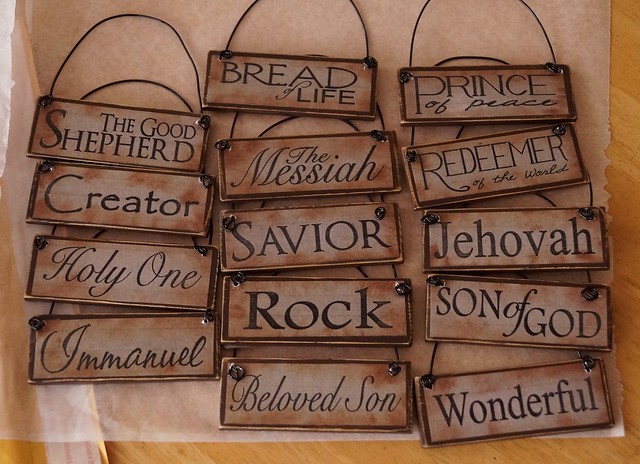
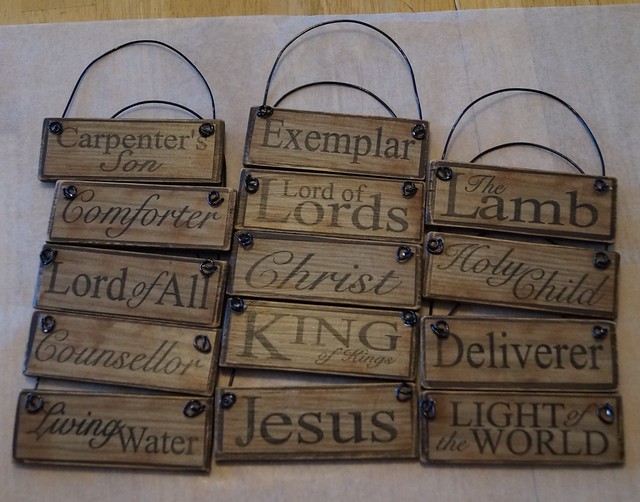


I "distressed" the edges a bit just by using some brown ink and a cottonball to smudge on the edges of the papers before I did the Mod Podge.  I really am happy with the wood grain paper I found in the scrapbook section at Michael's.

In the meantime I've also added some ornaments for my own Christ themed tree.
Besides the Names of Christ plaques I made this year attributes of Christ wooden plaque ornaments.
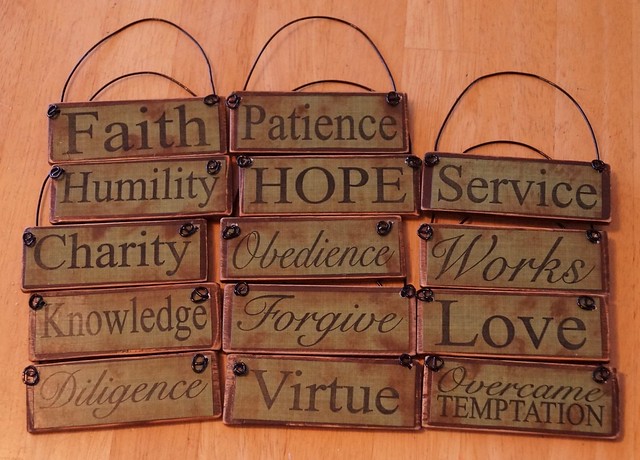

I added them to our tree this year.
I don't really have a theme going on this year, but felt that I could use the reminders myself of trying to be more Christ-like.
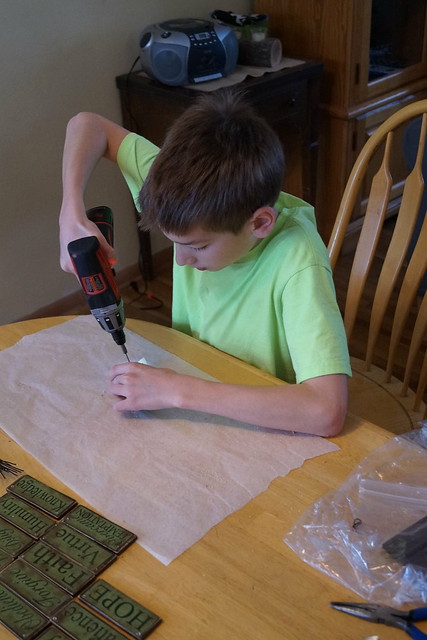

Here's my crafting helper re-drilling out the holes after the Mod Podge.


Details:
  • Original idea from HERE. Scroll way to the bottom of the link for the Names of Christ pdf.
  • Used 5/64 drill bit for the holes in the wood.
  • Darice Black Aluminum 14 gauge wire (or could use 16 gauge).  I bought mine at Jo-Ann's and one roll of  3 yds. allowed me to cut 14 - 9" lengths.  If you didn't want black wire you can find cheaper wire at any home improvement store.
  • I bought my 5 gallon paint sticks at Wal-Mart $.37/ea.  The freebie ones at Home Deport were too narrow for the printout.  You can get 4 plaques from each stick.
  • Matte finish Mod Podge--2 coats on the front only
  • Scrapbook paper in whatever color and style to you prefer.  I did copy some onto a bit more busy looking paper and I felt it distracted from the words and names.

Wednesday, February 20, 2013

More Washi

While I'm frantically trying to pack my bags (and my fabric!) for our sewing weekend today, I'll leave you with a quick picture of my most recent Washi purchase. 

 For the record, I love this stuff!  
But it wasn't all for me...


The blue chevron and the ruler tape washi were for my doll quilt swap partner.
The aqua/orange floral, aqua pluses, and film reel pieces were for Leslie for her birthday.
And, well...the top two were for me.  

 So, what are YOU doing today??

:)
Emily

Washi Tape purchased from Pretty Tape on Etsy

Wednesday, December 28, 2011

Kids Art to Greeting Cards

Does anyone else have a hard time figuring out gift ideas for their parents?!
This year I think I finally hit upon a fabulous idea for our mom!
She is an avid letter writer; as in the handwritten, slow mail variety.
So when I came up with this idea I was feeling pretty smitten with myself. :)


 When the finished product arrived in the mail I was even more happy!
  How can any grandma not like greeting cards made from her grandkid's drawings?!
It's genius, I tell you! :)

 
Here's what I did:
I took my kids' drawings from the art wall
Scanned them into my computer as a jpeg.img
Did a little editing in Picasa
Uploaded them to Shutterfly
And made them into blank greeting cards for her to use.


All of the pictures were originally 8 x 10 or larger,
but thankfully I didn't encounter any problems with distortion when they were printed.

 
I had them made on the 4 x 6 sized cards (I think they're actually bigger than that!) which will work perfectly for mom's letters!


In fact I am already thinking about a second series for her... maybe for Mother's Day.


P.S. For the record, Shutterfly has no idea who I am!  I am just a girl trying to make beautiful things for myself and my family.  I have used Shutterfly's services before (for photo books, address labels, and Christmas cards) and have been extremely happy with their products.  

Friday, September 2, 2011

Who needs toys?!

.
Lately my oldest son has been searching for and cutting up any cardboard boxes he can find
and then confiscating all my duct tape to craft some weapons, both by himself and with his friend.
 
They owe me....

Here's how you make your own weapons.
Trace out your pattern on the cardboard and make at least 3 copies.


Layer them together, reinforcing them in key spots with craft sticks.
Then you start covering them with duct tape.

And more tape....

And more tape....until it is completely covered and durable.

Then add a little black electrical tape for the handle and some other embellishments

and you end up with quite the aresenal of weapons.   

Now little brother is getting in on the action.

Crafting his own little set of knives


Next on Z.'s project list:  Cut out and sew a cloak so that he can be a character from the Ranger's Apprentice series of books.  Think Medieval Warrior.


He's already got the weapons to go with the costume. 
We'll post his sewing project next week.

Thursday, June 4, 2009

Easy Father's Day Cards


If you haven't seen these yet, they are super easy to put together and there's lots of space for the kids to decorate a card for dad. :) I would recommend having them color on the piece of paper before folding it into the shirt. Also, using thicker paper like card stock, was harder to fold. I would use construction paper or just regular white paper.

Tuesday, January 13, 2009

Framed Butterflies

I couldn't resist making my own version of this butterfly collage seen here. There have been a lot of these floating around my favorite blogs. Most use a butterfly punch. But I just used the templates that I have been using for L's room. All the butterflies were made with scrap paper. I didn't have to buy any new.

see another version here


Here's where they are in the house.....

these shelves hang above our computer.


This is what I used to apply the butterflies. they are double sided sticky foam squares. You can get them at any scrapbooking place.

Monday, October 20, 2008

Silhouettes


I've been wanting to replace the arrangement of photos that formerly filled these frames. They just weren't working. This is so much better (minus my helmet hair) :)

I was definitely complicating this project by thinking I need to print the photos and then get them reduced to the right size. Then this morning had an epiphone. I uploaded the digital photos onto my computer and pulled them up in Preview. Then I minimized our heads to fit within the borders of my 4x6 frames (4/$1.29 at IKEA). Then I grabbed a piece of copy paper and used my monitor as a lightbox to trace the outline of our faces. Done in less than 15 minutes. And that includes cutting. It would be fun to do this with each new member of our family over the years and hang the whole series as a group. I've got the perfect spot in mind.


***good luck getting your own 10 month old to sit still long enough to snap a profile. that was a doozy!

Friday, October 10, 2008

Skull Font

I watched Martha Stewart today for some fun Halloween ideas and got a couple.


Click here to download a skull font. Compliments of Skull A Day.
Or this one. Click here.
And click here for Martha's coffin treat boxes.

Or one more...a connect the dots Skull picture, also from Skull A Day. This has 458 dots!!!! That should keep some boys busy for a while. My Z., who is 7 yrs. old, did it and thought it was rather cool. So I am thinking we'll be printing more off for his school Fall party at the end of the month.

Thursday, October 9, 2008

Gift Garland

I'm so excited for the Holidays. Here's the second project for L's holiday room decor.


I saw this idea in my latest Pottery Barn catalog and I just fell in love. I had all the supplies to make this in my stash (ribbon, wrapping paper) except I needed to purchase a few more jewelry boxes. If you have a local Xpedx that is where I got my boxes. They have a ton of sizes. I used yarn and a thumb tack to hang, but I think it needs something sturdier. And the yarn looks kind of junky against all the nice ribbon. So I will replace that when it actually goes up for the Holidays. And make it a lot longer.


here's the pottery barn photo

Wednesday, October 8, 2008

Halloween Party People

This all started with Leslie's party people post and her second party people post. I wanted to try those decorations and so now we'll add the Halloween version of party people. My kids are so excited to have the Halloween decorations up. The sign letters you can print yourself can be found here.
I found my printed tissue paper in the Halloween/Seasonal section at Wal-Mart. They had candy corns, Happy Halloween, Polka-dots (I think I am going to go get some more of those), and others. You can probably find them at any party supply place too. I am not sure how I feel about the 2 different colors together, but I thought I'd try it out. Also, the patterned sheets don't always come in 8 sheets, usually only 5. So I cut them in half width wise and then stacked them and followed the directions. I kind of like that smaller size too.

Let your imagination run with it. The kids will think it is a party all day, every day. Thanks, Leslie for finding this fun and easy idea.

Party People continued....

I just had to show how cute these Martha decorations look. They are still hanging (and might linger even longer) because I love them so much. I MUST make pink ones for L's bday in December.


and you can see my plate wall...I've been gradually adding to it. If you see any great finds in these colors let me know. I ended up using dessert plates in 5-8". They just seem to be the right size.

here is the garland:


(after viewing this photo I suddenly have the urge to clear my refrigerator of the mess/storage. U-G-L-Y! )

Thursday, October 2, 2008

party people


I finally made some hanging pom-poms. Hubby's bday is this weekend so I've been getting things ready. On the easy scale this has got to be the easiest. And cheap too. A couple of years ago I bought a ton of white tissue paper during the after Christmas clearance. I got these huge packs for like 10 cents or something.

Stay tuned for more....I made some other party decor with mini pom-poms.

Monday, September 22, 2008

Origami Wreaths

I pulled out the book I bought months and months ago and decided to try some things (the origami crane continues to ellude me).

I think this wreath has so many possibilities. It's very easy. I'm about to make a bunch for our Christmas decor (hang with velvet ribbons). All white to hang above the bed in our room, red prints for the living room. I'm going all out this year since last year was such a bust (baby was two weeks old and I was a mess).

This project can be as cheap (copy paper) or as expensive (scrapbook paper) as you like it to be. I decided I didn't like the papers included with the kit I bought. All the colors were just off enough to be ugly. So I experimented with some of my wrapping papers. This damask is one of them. My wreath uses squares that are (6.75") making the wreath 15" wide.

**I looked for the instructions online, but couldn't find any. Sorry! I wanted to post them. But there are lots of other wreath variations available.

Tuesday, September 9, 2008

Print your own

I just printed my Happy Halloween sign. You can to...or happy birthday, or your name, or whatever you want because this link has the whole alphabet. Sweet.

Tuesday, May 27, 2008

Origami


Over the weekend I bought this origami instruction book (complete with paper). I'm so excited because I've wanted to learn how to do this for years. I wasn't sure how the paper was going to look (ugly colors/patterns???) because it was all sealed in a box. Luckily, I like the papers (nothing too fancy. Basic primary colors and a couple of cute, simple patterns). One of the things I keep seeing in my favorite mags/blogs is an origami mobile for baby's room. Most of them use the origami cranes. I'm loving them!

So I just might have to replace L's current mobile from IKEA (below).


Or I'll just make some decorative items. Who knows....
See book details here and stay tuned for the results of my paper adventure.

Saturday, May 24, 2008

Displaying children's artwork

When you have 5 children--3 of which are in school, it sures makes for a lot of paperwork that they bring home. I cannot possibly save every project or piece of artwork that they create and bring home. I do try and take pictures of lots of them before I throw them away--and we do save a number of the really "special" ones.

This past week M. (3rd grade) brought home a couple of different pieces of art that she has created and didn't want me to throw any of them away. We ultimately kept 3 different drawings that she had made and I told her that if she really wanted to we would frame one of them. She was thrilled. Part of the reason I did this is because recently she has been acting like she feels like the ugly stepsister or something. I don't know exactly why...but anyway, I was trying to do something to help her feel that she really is special in our family.

This is the drawing that she chose to frame. Charcoal drawing about 11 X 17--we cut it down some.I bought a poster display frame at Jo-Ann's, half off for $4, a large piece of black construction type paper for $1.29 and then a package of specialty brads, also on sale, for $1.79. I didn't even use all the brads. Then we made it look like it was double matted (just using paper) and attached the square brads in the corners just to give it a little something extra. She is very pleased with it and is trying to come up with the name of her piece. The artwork is actually an animal made up of various different parts of many animals so the name may be something foreign sounding.
I also added scrapbooking stickers I had on hand to mark the date that she made it. Once she determines if this piece has a name then we'll add that too. She also signed her name in the corner as any good artist would do. Not a bad little project for $7--and priceless as far as helping my daughter's self-esteem. She told me she wants it hung up in her room. I was thinking I would hang it in the dining room--but if she'd prefer it in her room that is fine with me.

Friday, May 9, 2008

Butterfly remix

Ok, I rearranged the butterflies and I like this much better. I kept trying a few ways surrounding the "DREAM" letters, but it just wasn't working out. This way totally works for me.

I had a painting hanging here that I took down. This is better.


here's a view of the whole room and how it all works together. I may still add a few more butterflies.

Tuesday, April 22, 2008

Memory Game

I saw a really cool memory game online recently. Modern and hip...but $40. So I decided to make my own. Found the 2" chipboard squares at the local Robert's and used all my scrap paper. I bought 40 squares and it was $4.50 (had a coupon).


I left the other side blank so the chipboard is showing, but you could choose one paper (solid or patterned) to mount to the back side for a more finished look.

I used Duro all-purpose spray adhesive (found at JoAnn Fabrics), but there are many brands and you can find it at any craft store. It is an aerosol can. I just followed the instructions on the back of the can: Spraying both the back side of my paper and the chipboard for a more permanant mount.

***check out the comments for some cool variations. a personal fave: using photos of family members for your memory game. Most of our relatives do not live close and what a great way for kids to feel connected. I love it!!

LinkWithin

Related Posts Plugin for WordPress, Blogger...