Monday, March 19, 2012

T-Shirt Series: Neckband #2 Binding


For years this method has been my go-to method for finishing off the neck opening.  However, don't use this on any boys' shirts.  This is more a feminine look.  For boys or men use ribbing on the neck.  This binding method can also easily be used to finish off sleeve hems for a different look.

Here's how I do this, which is also the same method I use to do contrasting binding on a swimsuit, minus encasing elastic into the binding.

I start out w/ 2 inch wide strips of fabric. 
I like to have plenty of fabric to work with.

 Figure out the size of the neck opening and cut your binding strip at least 1-1/2 inches shorter than that measurement.  I measure rather "accurately" by just folding the neck opening in half and laying out the binding piece and cutting it shorter as shown above.  Do what makes you most comfortable.

 I attach my binding to the shirt, right sides together, with a 3/8" seam.
Only stretch the binding just enough to fit it to the neck opening. 
You do NOT want to stretch the shirt at all.

 After sewing the binding onto the neck opening, trim away some of fabric to reduce the bulk. 
I do this at the neck binding seam as well as cut away a bit of the fabric at each shoulder seam.


Once this is done you will flip the binding strip back over the seam allowance towards the inside of the shirt.

Pin in place, below.

Then use whichever method you prefer to topstitch the binding in place.
Options: twin needle
single needle topstitch
stitch-in-the-ditch

 On this shirt we topstitched straddling the seam.
You could have also used 2 different threads if you wanted for this shirt:
white for the binding side and then black for the shirt side.

Here is what the inside of the shirt, using a twin needle, will look like.
The backside of a double needle topstitch is a zig-zag.

Then all that is left is to cut away the remainder of the strip.
Be very careful when you do this to NOT cut the shirt.
I always try to angle my scissors, shown below, so that I am less likely to nick my shirt fabric.


Here is another option below using this method--very contrast binding with a little ruffle embellishment like a tuxedo and then the binding also on the sleeve hems.


One more shirt that we made using this method, but with a pleated strip encased into the neck binding. This strip was about 1-1/2 inches wide and we only pleated the front half of the shirt from shoulder seam to shoulder seam.

Clearly pleased with how it turned out.

The only drawback to this pleated style is that after every wash we are going to have to iron the pleats again. 
It may only be the fabric that is the issue, but even still I'm not really into ironing, if I can help it. 
However, she loves it, and so she can do the ironing.

Thursday, March 15, 2012

T-Shirt Series: Neckband #1 Ribbing

We'll ultimately be showing 3 different methods to finish your neck opening.  This first one is probably the most common and what you normally think of when talking tees: Ribbing made from either the same fabric as the shirt itself or a contrast piece.

Tiffany and I think that the one thing on a t-shirt that will make or break your project is the neckband.  The biggest beef we have about neckbands is making sure they lie flat against your body when you are wearing the shirt.  Nothing screams "homemade" (in a bad way) more than a neckband that looks like it is standing straight up or sticking out. 

Here is an example of what I am talking about:

This is NOT what you want your neckband to do.

This shows the original difference in lengths on the neckband piece and the neck opening
for what I used in the above picture.  It is a difference of about 1 1/2 inches. 

Below is what it looks like once I took the neckband off, and took in another inch on the neckband seam and then re-attached it.
So MUCH better-- see how it lies flat against my body
This is what you are aiming for.
Once you have your neckband looking nice you can add the topstitching.
On this shirt I used size 2,5 double needle.

So, how do we get there.

Let's give you a general rule about ribbing neckbands.
The stretchier the fabric used, the greater the difference
between the neck opening and the attached band.

For Example:
Using actual ribbing fabric you would probably make the neckband anywhere from 2-1/2 to 3 inches smaller than the neck opening.
 
For moderate stretch knits maybe only 1-1/2 to 2 inches. 

Honestly, I start with around 1-1/2 inches smaller in diameter than the neck opening and then adjust from there.
  • For the neckband on this turquoise shirt I cut a 1-1/2" wide strip.
  • Seam it into a continuous circle the size needed for the neckband (approx. 2-1/2 inches smaller than neck opening for this shirt).
  • Then fold it in half, matching raw edges, and attach it w/ a 3/8" seam.  Pin as much or as little as you need.  And ONLY stretch the band as much as you need to get it to the size of the neck opening.  Do NOT stretch the shirt itself if you can help it.
  • That leaves you with about 1/2" wide ribbing neckband, which is a really nice finished size for the neckband.
I just need to say that I went browsing at the Land's End outlet a week or so ago to check out their detailing on some items.  When it comes to topstitching just about anything goes. 
  • Topstitch using either the 2,5 or 4,0 twin needle. 
  • Topstitch the neckband down on the shirt like the picture above. 
  • Straddle the seam with your twin needle so that one line of stitching is on the shirt and one line on the neckband. 
  • Use only a single topstitch.  I would only use this if the neck opening of your shirt isn't one where you need to stretch it open to get it over your head.
  • You can also leave it and do nothing.
Look at some t-shirts next time you're in the store and you can see what little details they are using on the neck openings.  Mostly it is some variation with a twin needle.

 Then when your neckband is finished you can try some embellishments if you want.
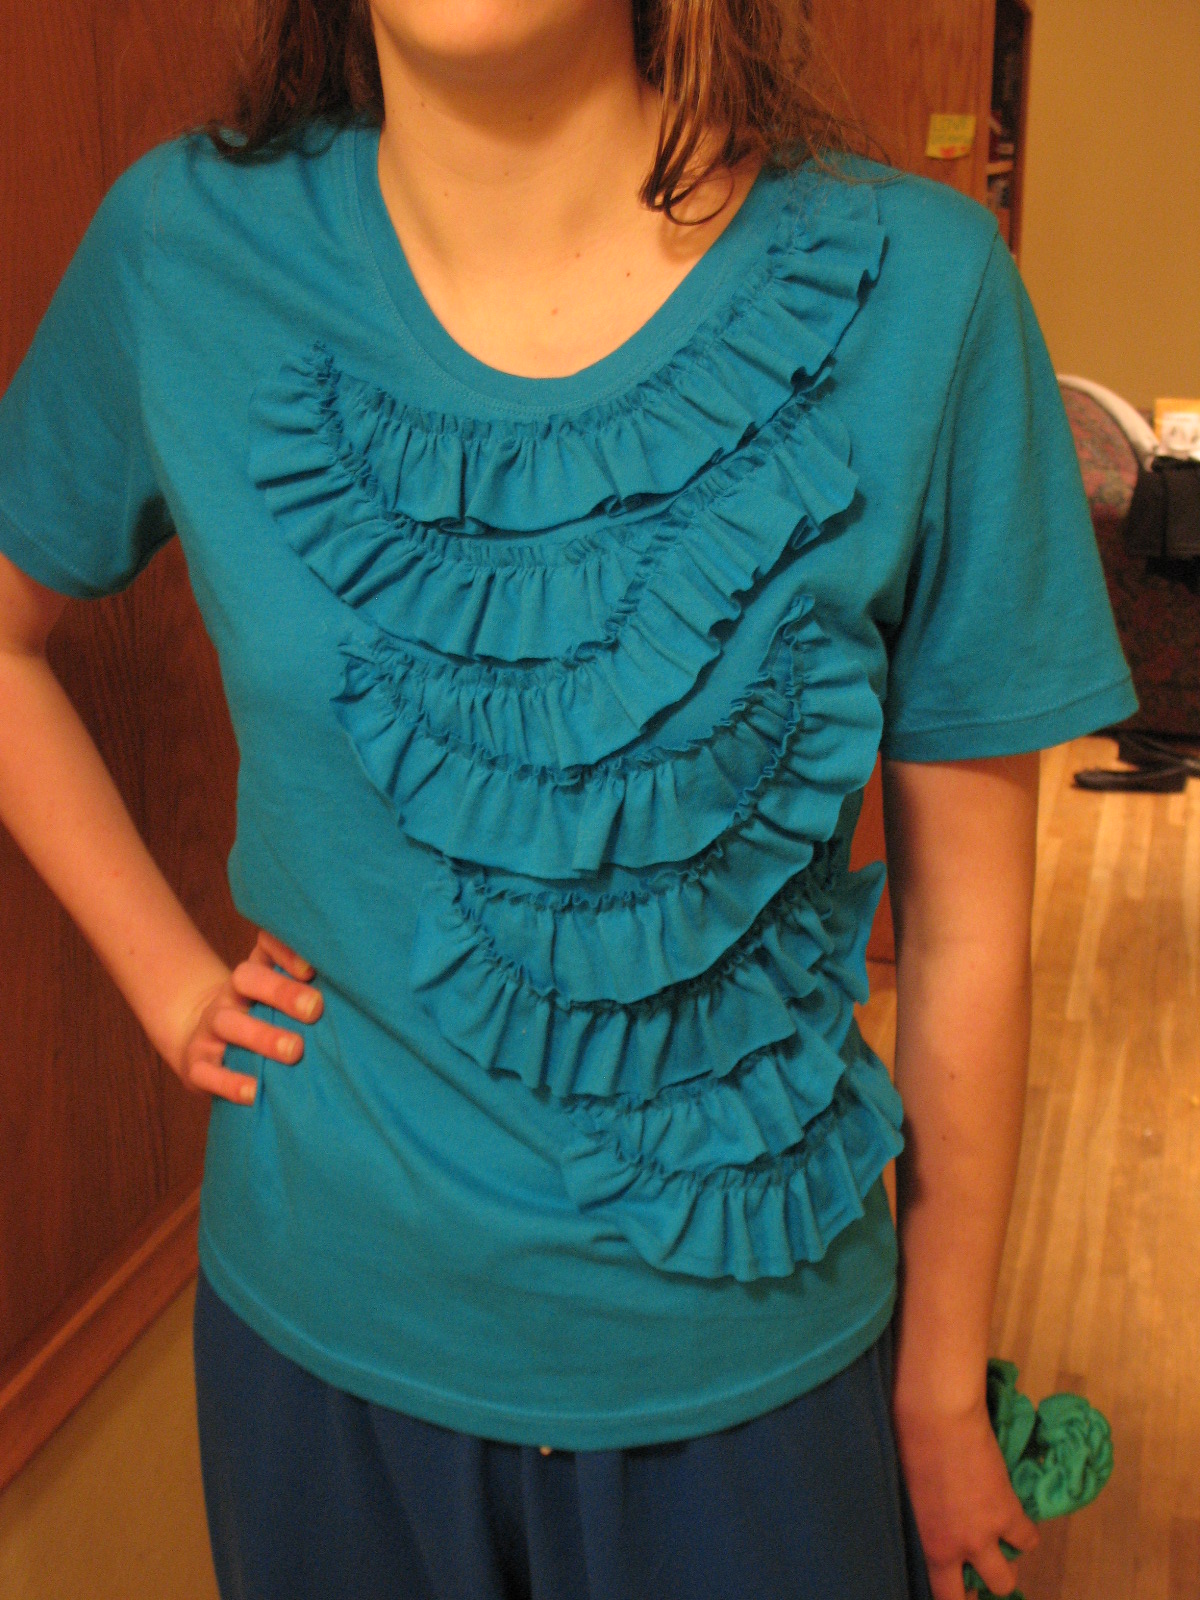
I made mine with rows of ruffles down the front.
  
  The picture above on the left shows how the topstitching looks with the ruffles sewn in with the neckband and not just added and topstitched free on the front of the shirt like the turquoise option on the right.  I'm not sure if I have a preference for one option over the other.  It does seem a little trickier to work with the neckband when you add the ruffles into that neck seam.  I think it just depends on what you prefer.

Although I am pretty sure I pre-washed this fabric (a thrifted knit sheet), here is what the shirt ruffles on the turquoise version look like post wash/dry for the first time.


Hmmm......
I might have placed them closer together had I known this is what would've happened. 
Oh well, it still works and I'm certainly not removing them and reattaching them.

 
Ruffle Details:
  • Cut 1-1/2" wide strips of fabric (I don't think it particularly matters which way the stretch goes on the decorative strips).
  • Fold over each end about 1/4 inch (unless you are incorporating the neck end into the neckband itself and then just do it on one end) and run a gather stitch.
  • We did 5 strips and varied the lengths.
  • Gather as much or as little as you want and then after pinning them in place sew them down right over top of the gather stitch.
Here is another great tutorial for embellishing the front of your t-shirt.
Zig-zag ruffles from Tea Rose Home


My oldest daughter wanted her shirt to have this look. 
Doing it exactly like the tutorial does require that your fabric look exactly the same on both sides.   

On this turquoise piece there was a definite front and back so we had to cut smaller pieces to gather then overlap them to get the same type look.

We also had to check the placement of some of the ruffles before sewing it down.  Once or twice the ruffle ended at a weird spot and we moved it around some.  She was so funny the day she wore this shirt to school for the first time.  A couple of the HS girls recognized this look from Pinterest and commented it to her. They were impressed we had made it. That made her happy!

Next time:
Neckbands made by binding the edge.

Tuesday, March 13, 2012

Dad's Quilt -- A Matcher to Mom's

When mom asked for a quilt, we decided that our dad could use a quilt as well.  His was a tag team effort. Renae found some solid color sheets that would match Mom's quilt, and sewed up a top/back in record time.  Then it was sent to me for quilting and finishing.  Unfortunately I am a LOT slower than Renae at getting things done.  But both quilts were mailed and received last week, just in time for Mom's Birthday!


About Dad's quilt:  Our dad is an Arizona boy transplanted to the cold!  He and Mom constantly "discuss" the thermostat setting in their house, so when it comes to blankets he likes them to be BIG!  Big enough to wrap his 6' self up good and tight. We made him a "couch quilt" that measures 70" by 90"!  Huge by normal standards, but he will love it!!

Side One: Shown Above
Inspired by the quilt on pg. 108-113 from "3-Fabric Quilts: Quick Techniques for Simple Projects" by Leni Levenson Wiener.


Side Two: Above pic
Inspired by traditional rugby shirts and some of these quilts.

Quilting Detail


Here are the two quilts next to each other for comparison sake.


Monday, March 12, 2012

Mom's Mint Chocolate Chip

I got the hint awhile back that Mom was wanting a quilt of her own, so last fall when she was visiting she and I went out and bought fabrics that would match her house.  But, as with most of my projects I let the fabrics "marinate" for some time before settling on an idea. You see, I feel fabrics get better with age! Ha! :)  Anyway...


This plus design was trending pretty hot and heavy thru blogland there for awhile. 
 I thought it would be a fun, easy design that Mom would like.  
Besides, she said I could "do whatever.." so I did!

 I was shopping with a friend when we spotted the backing fabric in brown and white.  My friend said, "It reminds me of chocolate!"  So when we found the same fabric in turquoise we decided it was the  "mint chocolate" version!  Thus it is named.


A hand sewn binding will make Mom happy.  
It is my little way of thanking her for all the hand sewing I begged had her do for me over the years.  Oh how I hated hand stitching the hems of my dresses!  She was good to me that way.

 I'm trying to be better about using/getting rid of leftovers from projects, so this small patchwork is the result from Mom's leftovers.  I included with the others that went to MHC.


Tomorrow we'll show you a matching quilt Renae made for our Dad. 
Updated: See Dad's here.


Quilt Stats~
Finished quilt measures: 45" by  67.5" 
Squares are charm sized (5").   If I ever make this pattern again I will probably use smaller squares--maybe 3.5".
Fabrics are from my stash & some from JoAnn's
The binding is a teal/turquoise sheet reclaimed by Renae.

Friday, March 9, 2012

Making a Dent!

Like I said before, I am trying to bust my way through my current WIP's.
I'm happy to report that I am making significant  progress!
This week I spent most of my time working on my Grandma Quilt.  The blocks have been done for awhile now, but I set about  putting them into top form this week. 


All those pinwheel seams were making me crazy, but after removing the bulk on over 200+ blocks I can now say I am pretty proficient at it!  Not my idea of a good time, though.

I thought I had the perfect vintage sheet for the backing in my stash already only to find that I had already cut into it! Bummer!  A search thru my favorite thrift stores this week yielded nothing as well.  So this quilt is on hold until I can find something I like.

--------------------------------------------------------

A little side project I also worked on was a "celebration" idea we came up with for quilt club.  This year marks the 10th anniversary of the club (I have only been in for 2.5 years).  After some discussion we decided to help each other make a quilt to honor the occasion.  

This is how it will work:  Each month the host of club gets to decide on her color scheme.  The rest of the members will then make her a 12.5" block (or 2)  in those colors.  After, she will have 12-24 blocks to make herself an "Anniversary Quilt."
It'll be fun to see what everyone chooses and comes up with.


This month Kae chose red/white/blue.  Since my ladies aren't too modern, I made her this block with some patriotic fabrics I've had for.ever! (They are churn dash blocks like my DQS)  I'm pretty sure she will love it, but quite frankly it's not really me.  


So, I decided to make her these scrappy postage stamp blocks as well.  They scream out "Emily" much more than the other one, don't ya think? 
I guess I'll giver her all 3 blocks and let her decide which ones make it in the quilt!


linking up to Finish It Up Friday @ crazymomquilts.
and WIP Wednesday @ Freshly Pieced

Tuesday, March 6, 2012

T-Shirt Series: Ruched Sleeves


Of my three girls, my middle daughter (age 12) is the fashion girl. 
She wanted this shirt (short sleeve version in white)...BAD! 
It was because of the sleeves.
I've seen these sleeves on clothing in Target for both little girls and not so little girls.


They are fairly easily to replicate.


If you want to ruche the sleeves on one of your favorite patterns here is what you do.
Cut the cap of your sleeve pattern about 5 inches higher than normal.


This shows the ruched piece with a regular inset sleeve piece on top so you can compare how they look.  The ruched pattern piece will also be gathered into the armhole, whereas the regular sleeve could just be eased in for a flat appearance.


Using 1/4" (or 1/8") elastic sewn into the sleeve on the wrong side of the fabric is what gives it the ruching.

On this pattern I used a 10 1/2" piece of elastic for the sleeve portion which measured 17" from cap to hem.  That's about 65% of the length.  So if you have your own pattern that you are adapting just keep that in mind.  You could definitely ruche it up more and then just cut your elastic a little shorter still.

Line up the elastic about 1/2" from the cap of the sleeve down to about 1" shy of the hem.
I just sewed a straight stitch right down the middle of the elastic.

It can be a little awkward stretching the elastic to fit into the sleeve.  Use as many pins as you need to hold it in place.  And really, if it isn't a perfectly straight line it shouldn't show.  It'll all be ruched up in the sleeve.

Some other changes just on the shirt itself:
We cut the front neckline slightly lower--maybe 1 inch, AND adjusted the shoulder seam so that it was not so boatneck style.  Extended the shoulder seam about 1 inch also.
'Cuz the fashion girl is particular about those things.


You can see my lines in blue showing where to cut and how I altered the pattern (size small).
Don't forget to extend the shoulders on both the front and back pieces.  Or you'll be really unhappy and end up cutting out another back piece.


______________________
I'm also loving the long sleeve green version with the draping/shawl collar. 
Daughter #1 is partial to that one too, in green.

I hope to show that one sometime soon, too.

Monday, March 5, 2012

Scrappy Bow Tie Swap

I found another fun swap to participate in and thought some of you might want to join as well.
 It's for Scrappy Bow Tie Blocks.  

Photo from fordcowgirl_85
This type of swap is super fun and easy. 
(I did the same kind of swap with my Red and Turquoise blocks.)
 All you do is sew up a bunch of blocks using what you have, send them in, and get a bunch of different blocks back.

Sign-ups and block instructions can be found here.  
But, Hurry!  Shipping deadline is April 16th!!

Lots of great bow tie inspiration can be seen here.

Friday, March 2, 2012

Me? Modern? Why, Thank You!

 In case you missed it,


 my Scrap-Tastic Quilt is being featured today over at the Modern Quilt Guild Blog 
 as part of their "Use What You Have" Series.

Feeling pretty happy that they chose to included Me!
 I'm in good company.

A little Baby Black and White


Inspired by the Snapshots quilt (pg. 51) in "The Practical Guide to Patchwork" and then adapted based on the amount of scraps (from this quilt) that I had available in my stash to work with, I made this pretty little baby quilt.


So happy with how it turned out.  I might have to try another one in different color combos.
The Snapshots quilt calls for 20 blocks.
I made 9 for a good size baby quilt.


Finished dimensions:
36 1/2" wide by 48 1/2" long.

If you're interested in this quilt you can find it here in my shop.

Thursday, March 1, 2012

T-Shirt Series: Putting Your Shirt Together


Sorry, this next post has taken a little longer to get all put together and posted.  Life is happening around here--as I'm sure yours is as well. 

Now that you have some information and a few of our hints for knits we can get started putting a t-shirt together.  You have your correct needle (ballpoint) and now you need to figure out what stitch you are going to use so that your knit fabric will stretch, like it is supposed to, once you are finished with your project.

There are a number of options you can use. 
By all means if you have a Serger use it.  This is probably the best method for knits.  However, you can achieve nice garments without one.  So don't be discouraged and rush right out and buy one.

Most machines are equipped with a some sort of stretch stitch option.

Below are 2 of my (both Kenmore) machines.  The yellow stitches shown on the bottom row are all the stretch stitch options.  Some are more decorative than constructive stitches, but lots of options nonetheless.
I have used mostly #1 and #6 (starting from the left).
You just need to change the stitch length dial (left) to the stretch option to get to those stitches.


 Same thing on this machine, but with not as many options.

Check your manual to see what it recommends. 
Practice and test, then do it again, and again, on some knit scraps. 
You'll find which stitch(es) you are most comfortable with and what gives you the best result based on your machine and settings and the particular fabric you use.

You may think that this is a bit of a cop-out; however, even pattern companies can't agree on the same method to use for knit fabrics.

Just looking at some of my patterns I found that this is what they had to say.

McCalls, Butterick & Vogue
  • "Stretch fabric slightly while stitching." 
Really this is a bit vague if you ask me.  What this means is when stitching with a straight stitch.  But otherwise that is their tip.  No other info included in the instructions to help you out.

I have to admit I do use this method a lot. However, (big pause) I've also sewn for a lot of years and kind of have the "feel" for it through trial and error.  If your tension and settings aren't right then the fabric will not hang right or even stretch at all.  (Done that more than once) Or if you stretch more than "slightly" you can completely distort your garment. Or your fabric will distort on its own without you even helping it.  So annoying!  I think this method takes a bit of practice and then it'll change with different types of knits.  So until you've sewn awhile with knits I would recommend finding a stretch stitch on your machine that you like or use the zig-zag method which we talk about below.

Kwik Sew

If you've never sewn with knits before, Kwik Sew really does include the best instructions about sewing with knits (including swimwear).  AND they have pics--even better. I copied the little section that is included on one of the t-shirt patterns I have from Kwik Sew. Click on pic to enlarge and read it easier. 

They also tell you which needle to use (Ballpoint!!)

Simplicity & New Look

  • "If you use a zig-zag machine...use a narrow stitch, medium length; trim seam to 1/4" and overcast edges together by machine. If you use a straight stitch...stretch fabric as you sew (unless working on a firm double knit) and sew seams 2 or 3 times close together."
In response to the sew 2 or 3 times close together.  I would only do this on a shoulder seam I think--somewhere where I really don't want the seam to stretch.  I don't ever do this. 

The zig-zag method is Tiffany's go to choice when working with knits.

Here is how she sets up her (White) machine normally.
Top dial is stitch LENGTH
Bottom dial is stitch WIDTH

Length at about 2 1/2 and width at 0.

And then her set up to sew on knits.
Length at 1 and width at about 3 1/2.

And here is a side by side of her zig-zag compared to a straight stitch based on the numbers listed above.

This allows for a lot of stretch and also can use up a lot of thread.  Once she has the fit right on her t-shirt she then goes back over and uses her serger to complete the garment covering up the zig-zag for the most part.  If you don't have a serger, you certainly don't need to use one as the knit will not fray or ravel.  It just makes your garment look more professional.
_____________________________
Having not used this method much I did a little practicing myself to see if I liked it.  I tried to go more on what Kwik Sew recommendations are:  narrow stitch width and medium length, so that I could have a comparison.

So my machine is set up like this.
Left dial is stitch LENGTH and right dial is stitch WIDTH.


After switching my dial to the zig-zag option, I leave my stitch LENGTH where I normally sew--at a 3.
However, I then move the stitch WIDTH to a 1 (more or less).
It would be set at 0 for a straight stitch.

Here is a side by side of my zig-zag option (left) and the straight stitch (right) based on the numbers above.
It sure doesn't look like there is any difference at all in the stitches, but there is a definite difference in the amount of stretch available for the fabric.

I tried this method on a Jersey chevron skirt I just made and loved it.  I'll be showing that a little later.

So I guess the point of this post is this: try a few different stitching options and see what you like best and see what your machine likes best.  Practice all the methods to get a feel for what will happen and then you can make a good choice for you.  There really is no one wrong or right way.  What we're all aiming for is a nicely constructed garment that people will admire.

Up next: Some detail options for hemming, necklines and other adjustments to personalize your tees.

LinkWithin

Related Posts Plugin for WordPress, Blogger...