Tuesday, September 2, 2008

About Us

We are three sisters with very diversified tastes, but our goal remains the same -- to make our families and our lives beautiful one project at a time.

Our mom taught us all to sew while we were still in elementary school. She was good to let us create and sew whatever we pleased. At first that meant sewing around the raw edges of cut fabric, then trying our hand at elastic waisted shorts/skirts, and finally sewing our own dresses and clothes. Over the years we've sewn through miles and miles of fabric, making everything from prom/wedding dresses to baby clothes, quilts to curtains, and custom bedding to swimsuits. It's safe to say we'll sew anything! Our lives are ever changing as we (and our children) grow, so our blog is ever changing as well. We blog about the things we are doing and loving at the moment.

You can contact us with questions or comments at emilylovesbaskets@msn.com.

Basic Knitted Washcloth

Our sister Shauna is the "Queen of Washcloths" in our family. I'm not sure she could count how many she has actually made. I think that for the past couple of years she has made a washcloth for each of the girls attending their Church girls camp. And, of course, no two are alike in color. That way everyone knows exactly which washcloth is theirs. She has given all of us sets of colored washcloths. New babies get their own pretty washcloth in some cute color. She really does nice work. So on her behalf I am going to submit a post.


Here is one basic pattern (of many out there) for a Knitted Washcloth. Shauna uses this one the most because she has it memorized and doesn't have to think too much as she is making them.

Size 8 knitting needles
Yarn--100% cotton yarn from Peaches 'n Creme or Sugar 'n Cream.

Cast on 35 stitches

Knit next 4 (or 5) rows

Start pattern--
Row 1: K3, Purl til last 3 stitches, K3
Row 2: K entire row
Repeat those 2 rows 11 times

Then knit 6 rows

Repeat pattern--
Row 1: K3, Purl til last 3 stitches, K3
Row 2: K entire row
Repeat those 2 rows 11 times
Knit 5 rows

Bind off and tie in loose ends. Finished size ends up being roughly 9 inches square. So adjust accordingly if you want a larger washcloth.

Thanks, Shauna, we all love the washcloths.


Here is another site I found that has a bunch of free patterns for knitted washcloths. Knitting Pattern Central is also a great place to find ANY kind of pattern you want. The link I posted is for their dishcloth section--loads and loads of styles to download for free.

Sunday, August 31, 2008

Lowes "Creative Ideas" Magazine

I've been getting this FREE magazine from Lowes for about a year now and am really liking all the home improvement/gardening project ideas inside. This month I am especially excited about their do-it-yourself outdoor fire pit, something I am currently wishing for in my own backyard. (They also have free magazines for Outdoor Living and Woodworking if you're interested.) You can view (or subscribe to) any of their current issues of all three magazines when you go their home page and scroll to the bottom. There is a PDF section that says "Read Current Issues" where you can click on one of the three magazines.

Happy Home Improvement Dreaming to You, too!

Thursday, August 28, 2008

Black Apple Dolls

Here is my favorite version of all the dolls I made. I made four total, but I don't want to post the other ones. They are going to be gifts. I have a few more in the works too so I'll post all of them later.

My review of this doll pattern:
It's the best! I highly recommend it to anyone. So easy and quick (my favorite kind of project). This is a great way to use up your scrap fabric which I think is a huge bonus. I only had to purchase the felt.


I just can't get over her pearl earrings. My favorite part!


I like this one too.
I'm a big fan of the striped legs. One of the other dolls I made has it too (red and white). Looks like tights.

*****And I will be painting faces as soon as I purchase fabric paint.

Wednesday, August 27, 2008

Dress opinion...the rest of the story

Now I have to tell you the rest of the story concerning my dress opinion post. I actually had already made a dress out of that funky black/green print fabric when I posted it. However, I was not happy with how it turned out. I thought I would love the pattern, but once I had it finished it did not look the way I had hoped for myself. Instead of helping camoflauge some problem areas, I felt it worsened them. Therefore, I sent out my pleas for some differing opinions.

Well, I was completely ready to make another dress pattern, go buy more fabric and start completely over. However, when I went back to Wal-Mart that piece was GONE!!!! I had even seen some other color combos of that same type fabric and they were gone too. So even though I was going to be brave and do a dress, I now have to salvage my old dress and settle for only a skirt.

I'll be fine with it and just use that second dress pattern with some other fabric down the road. I think I want to make it in that black and white combo on the pattern envelope. I really do like it. I'll add a black top to my new skirt and it should be a great little outfit. The top I am going to try is either Butterick 6085 view D or Simplicity 4487 view C or F. I found some nice black rayon type fabric that should look really good.

So thanks to everyone for your opinion. I'll post pics when I actually finish the top. A couple more days for us and the kids are back to school. Hallelujah!! Maybe I can finish up somethings that I thought I could have already completed by now.

Monday, August 25, 2008

I'm making one


I've seen these dolls mentioned on several blogs before and I just love them. But I'm way too cheap to pay $40+ for one. Imagine how happy I was when I came across the pattern online. Sweet!! I'm not into doll making, but these are too cute and so modern that I must give it a try. L is getting one very soon. The creator was kind enough to share her pattern. Thank you, thank you!

Want to make one too? See instructions here

Wouldn't it be cute to make the doll's dress out of fabric from one of Baby L's outfits?

Saturday, August 23, 2008

Dress Opinion needed

O.K. here is the deal--I am sick of most of the dresses in my closet. I want to make some new stuff but I need someone else's opinion besides my children and my hubby.

I found this awesome knit fabric at Wal-Mart--$1/yd. and you could wad it up on the floor, leave it there for a couple days and then put it on without a wrinkle anywhere. Gotta love that! I'm just not sure what to do with it. I'm afraid that it might be too much for an entire dress for a woman who isn't 25 anymore.
Here is the pattern I was thinking of using with the fabric--along with a solid black piece.
McCall's 4510
I like the Black and white version view C--possibly with the sleeves from the purple dress view E.


So tell me what you think. My other option would be to just make a somewhat flared skirt, elastic waist, and pair it with a black top.

Wednesday, August 20, 2008

A little mention....

Last night my friend, Abby, told me she was browsing one of her favorite blogs and saw my bird mobile mentioned. Cool! I did some browsing around myself and it looks like it will be one of my new favorites. Great inspiration.

See post here

{note to self: stop cutting corners on the photos posted on creative chicks blog. People actually look here. People besides my sisters and I}

Monday, August 18, 2008

Raspberry Jam and Homemade Bread

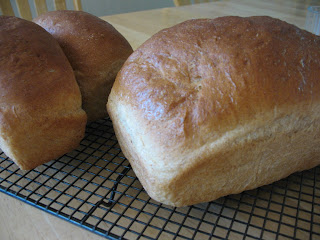
One of the easiest things to home preserve is jam--any flavor just about. All I do is follow the recipe included in the SureGel or Ball Fruit Jell Pectin boxes. They have recipes for both freezer jam, jellies, and cooked jams included. I prefer the freezer jam just because I have the storage for it and it takes a little less time. This is my raspberry jam that I made from the raspberries I grew in my garden. If you have never had homemade raspberry jam you are missing out. And I guarantee that you will never buy store bought raspberry jam again once you do try it. This is the only jam that my kids will eat. And if you have homemade bread (which I am making this morning) to spread it on it is like heaven!

I have been accused of not sharing a secret ingredient or tip about how to make this bread, but I promise I am not holding anything back. I've tried to put down as many of the little tricks or tweaks that I do so that you can have a successful outcome.

Here is the bread recipe that I most often use:

White Wheat Bread— from Toastmaster (bread machine)
1 ½ c. warm water
2 Tbs. oil
2 tsp. lemon juice
2 tsp. salt
4 Tbs. sugar
2 Tbs. dry milk
3 c. bread flour
1 c. whole wheat flour
2 tsp. active dry yeast

Mix all together. Let raise 1 hr. Divide into loaf pans, cover, and let raise another 45 min. Bake at 350 degrees for 30 minutes.

Tips--
**This is a bread machine recipe, however, I do not like how the bread turns out baked in the bread machine. So if I were to make it using my bread machine I would put it on the dough setting, and once that is complete divide the loaves and put in loaf pans, cover and let raise for the 45 minutes and then bake it in the oven.

**If you have a mixer like a KitchenAid or other brand, I mix all together except for the flours in the bowl. Let the yeast activate for 10 minutes or so and then mix in the flours. I have a bread setting on my mixer that "kneads" it for about 3 minutes before I let it raise the first time.

**I usually grease my bowl with shortening before adding the bread dough. Then I put it in a warmed oven (start to preheat your oven, but turn it off after 1 minute or less of preheating) covered with a towel to let it raise.

**I double recipe this to make 3 LARGE loaves for my family. The 7 of us can consume one loaf at one meal really easy.

**If you have stoneware loaf pans, use them. I like how it cooks better than other loaf pans.

Friday, August 15, 2008

Photo Board


This was a really easy project for me! It took about 30 mintues to do!  I just took an art canvas, layered with with alittle batting and fabric.  I used a staple gun to hold everything into place.  
My canvas was about 12x18, so I just purchased a "fat quarter" of fabric so I didn't have any left over.  I got three different types of ribbon (1 yard each, should have got more so I had more options on where to place each color).

Total Cost : Around $20.00

Wednesday, August 13, 2008

Little Girl's Eyelet Slip Extender

We were given some clothes from a friend of ours and M. found a skirt in the stash that she wanted, of course. However, it was a tad too short for her comfort zone. So we used Emily's eyelet slip extender idea and transformed that skirt for her so that she can now wear it comfortably.

Our slip is not separate, but I sewed it right into the waistband. I happened to use some eyelet lace curtains that had been given to me that I wasn't going to use as curtains and then just used that fabric to make the slip. I needed to adjust the elastic waist anyway and so that is why I did this way. She is happy with how it turned out and now she can enjoy this cute embroidered skirt for the remainder of the summer.

Tuesday, August 12, 2008

The Birds

Got a little sidetracked from my PA needlepoint and started working on a Bird Mobile to replace this Ikea one (see below) in my baby's room. It's been on my "to-do" list for a while and I'm so happy to have it completed.

OLD MOBILE.....


NEW MOBILE....


I thought this would be such an easy project. And although I love it, it was a total nightmare. The birds are easy enough to sew. It's the balancing of the mobile that is a problem. Ridiculous!! I resorted to some unconventional methods and was frustrated most of the time. So take on this project knowing you need patience.


added some extras to this corner of her room also


My variations:
1. Used a sewing machine instead of hand sewing the birds. I'm not sure why the tutorial suggests hand sewing. Although lovely it's totally unecessary and very time consuming
2. Used double sided tape to seal ends of tails. Did not like how sewing machine topstitch looked and.....got lazy/impatient! Seems to be holding up just fine though.
3. Used clear jewelry thread to hang. (Others have used yarn, ribbon, heavy thread)


a view of thread I used to hang


and baby was more interested in step stool used to hang mobile.


and the corner of her room


Wednesday, August 6, 2008

My little shop....

Still have more dresses and aprons to photograph, and need to finish up some details on others, but I thought I'd get a few items up and see what happens. Spread the word.


These are some of my favorite photos.


available at MyModern

Monday, August 4, 2008

One down....

....one to go.


Oh these pesky needlepoints! The saga continues and I've vowed NEVER AGAIN. But I think it looks pretty cool in the mix of my collection. In a pop art sort of way. Now to tackle Pennsylvania.

Yes, I CAN!

Our canning heritage starts way back--O.K. at least as far as our Grandma J. who always had a huge garden in Idaho Falls when we were little. They grew the best raspberries, among other things. She taught our mother how to can garden items and we in turn have learned over the years.

I'm sure that most of us haven't ever really done much canning until we each got married. We probably helped peel peaches, snap beans, or snitch raspberries during the canning process when we were younger and living at home. I guarantee we've all enjoyed eating the fruits of those labors. So a big thanks to Grandma J. and our mom for passing along those values and skills about home food storage and canning. 'Cuz if you've never eaten a home canned peach you are soooooooo missing out. (Even the most expensive best canned peaches in the store can't beat ones you can yourself.)

If you've ever thought about canning yourself then you need to get a couple resource books: The Ball Blue Book Guide to Preserving (this is THE canning Bible) or their larger volume Ball Complete Guide to Home Preserving. These are MUST HAVES if you are going to do any home canning.

August gets to be a busy month for my canning as my reserves are getting low and the gardens and Farmer's markets are loaded up with their produce. So here are a couple things that I've canned in the past 2 weeks. And I'm just getting started as peaches and pears will be ready here in the next week or so and I'm out of salsa and tomatoes.
Chili, recipe from the Blue Book--just add your own home canned beans (or store bought) and heat up. You are ready to eat on a nice cold winter day and it will taste like you've been slaving all day. This is probably my family's favorite chili recipe that I've ever made.Maple Syrup--I use the recipe off the back of the box of Mapleine Imitation Maple Flavoring.

Vegetable Soup, recipe also out of the Blue Book. My kids are not as keen about this recipe, but it is one of my personal favorites. You can also add cooked chicken chunks or browned hamburger to this if you don't want to be vegetarian. It is really good either way.

I just love how all the colorful jars look downstairs in my food storage area, lined up on the shelves. It also makes me feel a little better that if something disasterous were to happen to our family that we could "make it" for a bit.

Sunday, August 3, 2008

Zucchini Casserole

This is a family favorite recipe and a great way to use the plethora of zucchini that may come out of your garden. If you've ever grown zucchini you know that it can take over and then you are trying to find recipients of your bounty.

Zucchini Casserole
Cook in water until tender:
6 c. cubed, peeled zucchini
1/4 c. diced onions

Mix together:
1 can Cream of chicken (or mushroom) soup
1 c. sour cream

Add into above:
1 c. peeled, shredded carrots

Add all to drained zucchini and onion mixture. Mix thoroughly.

Mix in another bowl separately:
1 large pkg. herb stuffing mix (like Stove Top)
1/2 c. melted butter

Put 3/4 of the stuffing mix on the bottom of a 8x8 pan. Cover with zucchini mixture. Sprinkle remaining stuffing mix on top. Bake uncovered at 350 for 30 minutes. **Note--I usually double this recipe for my family of 7 and put it in a 9x13 pan.

Monday, July 28, 2008

Becky's Bag

My friend Becky is moving this week to Ithaca, NY where her husband is heading to graduate school. We are going to miss her and her family. Her kids are almost exactly the same ages as mine. So this is my little token of a good-bye. Not necessarily very original, but I am pretty sure that she'll like it. Since we have been knitting buddies, maybe she can use it for her knitting projects.
I used this font for her bag. It is one of my favorites from the Cute Embroidery website.Inside fabric--lips, lips, and more lips!! This is just right for Becky as she is rather sassy! I also added a little inside pocket for more storage options.

Travel safe Becky!! We'll miss you guys!!

Saturday, July 26, 2008

Sampler Stitch Purse

L. wanted to post a blog about her drawstring purse that she has been working on for about a year now. She just finally finished it this week. It is made out of Sugar 'n Cream--Neptune Ombre. We tried to re-locate the pattern online--I am pretty sure that we used one from Frugal Knitting Haus, but I couldn't find it to download. Since I had it saved on my computer we went ahead and posted the original pattern we based this one on even though L.'s bag is modified a bit.One thing about this purse is that L. is left-handed. I am right-handed. I taught myself to knit and purl left-handed so that I could help her. We both got it--then just recently I read something that said that left-handed knitters should just learn how to knit right-handed because all the patterns are written right-handed. So...now I am back to teaching her how to knit right-handed. She is getting the hang of it and just started her new project--leg warmers. I wouldn't show her how to read that pattern until she finished this bag. She is hoping that they won't take her a whole year to finish. She wants to wear them this Fall to school.

SAMPLER STITCH PURSE
FINISHED SIZE: (when flat) about 11 inches high and 10 ½ inches wide.

MATERIALS: Worsted weight yarn, about 300 yards. 24" circular needle, size 7, plus a set of double pointed needles for bottom decreasing. (Use any needle to give gauge)

GAUGE: 5 sts = 1 inch and 8 rows = 1 inch (measured over pattern sts.)

DIRECTIONS: Starting at top of bag, cast on 100 sts. Join being careful not to twist sts of round. Place marker for beg. Of round. P 1 round , k 1 round , p 1 round for top border.

First pattern: * K 2, p 2* around, for 8 rounds. Eyelet holes: * K 10, yo needle twice, k 5, yo needle twice, k 10 * repeat between* 3 more times. K next rnd, dropping off all yarn overs. (this will create holes )

Dividing row pattern: (P 1 round, K 1 round) twice , then P 1 round.

Second pattern—Seed Stitch: * K 1, P 1* around. Rnd 2: * P 1, K 1* around. Repeat these 2 rnds for 12 rnds. Work 5 rounds of dividing row pattern.

Third pattern: Rnds 1, 2 , : * K 2, P 2 * around for 2 rounds.Rnds 3, 4: * P 2, K 2* around for 2 rounds. Repeat these 4 rounds 3 more times.

Work dividing row pattern for 5 rounds:

Fourth pattern—Double seed stitch: Rnd 1 & 2: * k 1, p 1* around for 2 rnds. Rnd 3 & 4: * p 1, k 1* around for 2 rnds. Repeat these 4 rnds until 12 rnds have been worked.

Work 5 rounds of dividing row pattern, then work 2 more rounds to finish.

Bottom: K 1 rnd even.

Start decrease: * K 8, k 2 tog* repeating around. K 1 rnd even.
Next rnd: * k 7, k 2 tog*, repeating around. K 1 rnd even.
Next rnd: * K 6, k 2 tog* repeating around. K 1 rnd even.
Next rnd: * k 5, k 2 tog* repeating around. K 1 rnd even.
Next rnd:* K 4, k 2 tog,* repeating around. K 1 rnd even.
Next rnd: *K 3, k 2 tog, * repeating around. K 1 rnd even.
Next rnd. * k 2 , k 2 tog* repeating around. K 1 rnd even.
Next rnd.: * k 1, k 2 tog* repeating around. K 1 rnd even.
Next rnd: * k 2 tog * around.

Cut yarn, thread sewing needle with yarn end and draw through remaining sts. Pull to close bottom, and fasten off in inside.

Ties: Make 2: Cast on 145 sts. Do not knit, but bind off in k st. Starting at one side of bag, weave ties in and out of holes so ties end up at opposite side of bag. Starting at this side where ties ended, weave other tie in and out of eyelet holes to end up with ties at opposite sides of bag. You can make an overhand knot on each end of ties, if desired.

Friday, July 18, 2008

The bag that started it all

I am pretty sure that I am the one that started the "bag mania" around our families. The bag that started it all is the orange one on the right. I've had it for many years now. It was a bag that I copied from a bag I saw in the library one day when we were there for a story time, when L. was 4 or 5 years old I believe. I believe I discreetly followed this lady around the library to get a better look at the bag and make a few notes on a piece of paper so I could reproduce it later. It had this cute little side zippered pocket for the library card and if I remember correctly it zipped close at the top too. Then her name or her daughter's name was embroidered on the other side.
I didn't want to put a zipper in the bag so our "Library Card" pocked is velcro'd. Much easier to install and will not break or catch, etc. All great things when you are dealing with kids. These bags can hold a TON of books and then it also helps to keep all the library's books in one place so that they are less likely to get lost. And you don't have to keep swapping the stuff out of your other bags when it is time to go to the library.

Over the years we've made a number of these for friends and family. The latest one is the brown one on the left. Z. felt he needed his own, and one that wasn't too "girly" looking. So I think this makes for the 4th one in our family alone. However, instead of putting "BOOK BAG" on his we put "READING ROCKS". He is very happy with it as he got to pick out the inside lining fabric and what it said on it. Inside lining fabric.
I am all for doing whatever you may need to in order to get your kids motivated and happy about reading. If that means they each get their own library bag and card then so be it. READ ON!

Tankinis

"She wore an itsy bitsy teeny weeny yellow polka dot tankini..." O.K. not really, let's go black, white, and red and not itsy bitsy. That is the whole point of this project.
I've been unhappy this summer with my swimwear (or lack thereof), and have tried to find something else to buy for myself without any luck. I want a tankini; however, I don't want to flash my belly for the world. So buying a tankini isn't really an option as those in the store are about 2 inches too short for me.

My cousin Tiffany was here visiting and although her tankini was store bought, she inspired me to get serious about making one for myself. (Of course this was after we made a trip to my favorite local fabric store and we spent a wad of money on new swimwear fabric, etc.) Actually I should define "wad". I tend to be a cheapie when it comes to buying clothes. I spent $28 on swimwear fabric and ended up with a large bag of about 13 pieces of fabric that are 1/2 yd. to 1 yd. pieces. That translates into AT LEAST 13 swimsuits, but most likely it will be more since not all of them will be used for suits for myself. Little girl suits need less fabric, obviously. Even if I only got 2 suits out of that for me, that I like, it is well worth the money.


I've made other swimsuits for myself, but never a tankini top. The closest thing I've done to a tankini was a maternity swimsuit I made a couple years ago. I loved that suit as it was so comfy and covered up what I wanted it to. This time around I used that same now discontintued pattern, McCalls 2772. However I did go look on Kwik Sew's website and found two patterns there that are in stock and very similar to what I used. Kwik Sew 2868 is almost exactly what I used--view A with a little more added to the length, and then Kwik Sew 2689 you could also use and lengthen the top to your liking.Sorry, but as much as I like this suit I am not going to take a picture of myself in it to post for the entire blogging world. I know...chicken!! The bottom is a skirt attached to the panty. This was actually another suit that I had made, didn't end up liking the bust and so I cut off the bottom half and added elastic to make it a separate bottom.
Back view--fully lined top, straps attached at the back, tacked down. I did not put any bra cups in this one, but I am going to try it on my already in progress next tankini top. I mean really, every girl needs at least 2 or 3 swimsuits a season, don't you think?!

If you want to get serious about making swimwear I would recommend getting your hands on the Kwik Sew Swimwear Book. It has so many helpful sewing suggestions and how to customize your suit, or adjust it if you have a certain style pattern. It is a great resource book!!

LinkWithin

Related Posts Plugin for WordPress, Blogger...