Tuesday, March 31, 2009

Ashlee Gets First Dibs

You've all been witness to the slow evolution of these quilts over the months. For some reason they were getting pushed to the back burner while I worked on other more exciting projects.


But now they are done, washed, crinkly, and ready to go to some lucky baby girls. But first, Ashlee gets first choice on the one she wants for our new baby niece due in July!

So here are your choices:


Classic Pink and Green with Green Backing

Funky Hot Pink and Black with Hot Pink Backing
(This one happens to be the biggest, if you care about size.)


Or Soft Purple with Purple Backing

So there you go! Which one will it be?
I have 2 boy ones that are still waiting to be finished, whenever that might be...

Monday, March 30, 2009

Blog Anniversary

Hard to believe that is has already been ONE YEAR for us out there in blog land. We're always up for a good reason to have a party--so Happy Anniversary to us!! We've got three things we're giving away this month. We'll draw 3 different times for 3 different items. So that means 3 chances to win just by posting a comment.

#1 From Leslie: Fabric Garland

Back in the day I made two of these. But since I seriously overestimated the amount of fabric I would need for husband's birthday garland, I ended up with two. So one could be yours!
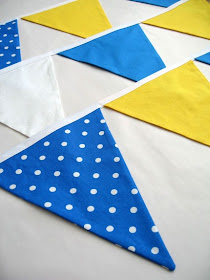
{Total length of garland is just over 15 FEET with and additional 6" of excess bias tape at each end for pinning. Each double sided triangle measures 7.5" wide and 9.25" long.}


#2 From Emily: Fabric
Half yard of Amy Butler's Floating Buds in Linen

and a stack of small scraps.

#3 From Renae: Library Bag

We've been loving the library so much at our house. It makes me happy to see that all my kids, including the boys, love to read. Even my 3 year old C. asks to go so that he can get some more "twain books". We love BOOKS!! I've posted before about the library bags that each of my kids have to use at our house. Today I am giving one away. The winner may choose between one of the two pictured.

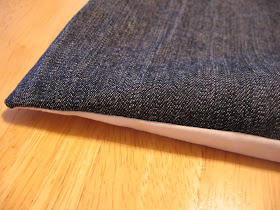
a. "Reading Rocks"--denim with turquoise/yellow/orange striped lining.

OR

b. "Book Bag"--denim with lime/turquoise floral lining.
To Enter our drawing, tell us the name of one (or more) of your favorite kids' books in the comments. Comments will close Wednesday at Midnight Pacific Time. One entry per person, winners will be announced on Friday, April 3rd. Good Luck!

One of Renae's kids favorite books is "The Toughest Cowboy: or How the Wild West was Tamed" by John Frank or any of the "SkippyJon Jones" books by Judy Schachner.


Also as a sweet surprise--we are also sending Tine her own box of surprises for being our first and therefore Longest Follower of our blog. Thanks Tine!!! We have appreciated the support!

**Be sure to add yourself as a follower and we might surprise you with some goodies, too!**

Saturday, March 28, 2009

Good News


The good thing about having morning sickness is the only project I have had any energy to work on is that pesky needlepoint. Over the last month I finally finished Pennsylvania. I think it is safe to say I will NEVER ever needlepoint again. Never!!!! I've decided to file this project under very "dumb ideas". Even still..... I think it looks really great on my wall.


**if you are crazy enough to start one check out the original inspiration here

Monday, March 23, 2009

"Fabulous At Forty" Quilt

Finally!! I can show you where I've been focusing all my hard work lately. We've been planning Shauna's Birthday for at least 2 months, so I figured that gave me plenty of time to make her a quilt.


I decided to make it like Amanda Jean's Flea Market Fancy Quilts. It was a very simple design that was easy to assemble and came together pretty quickly. I love how it turned out! I think the fabrics are very cheery and happy looking!


What matters most, though, is that Shauna loved it, too!


A Simple Back


A closer look at the beautiful fabrics!
(Heather Bailey's Pop Garden and a few other odds and ends)


I did simple straight quilting around the squares which made the back look cool, too.


(Directions and measurements for this quilt can be found here.)

Sunday, March 22, 2009

Happy Birthday, Shauna!

We all made our way to Shauna's house this weekend and surprised her for her 40th Birthday! It was a BLAST! She was clueless to our plotting and scheming, even after we started showing up one by one. Lucky for us she never caught on! Surprises are SO MUCH FUN!

Stay tuned for some birthday projects.

Friday, March 20, 2009

Works in Progress

I promise on Monday I will show you a totally finished project and none of this half finished stuff I've been giving you. But, until then...this is all I've got.

My two scrap projects are coming along nicely. I got the tops done, I have fabric on order for one of the backs, and am close to finding the perfect backing for the second. Let's hope they're done before...summer!


For some reason this picture is looking weird to me, but this scrap coin quilt looks awesome in person! Coins might be my new favorite! I will post the details and measurements about this quilt when I get it finished. Hopefully soon!

You can look through the Flickr Coin Piece-Along group photos here.


Again, this photo isn't doing this quilt any favors. It, too, looks much better in real life. It must be because you can see the detail in the fabrics better. I don't really have any plans for either of these quilts other than to practice my free-motion quilting and get them done as soon as possible. I've put myself on a "no starting any new projects" diet until I get some stuff finished and cleared out of my sewing room. Wish me luck with that! :)

See you on Monday with a finished quilt, I promise!


EDITED: FINISHED COIN QUILT CAN BE SEEN HERE

Wednesday, March 18, 2009

Guest Blogger -- T-shirt Quilts

I met Ann when we first moved to this area 11 years ago. Back then we just had a one year old and her "baby" was in kindergarten. We ended up kid-sitting for their 4 kids for about a week while she and Brad went on a cruise or something fun like that. Now her "baby" is a HS junior and the only kid left at home.

We have talked on a number of occasions about the t-shirt quilts that she makes for her kids when they graduate from HS and move on to college. To be quite honest she is the only one I know who has actually done this for her kids. And I don't mean just using a couple tees, but using LOTS of tees that have been saved over the years. I asked her if she would tell us a little about how she put these great gifts together.

_______________________________

T-Shirt Quilts
from Ann

Here's the history behind my quilts.


My son (who is now 23) loves to hang on to things – all things! When he was very young – elementary school age, he wouldn’t let me throw away his t-shirts, even when they were too small (or too stained!) to wear anymore. When his dresser drawers were busting at the seams, I bargained with him and said, “If you will let me take some shirts out of your drawers, I’ll save them and someday I’ll make them into a quilt.” He reluctantly agreed, and every year we would tuck away a few more of his “special t-shirts.”

The years flew by and finally his high school graduation was on the horizon. I decided it was time to make good on my word and have a crack at the long talked about “t-shirt quilt.” What transpired was a wonderful project that we truly enjoyed together as he spent time choosing his favorite shirts and reminiscing about all the fun memories. We had shirts from sports teams, family reunions, church retreats, school clubs, fun vacations, town festivals and much more.

Of course, it became clear very quickly that I would eventually have to make three more for each of his three younger sisters. It has now become a wonderful tradition and during each senior year of HS we take this walk together down memory lane and create a personal history in a quilt!

Here are some of the details.


  • First I cut the t-shirts in half right up the side seams so I have a flat piece of fabric.
  • The next step is the most important: before cutting the shirt into a square, I iron “wonder-under” or some kind of iron-on pellon interfacing to the underside of the shirt. Once this is done, the squares are easy to cut using a rotary cutter. The interfacing keeps the shirts from stretching out of shape.
  • I chose to make 12” squares (before sewing) because that seemed to be large enough to include most graphics from most shirts.

  • I tie the quilts at each corner of the blocks.


Other details:

  • I used 3” wide strips (before sewing) for the sashing between the squares. I let the kids choose the fabric for the back. All three chose flannel which worked well.
  • If the designs on the shirts were smaller I would piece together two t-shirts or sometimes even four shirts. This allowed me to include more shirts on the quilt.
  • The middle quilt square below was t-shirt not quite large enough to make a 12" block, so we cut out the graphic and then appliqued it onto a plain square in order to use it.
  • I went with 7 squares in the length and 5 across the width. This makes for a quilt that is approximately 8’3” X 6’. It is pretty big, but has worked nicely in their dorm rooms.
    My son had one dinosaur shirt that he couldn’t bear to have cut up because it had been such a favorite. So I got creative and carefully cut the shirt in half. Instead of cutting out a square, I appliquéd the entire front of the shirt onto the middle of the back. He LOVED it!
    On my oldest daughter’s quilt we used denim for the sashing strips between the squares and so we decided to put some jean pockets on the backside just for fun. We put them on the bottom so they wouldn’t bother her when she snuggled in. We both thought they would’ve been cute sewn upside down on the underneath top so that they would show when you fold down the top of the quilt.
    My second daughter was a gymnast and that was a HUGE part of her life. So along with many gymnastics t-shirts, we also cut up a few of her favorite leotards and used those.
    I now have one daughter left at home – a junior in high school. That means one more quilt to go! It’s funny, the quilts are so fun that sometimes we find ourselves looking at t-shirts and saying “We should buy that shirt, it would look so cute in my quilt!”

Sunday, March 15, 2009

Mucho Husband (and Garden) Love

My husband has learned that the quickest way to my heart is not with flowers or candy, but with finished home improvement projects! He loves it (not really) when I dream up a new project! But he is always (mostly) willing to humor me and attempt the craziness I dream up.

We have lived in lots of different places and have moved about every 3 years, give or take, over the course of our 13 years of marriage. I have pretty much begged him for a "beautiful" garden since getting out of college 10 years ago. We have had successful gardens in the past, but then...we move and start all over. None have been "pretty," though.

We've been in our current house for 3 years now, with no moves (cross your fingers) planned in the near future. So after much begging and batting of my eyelashes, he caved on my latest idea. Over the weekend he made me raised garden beds! And, seriously, I am the happiest girl in the world!


Here is our sad little spot before -- also known as my 4 yr old's truck graveyard and digging spot.


Lest you think that I'm the only happy one here, my husband got himself a new wheelbarrow and shovel out of the deal, so all was not lost.


And speaking of happy...our chickens went right to work tossing out our freshly laid soil. We'll have to put up some chicken wire ASAP if we want our produce to survive their antics.


We used these simple directions found at one of my favorite blogs. We bought 6 -- 2 by 10 redwood boards and had them cut at 7 feet. Our beds measure roughly 7' by 3'. All the boards and hardware for these three beds cost us $130, plus we bought $50 worth of soil. That sounds expensive, but we considered it "landscaping" since they look so much nicer than a traditional garden. As an added benefit, next year (and all future years) we will have very little prep work to do to get our garden in tip-top shape. I think we have decided to add at least 2 more beds before we're done, but they might wait until next year. Hey, I'm not complaining!

Next up on my dream list is fruit trees!

Friday, March 13, 2009

St. Patrick's Day Dinner Ideas

One of the traditions at our house growing up was that during particular holidays we would have a "color" dinner. For example: on Valentine's Day Mom would make our RED dinner meaning anything she could serve that was red she would: i.e. red Jell-O, some sort of red punch, spaghetti, etc. At my house we've made lasagna, or chili. For St. Patrick's Day the same applies, only anything green. This one is a little more difficult, trying to find a green main dish, but we aren't above adding food coloring to mashed potatoes, or to homemade bread in order to maintain the green theme. You can also make a little Shamrock Cake (white cake mix tinted green with white or green frosting and some sprinkles) for dessert--that would make the kids happy. Or a Key Lime Cheesecake--which would make hubby happy.

However, when it comes to St. Patrick's Day Shindigs we just had to spotlight our cousin, Annette, and her family. Traditional dinner, green attire, custom family board game, Irish Jigging, Pot 'o gold, green Jelly Bellies! They go ALL out and enjoy the season!


Click HERE to learn what their day usually includes and HERE to see their last year's St. Patty's Celebration. It makes me want to be at her house just for this occasion alone.

Annette's goal: To have fun together as a family. Each year she says they also learn fun facts about St. Patrick's Day. Those you can get online by doing a search for "St. Patrick's Day trivia". There are TONS of sites and info out there. You might even want to make your own St. Patrick's Day Trivial Pursuit game.


Here are Annette's recipes for their St. Patty's dinner as shown in her post.

Kerry Cottage Soup
1-1/2 c. chopped cabbage
4 T. chopped onions
4 T. margarine
2 can condensed beef soup
2 soup can water
1-2 cans corned beef
dash of pepper

Sauté half the cabbage and onions in the butter until tender.
Add soup and water.
Simmer.
About 15 minutes before serving add the rest of the cabbage.
About 10 minutes before serving add the corned beef.

HINTS:

Annette says: We usually vary the amounts of cabbage and corned beef. We all like more cabbage than the recipe says and I usually do 1 1/2 cans of beef. This recipe made enough for 5 of us but 2 of us ate cold cereal last year! It is not good as leftovers because the cabbage and beef get a little gross!


Irish Soda Bread
4 c. flour
1/4 c. sugar
1 T. baking powder
1 tsp. soda
1 tsp. salt
4 T. butter
1 1/2 c. buttermilk
1 egg

Combine flour, sugar, baking powder, soda and salt.
Cut butter into the mix.
Combine buttermilk and egg and add to mixture.
Knead on floured board until smooth.
Divide in two pieces and place in greased round cake tins and press down to fit.
Cut cross in top with scissors.
Bake at 375 degrees for 40 minutes.

Serve with honey.


Blarney Stone-Kissed Cookies
1 c. margarine
1 c. sugar
1 egg
1 tsp. vanilla
1 3/4 c. flour
1/2 c. cocoa
1 1/2 tsp. baking powder
1/2 tsp. salt

Beat margarine, sugar, egg and vanilla until well blended.
Mix remaining ingredients together and add.
Divide dough in half and place on waxed paper.
Roll a log about 7" long and 2 1/2" wide.
Wrap in waxed paper and refrigerate 8 hours.

To bake, cut into 3/8" slices.
Bake 15 minutes at 325 degrees.
Cool slightly then remove from pan.
Cool thoroughly.
Drizzle glaze (recipe below) over top and immediately put an unwrapped Hershey kiss on top.

Glaze:
3/4 c. powdered sugar
3-4 tsp. milk
1/4 tsp. vanilla
3 drops green food coloring

Thanks, Annette, for letting us borrow you
and your fun family tradition!!
Happy St. Patrick's Day Everyone!!

Wednesday, March 11, 2009

Mom's New Apron

What do you get your mother for her birthday, when she repeatedly makes a point of saying she has all she needs? Well, in my case you wait for her to call and ask, "Could you make me a new canning apron?" Love to! So Happy Birthday Mom!! I'll get your apron in the mail here soon.

Lined or Reversible Chef Style Apron Tutorial

**This pattern came from the Family Circle magazine, Sept. '73. Thanks to Grandma F. who sent it to me a couple years ago.
Copy pattern onto paper or plastic using dimensions provided below.


Tips:

Keep in mind that you can adjust how deep the armpits are and how wide across the top edge is depending on who you are making this for. My aprons tend to be closer to 10" across the top edge and not 12" like this pattern shows.

Also, I lengthen my own aprons to 36", not 31" as shown, but I am 6'2" tall and I like them long.

If you are making a reversible apron then I would not add the pocket at the end, but do it first thing so that the stitching does not show through on the back side.

Materials:


Directions:

  1. Cut 2 pieces, one from fabric and one from lining fabric
  2. Add any embellishments at this point to your apron. This time I did some embroidery. See here and here for pattern details.

  3. With right sides together sew sides and bottom, leaving armpit and top open.

  4. Clip corners, turn right sides out.

  5. Press and top stitch along sides and bottom.
  6. Top side viewBack side viewI usually topstitch at 3/8" and then again right at the edge.

  7. Using bias tape, sandwich the top edge of your apron in between your bias tape. Topstitch close to edge of bias tape.

  8. Use remaining bias tape to form ties and neck band. Take the remaining tape, fold it in half and mark the halfway point with a pin. Measure down about 8 1/2" on either side of the halfway point and mark again with a pin. This is where you will place the top edge of the apron. (This length can also be adjusted according to the wearer and their comfort factor.) Sandwich and topstitch the same way as you did with the top edge of the apron.Pin bias tape along armpit curve. Start sewing bias tape at one end of a tie and sew continuously from there up and around the neck down the other side to the end of the opposite tie.


  9. I reinforce the corners where the ties connect with the body of the apron on each side and at the two corners of the top edge of the apron.

  10. Add front pocket (optional). Cut any size and shape you desire from the remaining fabrics. Sometimes I line the pocket and sometimes I don't--depends on my mood and if I embellish the pocket. See here for pocket embroidery details.

  11. I usually just tie the ends of the bias tape in a knot and maybe add a dab of Fray Check to it.

See this post for another apron using this same pattern.