.jpg)
Supplies needed:
1 yd. flannel for front
1 1/4 yd. contrasting flannel (for back and contrasting sides)
Thread
Ruler
Finished size:
38 1/2" square With approx. 2 1/2" wide border
Directions:
Cut the back fabric to 44 inches square (or whatever width your fabric may be, could be 43 or 42 depending on the selvage waste)

Cut the front fabric to 34 inches square (or 10 inches smaller than the back fabric, 33 or 32 inches, etc.)

Find the centers on all sides and use a pin to mark them.


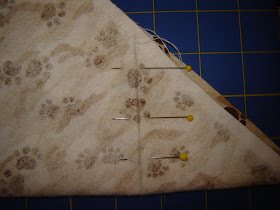
This 1/4 inch is the corner of your miter. If you do not leave this much of the seam allowance free it will not flip through. See picture below.
Repeat the process for the two opposite remaining sides. Remember to leave an opening on one of those edges, so you can flip the entire blanket right side out.
The following pictures show what the corners look like once all the sides are sewn up.
The next step is to create the miters.
With the front fabric facing up at you, fold the corner to create a large triangle. Make sure the fabric lays flat and the fold is closest to you.
I used a straight edge with a 45º angle marking to make sure I drew a straight line at the very end of my stitching line.
(The 45º angle mark should line up along the sewn edge of the blanket. You will be drawing a line perpendicular --90º-- to the folded edge of your blanket.)

(Be careful not to sew over your original stitch line otherwise your miter will be puckered when you go to turn it.)
Flip your blanket right side out and iron the seams towards the outside edge.
Pin the two fabric together once its ironed so it won't move while you top stitch the two pieces in place.
Use whatever topstitch method or stitch you prefer. On this blanket I used a triple zigzag or multi-stitch zigzag.
According to Tiffany the first time she made one of these blankets it took her about 2 hours from start to finish. However, after the initial blanket her time was greatly reduced and she says she now can finish in about 1 hour. We love quick projects that look like we "slaved all day".


wow, that looks so nice that way.
ReplyDeleteI think this is the best, clearest, easiest to understand tutorial I've seen for this kind of blanket. I've always been afraid to try them before, but this makes it look actually do-able! Thank you!
ReplyDeleteYou make the process amply clear.The edging is tough and has to be with care and following the instructions.
ReplyDeleteblankets
I nominated you as a Kreativ Blogger on my blog (http://varinas-garden.blogspot.com/2010/01/kreativ.html).
ReplyDeleteSo glad you did this for us so I didn't have to figure it out on my own. My friend Andrea wanted me to help her do one, but neither of knew how. Now we can whip a couple up.
ReplyDeleteTHANK you so much for posting these instructions. I had a friend teach me how to do this but I lost my notes. This is a fabulous help for making such a darling blanket!! Thank you for making the effort and helping me out!!!
ReplyDeleteI just used your instructions after trying all day to figure out how to do this. Thanks for the great tutorial! I made a really small one to start with (the back was 6 inches square, the front 4 1/2) so that I could see what I was doing before I messed up the fabric I want to use. It turned out perfect!
ReplyDeleteYay!
I had someone explain to me how to do this and I just tried it ... all I'll say is I wish I'd found these instructions first!!! I'll try again now that I know what I'm doing! Thanks.
ReplyDeleteI have design in my mind - I do love dolphins and am very excited to make one :D
ReplyDeleteI love your blanket and have made it for several baby gifts. Thanks for making it easy to understand and with lots of pictures as I need visual instructions.
ReplyDeleteMy big question is how to easily print the directions.
ReplyDelete