Wednesday, January 30, 2013

Blushing Squares {A Finished Quilt}

The weather is wrecking havoc on my picture-taking these days.  We are finishing up an entire month of  hazy, snowy, cold January weather, which doesn't look to be changing any time soon.  I've been holding off taking pictures of my finished projects because they all turn out "blue" and weird-looking.  But it turns out that if I don't have any pictures, then I can't blog.

So, with the wind howling and the snow falling around me, today I am showing my "blue" weird-looking photos.  Hope you'll not be too critical. 

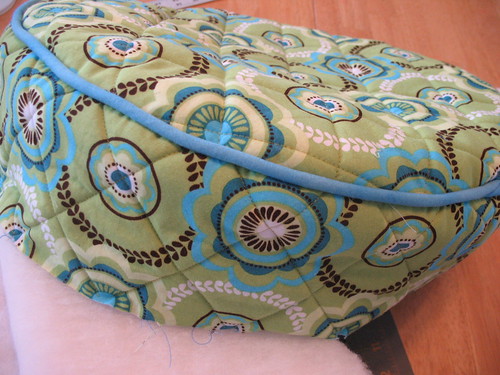
Without further ado, here is my finished Blushing Squares quilt.  
 It's been done since early December.


You'll have to click on this post to see it in all it's pre-winter prettiness.  I wanted you to see the light-colored border around each block but our yucky weather is not picking up any of the color details very well.  Boo!

 Once again, Lynn's quilting is amazing.
I gave her free reign and she did not disappoint.

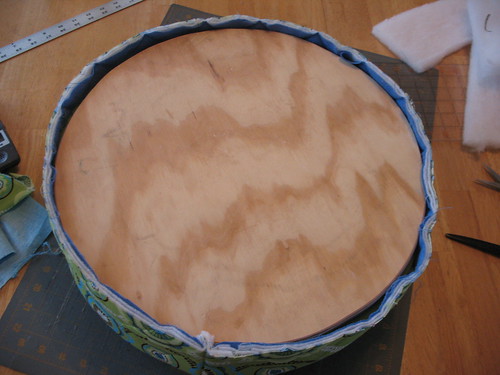
 I had planned on using the remainder of the awesome bold pink stripe sheet that I used here for the back, but in the end used this (sorry, you can't really see it) tiny pink gingham sheet instead.  The other one would've required me to piece the back and I wasn't really in the mood.  Sometimes our choices are between two equally good things, huh?

The binding is some Amy Butler coriander that I reclaimed from a project of Leslie's wwaaayyyy back in the day. I'm not ashamed to admit that I totally cut up her skirt and used the fabric.  It was still in perfect shape!  Thanks, Les.


As for the recipient, originally I thought I might sell it, but a certain someone I know and love is having a girl in early summer, so I think I'll save it for her.  Can I get a cheer for baby gifts being done early?!  Hooray!

Hope your city is less "blue" than mine today!
Emily

Previous posts about this quilt are Here and Here.  Seems I've been working on this quilt for a very long time...

Monday, January 28, 2013

Scrapper's Delight -- A Bowtie Block Top

Over Christmas break I pulled out some UFO's and tried to make a little headway on them. 
First up were my bowtie blocks which have been sitting around for some time now.  
They were in various stages of completion and needed just a few final touches.

After cutting and sewing my little heart out, my blocks...

turned into this lovely top.


It's not the prettiest quilt I've ever made, but definitely a scrapper's delight.
I think it finishes somewhere in the neighborhood of twin sized.  That's seems to be my go-to-size as of late.  But since we like BIG quilts to snuggle with I'm sure no one will be complaining.

I have no idea how I will finish it off or who the recipient will be, so for now it will go into the closet until I figure that out.  But another WIP checked off the list. Yea!
 
Happy Scrapping!
Emily


P.S. Another round of the Bowtie Block Swap is going on now.  Check out the flickr page for sign-ups and details.
Block directions Here.

Friday, January 25, 2013

Looming Deadline = Productivity

I have to confess that I totally spaced the fact that the deadline for this round of the doll quilt swap is mere days away (Feb. 7) until I was perusing the flickr pool and saw that some people had already mailed their quilts off! Ack!  Since I hadn't started (beyond pulling fabrics and ideas) I sort of panicked there for a minute.  

So, last night as my family went off to sleep I sat down to "start" on my quilt, and... well...
I went a little crazy, burned the midnight oil and busted out the whole thing.  Today I'm paying the price for my lack of sleep, but ultimately I am happy to have it done.  Definitely a relief.

Here's what I made:


 I can't reveal too much about my partner, but suffice it to say she likes bright, saturated colors.  I'm guessing this will fit the bill.


I chose to do some mini paper piecing.  These blocks are a tiny 4" finished.
I had a bit of trouble lining up the points with my first couple blocks but after some trial and error was able to get them perfect.   Then it went pretty smoothly.  I am very happy with it!  I hope my partner is, too.  

Now I have to decide on quilting... and fast!
...I'm open to suggestions.

:)
Emily


block instructions found here

Tuesday, January 22, 2013

Vehicle Garbage Bags

The beginning of December the transmission on our van went out.  Merry Christmas to us!  Not!

By the time we figured out that it wasn't going to be financially smart to replace the transmission (we were hoping for the possibility of a somewhat cheap repair) it was too close to Christmas that I couldn't even think about looking for a new vehicle.

Well, almost one month later exactly, we got a new(er) van.


As Emily said, you don't really realize what a piece of crap you might be driving until you buy a newer model.  Amen.

We spent the first couple days playing around with all the new options we didn't have before and the kids are THRILLED that the side door windows roll down.  They really could care less about anything else.  Hubby is thrilled with the Stow-n-go seating---he's thinking ahead to next hunting season and how easy it will be to haul a deer in this van.  Maybe...we'll have to see about that.  Me, I'm happy the heat works and the windows roll up and down (both an issue with our previous one...before the worse transmission problem.)

Since the kids can see how nice the new(er) van is they are all on board with keeping it that way.  Even though less than 3 hours after getting the van home we had a nosebleed issue in the back seat.  (You've got to be kidding me!!!)  So instead of just using a Wal-mart plastic bag as the trash sack in the van I went on Pinterest and found some tutorials for cute car garbage bags.

I made a couple with some scrap fabric from my stash.
They don't match each other, but I didn't care.  I just wanted something to contain the messes.
And not look like Wal-mart plastic bags.

One for the back seat kiddos.


And another for the middle seat kiddos.


I didn't follow any tutorial exactly.  I just winged it based on how much fabric I had.  I am able to put a brown lunch bag in it as the liner to just pull out and toss when it is full.

Some details:
  • Cut 2" wide strap pieces and then folded in half and then folded in half again, like a piece of double fold bias tape and topstitched it down.
  • Fully lined.
  • Mitered bottom corners to square it up nicely.
  • For the green version it looked too boring and so I added a little strip of the lining fabric outside sandwiched between the bag and the binding piece.

Thursday, January 17, 2013

Cane Chair Redo

We got this chair on the curb near my neighborhood last summer.
It was a freebie that someone didn't want to deal with .
We drove past it once and I told myself that if it was still there when I came back that I'd grab it.
It was.
I did.

It was a bit rough in spots and the seat was coming undone, but when I saw it I had other visions in mind.  Pretty bright paint and a cushioned seat, possibly with upholstery tacks.


During the process B. was more than happy to do a little hand sanding on it to help get "her" chair ready.

Primed
I wasn't sure exactly how I was going to finish off the seat/cushion so don't do your chair redo in this order. 
I thought I was going to just make a pad that you could tie onto the back of the chair and then set it on top of the wicker seat.  However, it ended up being too worn and would break through after some time.  So after painting it we decided to get rid of the wicker seat.  It would be easier and better to do this first, then your painting.  It already needed another coat so doing it this way didn't completely screw up the plan.

Basically we snipped all the way around the seat to cut the connections and then we had to go back and get rid of the weaving underneath.  I used an Allen wrench to poke it down thru the hole and then pulled the strings from underneath.  Just keep working your way around until it is all gone.  You can always get a pair of pliers to help pull it out.


For the seat cushion I cut a piece of 3" foam in a circle the size of the seat.
Added a little more batting to give it some umph!


Then I made the fabric covering.
I machine quilted the fabric with some batting and muslin.
I wanted it to be sturdier than just the fabric.

Made my own piping.
And then double checked the sizing.

I went ahead and serged around the bottom edge before I stapled it to the seat cushion bottom.
This was then screwed to the chair itself up underneath.


And Voila!!

I was going to give this to Miss B. for Christmas but it seemed she was already getting more than everyone else.  So I just held onto it and waited until this past week.  


Now this chair makes her desk look horrible.
Guess that will be the next redo project--in the Spring.
She wants it lime green to match the chair.  Not sure if I'll go that direction or not, but I'll think about it.

Details:
  • Rustoleum 2X spray paint in "Lagoon"
  • Replaced the feet pads to avoid any scratching.
  • Fabric from the stash.
  • Foam pad and batting from the stash.
  • Bought the piping fabric because I couldn't find anything in my stash to match the way I wanted.
  • Hubby cut new circle seat bottom out of scrap from his stash.  

Monday, January 14, 2013

World's Fastest T-Shirt-to-Scarf Recycle

As I'm posting today, I'm kind of laughing at how easy and ridiculous this project is.  But instead of telling you that I'll just pass it off as a stroke of genius on my part (...she said with a heavy dose of tongue and cheek).

This cute scarf was made in 2 minutes.  Literally.


Here's how it went down...
I kept seeing all these easy/cute t-shirt scarf tutorials on Pinterest in the fall and thought "maybe I should try one of those ideas."  ...I never did.  Recently when I was cleaning up my sewing room I came across a t-shirt dress of my daughter's that was headed for the donation bag. 


 I decided to chop off the skirt and see if I could make a something out of it.


So I literally hacked off the bottom of the dress...

   and voila!

I didn't even hem the cut edge, just tucked it in, 'cuz I'm lazy that way.
See, I told you it was stupidly easy.
So go check your closets and see if you can find an awesomely patterned knit you can chop up, too.

Have Fun!
;)
Emily


Details:
The A-line style lends itself well to a good drape when worn.
Here's how it breaks down:
Scarf is 17" long (from cut edge to hemmed edge)
Top (skinny) edge is 15" wide, bottom edge is 22" wide.
NOTE: These measurements are finished measurements, so you will need to double-fold your fabric and adjust measurements accordingly if you are making this from scratch.

Friday, January 11, 2013

Friday Finds and a White Christmas Tree

The kids are back in school this week and I'm relieved.
I took down all the Christmas stuff on Monday; however, the majority of my finds are Christmas related.
It is what it is....


Found this white Christmas tree a couple weeks ago in December at one of my local thrift stores for $12.46 on one of their 50% off day sales.  I checked on white trees at our local Menards store and they were selling one the same size for $99 or pre-lit for $149.  Woohoo!!  I'll take my $12.46 tree thank you very much.  It is a 6 footer and although I don't want to use it every year, I want to try it once in awhile--next year for sure--you know, change it up a bit at our house.  And for that price I can store 2 trees and decide what mood I'm in for that particular year.

After bringing it home I discovered that the pre-lit lights we're all blown out.
I didn't really care, because I may be putting colored lights on it anyway.

White lights should not look black.  The entire strands over the entire tree were like this. I'm not opposed to buying replacement bulbs, but with ALL of them blown it was not cost effective.  They had to come off.  I have to say that pre-lit trees are great UNTIL something happens with the lights.  Then they are a royal pain in the backside.  This is the second pre-lit tree that I've taken off the lights and it is a not a quick job. Those workers who attach the lights to pre-lit trees do an A+  job of making sure they won't come off--practically E.V.E.R.


An hour and a half later, and after getting out the wire cutters five minutes into this project, this is what was left of the burnt out lights.  Bye-bye!  So glad that I took care of this now.  That way I can just pull it out and decorate for next season.

A couple other finds that I've scored over the past couple weeks.

Wire chicken basket and wooden eggs for $4.50.


I actually bought this for the cool wooden eggs--thinking to Easter upcoming.  The poor chicken had a broken leg--one leg hanging loose by some wire.  I tried to fix it so she could stand up but couldn't get it quite right.  She still kept falling over, especially when I put the eggs inside her--a little bottom heavy.  So we did a little surgery and both legs came off and now she roosts up on my cornice in the dining room.  I still may just use the eggs come Easter, but for now I like her up there.


8 pack of star cookie cutters, still with tags on them, for 96 cents that I am going to use as ornaments for the white tree.  I may or may not spray paint them a different color.


Various strands of white corded lights for the white tree--all less than $2 each.  One in particular for 96 cents that has colored lights and 16 different lighting combos (i.e. slo-glow, chasers, etc.)  LOVE it!!  I might have to be on the hunt for another one of those somewhere.

PEACE brass stocking holders for $3.

I just saw them before Christmas at Target retailing for $30 for the set of 5.  We've never had a place to hang stockings before, but with our new (Craigslist) entertainment unit (see first pic) we were able to use that this year and the kids were thrilled.  I now may have to make new stockings since the other ones were just whatever stockings that only came out on Christmas Eve.

A wooden stable for one of my nativities for $4.45.


A cool tall (16 inches) wicker pumpkin for $2.47 to go with my other twiggy pumpkin.


And lest you think I'm becoming a hoarder, here's the pile that left my house last week to go to the DAV. (I just love charity/donation pick ups at your home).  And that is besides the couple things we've sold recently on Craigslist.

See, I do like change....along with a good dose of order among the chaos.

Wednesday, January 9, 2013

Vintage Dresdens {Finished}

Over Christmas break I was able to finish up my dresden quilt.  
It was made with the help of the lovely ladies in my Bee Vintage VQB group and it only took me from September 'til now for it to get finished.  It's a miracle! :)

 Isn't it so pretty? I made it a twin size, so it will reside on my daughter's bed after her big sister moves out of their shared room.  Oh, happy day!  I have visions of a girly, vintage-y, pink and white cottage-y room for her.  In my head it's going to be fabulous...

I chose to add grey sashing as opposed to white because I wanted to give it a bit of a modern flair.  While I'm fully aware this is not a "modern" quilt, I felt like the grey updated the sheets a bit while still retaining the vintage charm.  Thus, modern.  In my eyes it worked out perfect. 

Once again, our quilter worked her magic and quilted the heck out of this one. 
I love what she chose to do.


The binding came from my LQS.  I bought it as a stash piece not realizing it worked with the quilt until it sat on my cutting table for a few days.  Then...light-bulb! (name that movie)

The back is a vintage sheet I thrifted awhile ago.
I think it has a Monet look to it, don't you?!
For some reason I think I might have had this sheet as a kid.  Mom, Renae??

Have a great week!
Emily


Quilt Stats
Dimensions: 70" by 90" (twin)
Sashing: Kona Ash
Dresdens: Reclaimed Vintage Sheets
Backing: Reclaimed Vintage Sheet
Binding: Sweet Flirtations by Exclusively Quilters

Monday, January 7, 2013

Goals: Out With the Old, In With the New

(This picture has nothing to do with anything.  Just some random picture of me on my birthday in a pose we like to call the "Flaming Inferno."  Just light up the candles, turn off the lights, and snap a picture minus the flash. Ta-da!  Flaming Inferno. Believe me, it gets better with age!)
 -------------------------------------------------------------------------------
I love looking back over the previous year's accomplishments/failures and taking stock for the new year.  I wanted to update my goals for 2013, if only for my own personal record keeping, so bear with me while I do just that. :)

2012 was a pretty productive year for me.  I made somewhere in the ballpark of 20 quilts and I-don't-know-how-many bee blocks.  (I'm pretty sure that won't happen again this year.)  Here's a look back on the goals I set for myself last year how I did:

*Definitely one (maybe two!) scrap quilts for the year.  I think I got this one covered!  I made at least 3 baby scrap quilts as well as my Paint Box Blocks quilt.
*A few "Solids Only" projects I've got brewing in my head.  I have an Amish Buggy top started and finished a doll quilt
*Finish my Grandma Quilt   Here
*And a bed quilt for me and the hubs.  (Barely got this started in 2012, but it is on the top of my list for 2013.)
 
 I'm guessing I will be a bit less productive in 2013 as I have made a conscience decision not to get too caught up on quantity.

So my goals for 2013 will again be simple. I want to:
*Make another "solid's only" quilt
*Finish the low volume quilt for mine/hubs bed
*Make a quilt using only improv techniques
*Make a big-kid quilt for my 8 yr old son
*Keep on top of my WIP list
and
*Make a bed quilt for 11 yr old daughter's new room 

What about you... What are your sewing goals for this year?

 Here's to Fresh Starts!
Emily

Thursday, January 3, 2013

Dear So and So...

Dear White Background Fabric,
I love you very much, but for the new year I'm trying to break myself of you... At least partially. 

Dear WIP List,
Since you've been conquered I've vowed to keep a watchful eye on you. You're a sneaky one who gets out of hand easily when not reigned in. 

Dear Fiskars,
After buying and using two of your rotary cutters over the course of a few years I've decided to switch brands.  Both broke in the same way, which made me kind of frustrated.

Dear New Brand of Rotary Cutter,
You hurt my hand after I used you but I guess that was because I cut with you for four hours.

Dear Fabric Stash,
Be forewarned, although you are beautiful just sitting there all folded up, you are on the chopping block (err, the cutting mat) this year.


Dear Denyse Schmidt,
I promise to stop hoarding your fabrics and finally USE them.  Any ideas for me?  I'd love to hear your suggestions.  Call me...  :)

Dear New Sewing Machine,
I have dreamt of you for a very looonng time.  Now that you are in my life I think far less angry thoughts as I sew.  You make me very happy!

Dear Blogosphere/Quilt World,
Whenever you all decide to make the same quilt at the same time it makes my reader pretty boring.  Dare to be different, please.

Dear Scraps,
You might be frustrating me a bit right now.

Dear Daughters,
It makes me so happy that you both want to spend time with me sewing, but maybe we could figure out a better schedule so there will be less feuding over "your" machine.  For the record, it's a machine for the both of you.

Dear Son,
You surprised me when you asked if you could sew as well.  And the answer is yes, you can!

Dear Orphan Blocks,
I think I have finally figured out what to do with you.  Of course, I don't think mine will be nearly as cool but I love the concept.

Sincerely,
Emily

LinkWithin

Related Posts Plugin for WordPress, Blogger...