Thursday, October 28, 2010

Squash {Part 1}

Our cousin Tiffany and I have been slightly obsessed recently with all things squash. Winter squashes, unlike summer squashes, can be stored almost indefinitely in a cool, dry spot, like your basement. This is just fine, unless you have a squash like the one in the picture below.
This is Tiffany with one of TWELVE 3-4' long banana squashes that were grown in her parents' garden. Where are you going to store 12 of those babies?!

Cutting one into workable pieces requires a hubby with strong muscles and a machete or chain saw....seriously. And unless you want to eat banana squash for about a week straight for every meal (and that is just 1 banana squash), or feed your entire neighborhood for a couple days, you have to figure out something to do with once you cut into it.

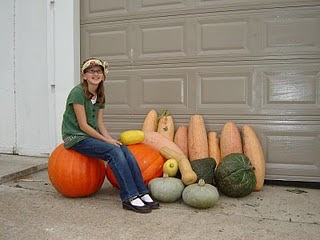
Here are more of the famous banana squash along with the other varieties they grew (and Tiff's cute daughter).

My husband brought home about 10 butternut squash for us, from work, that someone had just left in a bin outside the back door hoping people would take them. I told him to bring as many as he could.

So, if you don't have lots of freezer space to store cooked puree, you could can it. However, you MUST use a pressure canner. I canned half of my squash for now.

Per the Ball Blue Book:
Basically, remove peel and seeds, and then chunk up the squash into 1" pieces. Add to clean jars, plus 1/2 tsp. salt for pints and 1 tsp. salt for quarts. Fill with hot water. Adjust 2 piece lids.

Can pints for 55 minutes at 10 lbs. of pressure.
Quarts for 90 minutes at 10 lbs. of pressure.
(adjust as needed for your altitude)


So then the question is: What do you do with canned winter squash?

Well...for starters just about any winter squash can be interchanged with each other in any recipe that you have. Any recipe that calls for pumpkin (including pumpkin pie) can be substituted with winter squash. We've used butternut squash for pumpkin pies for years. The "pumpkin pie" flavor is all in the spices.

Here's a couple soup recipes to try:
Simplest Butternut Squash Soup from Parade Magazine
Butternut Squash Soup from Woman's Day Magazine
____________________________

Tiff's Pumpkin/Squash Soup Recipe:

  • 1 Butternut squash- peeled, seeded and cubed (I think you could use acorn, pumpkin or banana squash and be just fine)
  • 1 apple--peeled and cubed (any variety--though a lot of recipes say use a tart one)
  • 1/2 onion (large) quartered ( I used white, you could use yellow or purple)

Put these 3 ingredients in stock pot, cover with chicken or turkey broth bring to a boil and cook until tender.

  • Add salt and pepper to taste
  • 1 C. heavy cream (I used plain yogurt cause that's what I had)

Using an immersion blender, regular blender or food processor, blend everything to a smooth texture. Top with parmesan cheese for savory flavor or brown sugar for a sweeter flavor.

Some variations to this:
heavy cream--you may use plain yogurt, sour cream, or coconut milk
additional seasonings--I love curry, so I dumped 1/2 tsp. in mine
If you want a cheesier soup add a few Tbs. of cream cheese, very rich and makes the soup thicker.

____________________________

Tiffany and I have been experimenting with some other ideas and recipes. We'll post more in a couple days. (see Squash {Part 2})

Monday, October 25, 2010

Mendocino Bricks Quilt

This is the first of three quilts I'm trying to get done for my kids before Christmas. 
This one is for my eight yr old daughter. 


It's made using Heather Ross' Mendocino line
I added a few other prints to the mix to give it more color and contrast.
 

I chose this beautiful Joel Dewberry print for the back.  I actually like it much better than the $40/yd print I was considering for half a second.  (Still not sure why --or who-- would actually spend that much on a yard of fabric no matter how beautiful it is!!) 

 The binding is a nice golden solid.  I love solid bindings for borderless quilts.


Even though my daughter is eight, she still has dolls/stuffed animals that she loves, so a mini was in order as well.  The mini measures 15" by 19".


I just did straight-line quilting shadowing the rows.
The finished quilt measures 52" by 74".

Last year when I gave my husband an unfinished quilt top for Christmas I vowed to start early on my kids' quilts.  With only one of three done, looks like I'm cutting it close again this year.

Wednesday, October 20, 2010

Purple & White T-shirt Dress {Butterick 5522}

Finally I have been able to make something for ME!!!

I have not been liking my options for Sunday church wear and have had fabric and patterns set aside for quite some time. After all my water mess and purging of the sewing room I have put sewing for myself back on the priority list. All other fires will have to wait to be put out at another time.

This dress (Butterick 5522) seems sort of retro to me. But hey, I was born in the 60's.....and I like it. Maybe that makes me retro too.
The only changes to this pattern that I made for me were that I had to add about 7" in order to get it to at least hit my knees. It also called for putting a 9" zipper in back. Why!? It is made out of t-shirt knit. I don't see why you need a zipper with t-shirt fabric. But just to double check I only sewed up to where the zipper would be, then basted the remainder to the neckline. I tried it on that way to make sure it would work before permanently sewing up the back seam.

I thought about making the neckband white, but decided against it. I wanted the focus to be on the sleeves, or whatever cool piece of jewelry I could find to go with it. I like my little improv chain.
I've had this dress completed for a bit, but hadn't yet worn it as the weather here was staying in the 70's and 80's. I needed it to be a little cooler before I debuted it. Finally this past weekend I wore it.

I only wish I still had my awesome pair of purple suede pumps. I had to give those away years ago after they no longer fit--post babies. I loved those shoes. I actually bought them before I had anything to wear with them. Then I found fabric and made an outfit for the shoes. In the "old days", i.e. pre-marriage, pre-babies, that is how I usually shopped. Bought shoes and accessories I liked first, and then made the outfits to go with.

Monday, October 18, 2010

Everything Tote Critique

Over the weekend I finished making up the Everything Tote. This bag comes from the book "Weekend Sewing" by Heather Ross.

I had checked it out at the library and then thumbed thru the items to see what interested me. I'm always game to try a new tote pattern, even though I have ZERO need for a new bag. So the bags, yes, BAGS, I made from this pattern (and the decorator fabric I needed to get rid of) will be donated to our Zihuatanejo bag project. For these bags I didn't line them as I was messing around and wanted to make sure I liked the pattern. However, with that being said, I will eventually make myself one, I just haven't decided exactly what fabric I want (I'm thinking about a red piece of pleather that I currently have in my stash) or how I want to do it. Until then here are some of my suggestions and troubleshooting for this pattern.

Notes:
  • You definitely need MORE than a 1/2 yd. fabric per outside/lining piece. Try 1 yd.+ per bag.
  • The binding pieces for the side gathers don't allow for hardly any gather--adjust accordingly. I think that I cut off about 2-3 inches off the binding pattern length in order to get a more obvious gather. That is all personal preference. You could also try a little pleat in the center.
  • You don't necessarily have to cut handles on the bias. For this bag shown I did, but some of the others I didn't and it was all about the same difference. Based on what I did above my finished handles were 14" long.
  • The strap directions absolutely stink--no offense--for such a cute and simple bag. Why would you make a tube (using both outside and lining fabric--and then not see the lining fabric! What is the point of that?!) and then use the tube like bias tape? That is like sewing thru 10 layers of fabric!!!! Yikes! Don't torture yourselves. If you are going to "line" the strap per the directions just attach it as follows--fold in half lengthwise only once and topstitch down with the bag sides sandwiched in between.
  • OR just cut your handles out of the fabric you want and then apply that piece like bias tape--pressing in half lengthwise and then pressing into the fold again. You'll end up with about an inch wide strap.
  • I also went ahead and sewed the 2 strap pieces into a continuous circle and then marked accordingly.

Flickr has a group where you can view all sorts of versions of this bag.

Note: It appears there are a number of errors or problems with the patterns in this book, based on what I've seen online, so be careful before starting any of these projects. If you are having issues, more than likely it is the pattern and instructions, and NOT you!

Wednesday, October 13, 2010

His + Hers {Part Two}

Finally, His + Hers are reunited! 

His is decidedly different than {Hers}
I started with the backing fabric (cotton yardage from his favorite NBA team) and went from there. 


For the front I decided to use solids in the team colors.


I came up with this simple Solid Squares design. 
It's not original, I'm sure you've seen many a quilt designed like it before in blogland. 
But I like it in solids nonetheless.
Simple and masculine.

For the quilting I did lots of straight lines. 


After taking a spin through the washer/dryer, it's ready to go to it's new home.
I just need to decide if I'm going to give it to him now or save it for Christmas...

Finished measurements:  45" by 60"
It didn't need to be huge. My FIL likes to watch the games in his recliner with a blanket on his legs.  This should be just right. 

Like {Hers} I made a label for the back and had all my kids sign it and write a note. 

Pattern details/instructions HERE.

Details:
*All solids came from JoAnn's.  They are Country Classics:  Navy, Cornflower, Charcoal Grey, White, Orange, and Purple. The sashing is Kona Ash.  It might be my new favorite neutral. 
*JoAnn.com has a good selection of NBA team cottons. This is a great way to get fabric if you live far away from your team. Use your 50% off coupon and you could get it for a bargain. (This is how I got mine!)
*Check out the NBA quilt made by Oh, Fransson! She used a vintage sheet for her backing. I LOVE this one!

Anyone else made an NBA themed quilt?  I'd love to see it!  Leave a link...

P.S.--This quilt, same design/different colors can be found here.

Monday, October 11, 2010

Pumpkin Chocolate Chip Muffins


Super Delicious recipe from allrecipes.com

My variations: I quadrupled the recipe so I could use the entire (Libby's large) can of pumpkin. I also used mini chocolate chips (highly recommend) so they don't all fall to the bottom of the batter when you bake them.

After having breakfast dinner on Friday night I still ended up putting 2 1/2 dozen in the freezer, which means I can enjoy them all month long! Yum!

Friday, October 8, 2010

Mendocino Scraps Winner is...


Jenny

And a big thanks to all of you who signed up to help with our bag project!  We are firm believers that doing good for others makes you feel good. :)

Thursday, October 7, 2010

Donation Baby Quilts

Over the course of the summer and the past several months I have been helping the young women at church with a sewing project. For many of them it was their very first sewing project. But I decided that they could handle straight line sewing and put together baby quilts. I assembled the quilt blocks into coordinated little packets and then let each girl pick their packet and then design their own top. Most packets had extras so that they could have some freedom in what they designed.


In the end we had 40 quilts to donate to a local hospital and their neo-natal ICU. Here is what they all looked like piled on my table. The girls helped package them all up nice with ribbon and a tag.


A big thanks to the moms, friends, and Young Women leaders who helped with this project. And another thanks to all those who donated their fabric scraps. We really appreciate it!


Now they're off to be delivered.


P.S. You have until tonight to enter our giveaway...

Tuesday, October 5, 2010

A Giveaway


Today we are doing a giveaway, with a small twist...

The winner will get these lovely scraps from the Mendocino line by Heather Ross.  I think there are about 35 rectangles (about 1/2 of which are HR and 1/2 the blender fabrics).  I am currently working on a quilt for my 8 yr old using these fabrics.  When I went to buy the backing I found the fabric listed on etsy for... get this...$40 a yard!!!!  What?!  Don't even get me started on how ridiculous I think this is!  I quickly decided on a beautiful non $40/yd print.  But I digress...

Here is the twist:  To enter you must commit to helping us with our Zihuatanejo Bag Project for Project Million Amigos.  We don't care if you can only do one bag or 50, we just want you to help.   If you still want to win the scraps tell us in the comments section how many bags you will make.  Make sure you leave your email or some way for us to contact you.  We will draw a winner on Friday.  And if there happens to be a large enough response I might be willing to give up my eight Heather Bailey Pop Garden fat quarters as well. 

Now we know that there is no way we can check to make sure everyone actually makes their bags, but we believe that you all will be honest enough to commit only if you are serious and not just to win. Good Luck!

(Here is the simple bag tutorial if you're unsure of the difficulty level involved.)

LinkWithin

Related Posts Plugin for WordPress, Blogger...