Sunday, May 30, 2010

Scrappy (Nine Patches) Makes Me Happy

Sat down with the hubs and a couple of movies over the weekend and bound my monster scrap nine patch that I started a year ago.


It reminds me of quilters past who cut up/recycled/never wasted/used up every bit of fabric they had.
Somewhere I heard this: Pioneer/frontier women would buy fabric at the general store for clothes. After their clothing was unusable, they'd make a quilt out of the fabric. When the quilt was unusable they'd cut it up and use it to make braided rugs. When the rugs were unusable they'd burn them for fuel in their fires. Then they'd take the ash from the fires and use it when they made candles and soap for their homes. How's that for not wasting a thing?!

If I've said it once, I'll say it again, scrappy quilts really do make me happy. That's why I'm naming this one Scrappy Makes Me Happy.

I LOVE the back a LOT! I might even like it better than the front.
(I'm not afraid to say that I totally ripped off Ashley's design from her nine patch.)


You can read more about this quilt here.


I'll leave you with a picture of a Scrap Nine Patch done by my husband's Grandma. She has since passed away, but her beautiful quilting lives on (all hand done!).

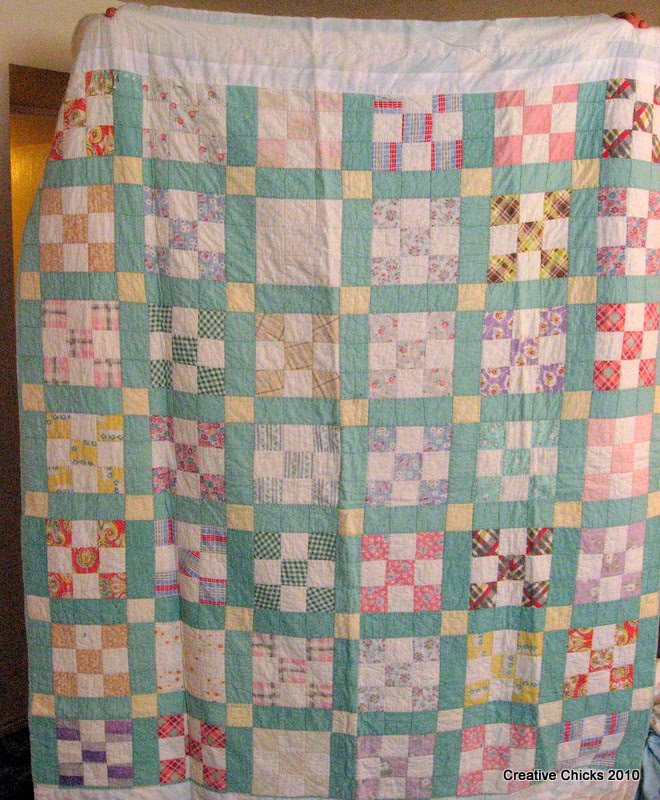
This one is over 50 years old. She used it on her beds underneath her spreads. When my MIL showed this to me last year I about fell over. It really is still beautiful after all these years, despite some repairs. I'm crossing my fingers that I'll get to inherit one of her old beauties sometime down the road...

Friday, May 28, 2010

Vintage Quilted Pillow

This was one of the vintage sheet FQ's I received in my swap box last week. I was instantly drawn to this particular piece and decided to turn it into a pillow for my living room couch.


I just sandwiched the FQ, did simple meandering quilting on it, cut it down to size, and sewed it to the backing.


For the back of the pillow I used a men's dress shirt. The buttons make for easy removal of the cover whenever it needs a wash. I probably could've made the cover a teensy bit bigger as the buttons pull a bit, but I'm not fixing it.

Wednesday, May 26, 2010

Swimsuit Sewing Updated Tips

Last year I posted quite a lengthy list of tips for sewing swimsuits and then added a couple more after some of you had questions. Our cousin Tiffany, after reading the post, wanted to know why I wasn't using my serger to make suits when I had one. My response, "I have no idea." And really, I don't know why I wasn't using it because I LOVE my serger! I've had it as long as I've been sewing swimsuits. And anytime it needs some work done I am immediately calling my sewing machine guy to fix is ASAP.

So..., since then I have been playing around with sewing suits with my serger. And I have to say that I love the finished look so much better. I've even used the serger to attach the elastic directly to the suit. You can certainly make swimsuits without a serger (I did it for YEARS), but if you have one--use it! It may take a little practice or getting used to but I find that the suits go together much more quickly using a serger. And it looks more professionally made.

Elastic Update:

I have switched to using 3/8" swimsuit elastic on everything except little baby suits. I haven't ever had problems with regular elastic breaking down from the chlorine, but I do think I like it better as far as the stretch and comfort.

Also, once again remember that you need only stretch the elastic the LEAST amount possible to fit into the piece. DON'T overstretch or it will not lay the way you want.

Here's the latest one I just made for my middle daughter. Shouldn't lose her when we're at the pool. Fully lined except for the back inset orange piece.
Topstitch Update:

I've also adjusted how I topstitch my swimsuits. I use a STRETCH twin needle exclusively now. (and make sure it is a STRETCH twin.) It makes for a more professional looking finish.
This is what a TWIN (or double) needle topstitch looks like on the swimsuit. For the majority of suits I use a size 4,0/75 Stretch Twin. At times I use a 2,5/75 on baby swimwear (if I am using 1/4" elastic).
Most machines are made so that you can use a twin needle. Check your manual to be sure, but if there are 2 thread loops where your needle inserts into your machine for sure it is made to handle twin topstitching.

We're gearing up to enjoy the summer and the pool.
We had our first test run the other day at our friends' house on the lake. Bring it on!
Hope you all have a great summer too!

________
You can always check to see what's available at my shop too!

Monday, May 24, 2010

Vintage Loveliness

My package arrived over the weekend from the Vintage Sheet Patchwork Swap on Flickr.

Check out all the loveliness I received! I'm real happy with the quality of the sheets and all the beautiful prints everyone sent in. Out of 65 FQ's I only got 6 that I didn't care for. I'd say thats not bad.

I've already got some ideas brewing in my head for these...

and these!

In other news, today it is snowing in my area! Can you believe it? Neither can I! The only good thing about it, is that I am having another marathon day of canning beans today and snow makes it a little easier to get in the canning mood.

In case you are wondering I'm doing red beans and white beans today. I use my red beans for chili and taco soup and my white beans for white chicken chili. I'd sure like to expand my repertoire so if anyone has a good bean recipe, please share!

Friday, May 21, 2010

Blogger's Quilt Festival


I'm showing my husband's Alumni Plain Spoken Quilt for this year's Blogger's Quilt Festival. It was my gift to him for his college graduation~only 12 years later!

(I just realized that my entry from last year was also a special celebration quilt. I see a theme brewing for me!)

I looked around for a very looonng time trying to find a truly "manly" design for him. When I came across this quilt, it was perfect in every way!! I worked on his Aggie version for months without him knowing a thing. He was totally shocked and surprised when I gave it to him for Christmas last year.

The quilting was a scary challenge for me. I don't own a quilting machine, per se, so I squished and tucked and pulled that bad boy into my little non-quilting machine. I can't tell you how happy I am with how the quilting turned out, though! I know there are flaws, but it looks exactly how I had envisioned--maybe even better!


I pretty much love everything about this quilt, even the simple scrap binding and the polka dot backing! It now lives in our tv room where my husband and I can snuggle up in it while we watch tv.


Go check out all the Blogger's Quilt Festival entries on Flickr.

Tuesday, May 18, 2010

The Best Refried Beans EVER (according to me!)

My family has been in panic mode since we ran out of refried beans in the pantry a couple of weeks ago. To say that my family likes beans would be the understatement of a century. They eat burritos like anyone else would eat PB and J. Thankfully beans are darn cheap! And when you can them yourself, they become even cheaper...and yummier!

Recipe:
I use the basic Dry Bean Recipe from the Ball Blue Book (aka the canning bible) but instead of leaving them plain, I add one (or more depending on how hot you like them!) whole seeded jalapenos. Delish! They are comparable (or better if you ask my husband!) to a particular popular brand of Spicy Refried Beans.

Refried:
Here is what they look like in the jar after pressure cooking them. See the jalapenos? Pretty, huh? So to get them to refried stage, just dump the entire contents of the jar in a pan, heat them up, and mash them to the desired consistency with a potato masher or fork. It literally takes me 5 minutes to do this. I also add a small amount of salsa when I'm heating them up for even more kick.


Gas:
You can't mention beans without mentioning gas. As far as that goes, we all know that the more beans you eat the less gas you have. So, I pretty much have the most regular family on the planet! :) But, one trick I do is this: one of the steps when canning any dry beans is to soak them overnight. To lessen the gas, I dump out my overnight water and refill with fresh water before canning.

Yield:
Dry beans are super easy to can, they just take a long time to process. It takes me about 4 hours for an entire batch -- heating them up, put them in the bottles, processing them, and the cool down. The other day I canned 2 eight pound bags of dry pinto beans, which yielded me 56 pints. For the rest of you that is WAY more than you'd need in a lifetime, but for my family that is about a 6 month supply. (I told you we eat a lot of beans!) For one days work I now have a HUGE supply in my food storage. Can't beat that!


For those of you that are afraid of the pressure cooker, I'm here to say Don't Be!! Just read the directions, follow them, and everything will work out just fine. Here are great instructions from the Ball Website.

Monday, May 17, 2010

Small Finish

I am trying to branch out from my usual baby quilt design. This one was dictated by the scraps I had. They came from a jelly roll.


Anybody want it?
(That way, maybe I could keep both my kidney's!)


Made from the leftovers of a yet to be revealed large quilt.

EDITED: Large Quilt can be seen HERE.
Fabric is Hello Betty by Moda


BTW, I finally found a home for my Boy Quilt. For 2010, Margaret's Hope Chest is providing birthday quilts to children who's parents are currently incarcerated. A little 2 yr old who loves sports/balls is going to get snuggled up in my little blanket. (Be sure to take a few minutes to read about the project.)

Friday, May 14, 2010

Color Blocked Swimsuits

"Blocking involves, drawing the design, cutting the pattern piece apart, adding the seam allowances to the new cut edges and sewing the pieces together to make it one piece." --from Kwik Sew's Swim and Actionwear book.


I first tried this technique last year on this suit for my middle daughter.
We used the basic racerback tank (Kwik Sew 3785 is the current pattern) and cut it to be a 2-tone suit. We thought the stripe might be just a little much for the entire suit. M. loves this suit. She received a ton of compliments on it last year too. This year it seems a little snug; however, she wants me to add another little piece into it so that she can still wear it. Since I still have both of these fabrics I may just start from scratch and go a size larger for her, because it was a cool suit.

Here are this year's suits using color blocking techniques:

Tikki Hut Print Suit

Added a stripe at the empire waistline as this print was extremely busy and the 10 yr. old friend it is for needs a little visual definition there. M. thought it looked cool.


Navy & Floral Suit

Did this one for my youngest as I didn't have enough of the floral piece to do an entire tankini. So we used it for the bottoms and the contrast to the navy top. I really like this look.

Here is a little detail close-up of the straps and how they cross each other in back.


**By the way, I have swimsuits available for purchase in my shop at Etsy. Or drop me a note if there is something specific you are looking for and we can work something out.

Wednesday, May 12, 2010

Tropical Breeze Freezer Jam

Every year I like to try some new canning recipe to #1 see if my family will like and then #2 to expand the variety of items in my food storage. I received this recipe recently from the Ball® e-newsletter and thought it sounded delicious: pineapple, banana, mandarin orange, & a touch of coconut.


Quick Tip from Ball®: Add one or two tablespoons to smoothies and milkshakes or stir into warm Maple syrup for a special topping over pancakes and waffles. (***I tried this with syrup on Popeye Pancakes the other morning and it was Scrumptious!!! )

Recipe for Tropical Breeze Freezer Jam. Makes 5 half-pints.

Sign up HERE to receive the Ball® monthly e-newsletter.

I also want to try Pineapple Chili Salsa this year.

Monday, May 10, 2010

B/W Tessallation Quilt {Finally finished}

So about a year ago I finished the top to this quilt. Then life happened...alot. And I didn't want to do whatever and screw it up. I actually tried to finish it for Christmas this past year for hubby. But I was having issues with the quilting and needed to pick it all out and start over. FRUSTRATING! So I put it away again and finished up some other things before finally setting a goal for myself to "get 'er done".

I still had to pick out all the quilting (basic cross hatch) I didn't like and sort of did that as I was doing the new quilting. Originally I had thought about quilting each whirlygig, decided that was too time consuming; however, that is exactly what I came back to. And I really like how it looks--it makes me much much happier, and considering how much work I put into it I want this quilt to make me happy.


Now it is D-O-N-E! As sort of an evolution during this past year of working on it I decided it would be an anniversary quilt. We celebrated 15 years this past week! Hubby made a simple quilt for me while we were engaged with the help of his grandma. Now it is my turn.


Details:
Finished size: HUGE!...actually 84" x 86"

(I'm not sure I'll ever do one this big again--or at least for a VERY long time. Give me some easy baby blankets any day.)

Embroidered Hearts found HERE for a free download.

Friday, May 7, 2010

Friday Fun Facts: Why We Sew

Leslie:

I started sewing because our mom sewed and just wanted to try it. The reasons why change all the time. As a teenager I sewed for the creativity. I mostly made dresses for dances because I never really liked what was in the stores. And it was much cheaper to sew my own.

I didn't sew all through college and the first years of marriage. I just wasn't into it, but once I got pregnant with my first baby I got the bug again. I love seeing the girls in something I've made them. It is just so satisfying. I guess I've gotten sentimental about it. I want them to have things that their mom made them. I also like that they are one of kind items and almost always better quality than what I buy for them. And there's still the creative part that I love. Deciding on fabric, cutting, the whole process.


Emily:

I started out sewing as a little girl because mom sewed. It was fun and I loved turning fabric into something useful and pretty. As a teenager the only thing I remember sewing were dresses and skirts for church and dances. I had to sew those things because I couldn't find skirts long enough for my liking and dance dresses that weren't strapless/sleeveless. Besides, I could make a dress that was different from all my friends and for WAY less money. That always made me feel good.

When I was newly married (and dirt poor!) I made a few things for my babies, but mostly I made table clothes, curtains, pillows, anything for my house that I didn't have the money to buy. My sewing has evolved over the years based on the things I like at the time. Obviously now I am making quilts more than anything, but I still enjoy making clothes and home goods. The bottom line is: I enjoy creating in fabric no matter the project!


Renae:

I am pretty sure that sewing started for me because even as a younger person I wasn't able to find clothes that fit. Currently I am 6'2" tall, but I have been at least 6' tall since I was 15 years old. And for most of those teen years I weighed about 120 lbs. Yeah, think major beanpole. (Oh to be closer to that weight now.....sigh....O.K. moving on.) I'm reliving some of that again with my almost 14 yr. old daughter who is currently 5'11".

However, what started out as a necessity has turned into something that I really love to do. I sew to get better fitting clothes and to have more modest clothing than what I could buy. I sew because I love to create things. That probably has turned out to be the main reason I sew--Creativity! It doesn't hurt to know that I won't be seen in the same outfit as someone else. I also sew because I love the challenge of being able to duplicate something I've seen and do it better (unfortunately there is some shoddy workmanship sold out there in stores), or less expensively. Hubby says I'm an addict----probably true, but there could be worse vices.


So why do you sew?

Wednesday, May 5, 2010

Mending

I've been up to my eyeballs in mending this week. The weather has turned warm and my eight year old doesn't have a single pair of pants without a ripped knee or hole in them. None of this is rocket science or new ideas on my part, just wanted to show you what I did.

Here are my fixes:

First up are the distressed jeans that I wanted to make last longer than five minutes. The first day she wore them the knee tear got bigger (no surprise!) and I caught her sticking her finger in the thigh holes. I knew that they weren't going to last at that rate...

So, I took matching pieces of scrap denim from my overflowing pile of jeans and put small squares behind each of the rips and tears. I carefully zigzagged close to the fray to lock the scrap in place.

The beautiful thing about denim is that when it frays, it covers up your stitches. You can click on the pictures to see more details.


The second fix involved cut off jeans. I fixed all the tears on this pair like I did with the above pair. Then I folded up the hem about and inch and sewed it in place to make a cuff.
The picture above shows what the hem looked like before and after washing. I probably could've sewed it with a straight stitch so the fray would cover it up better, but I think maybe one more washing will do the trick.


The last fix involved finishing off the hem. I didn't want every pair of her shorts to be frayed at the end so I cut a strip of fabric 2 inches wide and made a sort of bias tape for the hem.

This picture is the pair of khaki shorts I did for the 3 year old. The 8 year old 's shorts are denim. I coudn't get any pictures because she put them on last night after she got out of the bath, wore them to bed, and wore them to school this morning. I guess that means she likes them, huh?


Renae's directions for hemming jeans into shorts.

Monday, May 3, 2010

Shopping

So, my husband took me on a shopping/researching trip for a new sewing machine over the weekend. I'd have to say that I was pretty upset by the whole process. I went to my trusty repairman's main shop to see what he had to offer. After telling the lovely little (old) sales lady what I was looking for, I was promptly shown an expensive model with WAAYY too many features. Again, I told her that I really didn't need all the fancy stitches and bells and whistles, that I just wanted a workhorse type machine, one that could do just what I wanted. She proceeded to tell me all the reasons why I needed said expensive model and how I would be so disappointed with a basic machine.

Needless to say, I left pretty discouraged. I wasn't planning on buying a machine that day, but I wasn't really prepared to deal with someone who supposedly knew my needs better than me. For one, I feel like I am a pretty experienced sewer. I sew A LOT and I've sewn for a very long time. I'm pretty sure I know what I want. So my question is: Do sewing machine sales people really even sew? Or do they just sell machines?

My advice to them would be: Take a class in listening, 'cuz you aren't hearing what I am saying!

I feel better now, thank you...

In happier shopping news, I scored some beautiful sheets at my thrift store that I plan to use for the backs of some upcoming quilts.


Finally, here is a peek at a quilt top I recently finished. Now, I just need to figure out how to get it quilted by June with a busted machine.

LinkWithin

Related Posts Plugin for WordPress, Blogger...