Tuesday, March 30, 2010

The Tennis Dress (Recycled Tees)

This project has turned out to be my girls' Summer Dress of 2010. (Kind of like the dress of '09 and '08.) With that being said, this one was the easiest of them all!

I did a little chopping up of some t-shirts that were destined for the giveaway box (or trash!) and made this little dress.

All I did was take an existing shirt from my 3 yr olds stash, cut a strip from a different shirt for the contrasting band, and added the bottom hem of one of my old shirts for the skirt portion. I think it took me about 45 minutes to cut and sew one up. Easy, peasy!

I ended up making 4 dresses for my 3 yr old and 1 for my 8 yr old. (I cut up a total of 7 shirts for the 5 dresses.) Two of the dresses started out with long sleeves, but since they were getting too short, I cut the sleeves off and re-hemmed them short. How's that for recycling?

This long sleeved shirt still fit really well, so I took a gamble and kept the sleeves long. I think (hope) it will still fit come next fall. I made the skirt a bit longer than the others in hopes that it won't end up being a mini by fall.

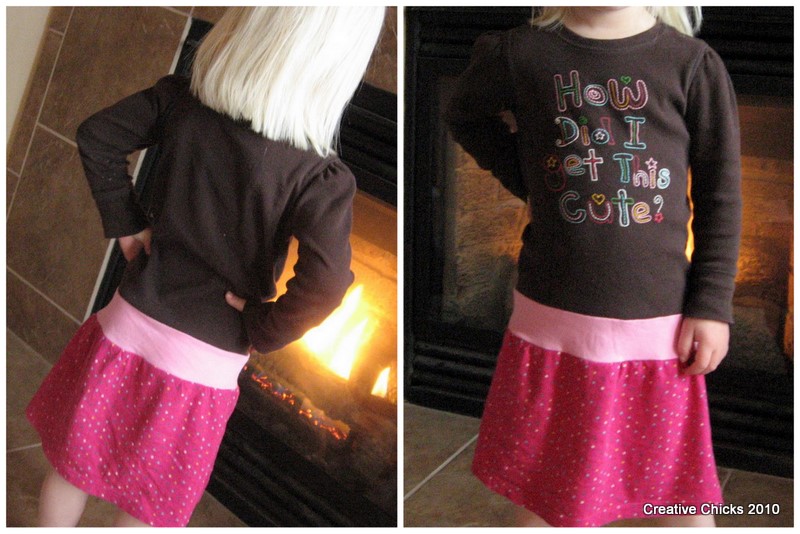
I love how the dress sits a bit lower on the hips. It looks so comfy!

Has anyone else done a recycled tee project? We'd love to see your ideas, too! Leave us a link in the comments...

Sunday, March 28, 2010

The Game Quilt {Guest Post}

This quilt idea comes from our Aunt KayLynne. She is the mom to our cake decorating cousin Nancy, and our book loving cousin Annette. She is also the one person in our family that has a game for everything and every occasion. So, it came as no surprise that she'd come up with such an awesome idea!


Here is her Game Quilt:

She made it to take on picnics or to pass the time on trips or while waiting for a parade. Genius, huh? It is backed with brushed denim.

The quilt includes the following games: Backgammon (bottom left), I Spy or Matching (bottom right), Don't Eat Pete (middle left), Bean Bag Toss or Tic-Tac-Toe (top left) and Checkers (top right). She also made herself a carrying bag to put all the game pieces in.


If you love this idea as much as we do, leave Aunt KayLynne a comment so she can read how cool she is! :)


If you don't know about Don't Eat Pete you need to try it, even if you don't make this quilt. This is a favorite game with the kids in our families.

How to play "Don't Eat Pete":

Send the first player away from the game board or into another room. The remaining players choose which one of the twelve people (or spaces) on the game board will be "Pete" for the round. Place one M&M in each square of the game board. Have the first player come back and begin picking and eating M&M's from the game board. As soon as the player tries to pick "Pete" everyone yells "Don't Eat Pete!" The player keeps all the M&M's picked up before trying to get Pete.

Refill the game board and play again with the next player.

You can use cereal or other small snack foods as well as any type of small candy for this game.

HERE is a really cute free download of a Don't Eat Pete game board.

Friday, March 26, 2010

Friday Fun Facts: Our Favorite Mags

Leslie:

I'm a full blown magazine junkie. Here's a list of what I get each month. (the ones I can think of anyway)

Pottery Barn
Pottery Barn Kids
Pottery Barn Teen
West Elm
CB2
Crate and Barrel
Anthropologie
JCrew
Boden
Mini Boden
Parents
Body and Soul
Marie Claire
Baazar

My magazine rack:


Emily:

The only two magazines that I get right now are Runner's World and Country Living. I used to get a few more, but realized they weren't doing it for me anymore. If my dreams ever became my reality it would be a cross between these two magazines. I'd be able to do daily long runs, be fast, and have a body like the cover model, all the while coming home to a house that looked like the ones featured in Country Living. Right now I'd settle for any daily run and a clean house! :)


Renae:

I must be a closet gossip--because I love People magazine--a.k.a. the "smut" magazine around our house. However, I don't buy it. My friend Cindy passes her back issues along when she is done reading. So does that make Cindy my enabler??! Anyway....

I've recently let my Family Fun subscription lapse after having that for years and years. I figure my kids are getting big enough now and I have enough back issues that I can find stuff for us to do, if need be, without too much difficulty. (However, their website STINKS! in my opinion).

I just started receiving Better Homes and Gardens again. I think I wanted it again because we are trying to redo some things in our own home and I'm open to ideas. I like the variety in their magazine--food, garden, home dec., etc.

But probably the one I find most useful and motivating at our house is The Family Handyman. This magazine walks you thru lots of DIY projects, which is right up our alley. These have real projects, not so many "outta-my-price-range-and-we'll-never-be-able-to-do-that-in-our-small-home" ideas (i.e. This Old House over budget by $50k projects). We also LOVE the Great Goof stories at the end of the magazine!


Tell us what magazines you can't live without!

Wednesday, March 24, 2010

Trumpet Skirt

We love this skirt pattern--view D (floral), no slit.
Easy, comfy and cute.


Made this for the 13 yr. old and added some bias tape on the seams to give it some added detailing.

Wednesday, March 17, 2010

Neckties

The boys at my house sometimes feel left out in the sewing department. Hubby asked me awhile back if I would make some matching neckties for the 3 of them for church.

Well, this is what you end up with when you take the 4 yr. old with you to pick out fabric.
I was looking for something a little more subtle. And yes, that is glitter on the fabric.

They got rave reviews at Church this past Sunday.
Happy St. Patrick's Day Gentlemen!
This is the pattern I used.
Simplicity 4762

Notes:
I was able to get 3 neckties out of 1 yd. of fabric. The pattern calls for 1 yd. for a man's tie. The only reason you need that much is because it is laid out on the bias.
I also am not convinced you need the interfacing, at least with the cotton fabric (not the best for ties, but we were going with a theme) the interfacing seemed pointless. And at least with these particular ties, they are going to get limited wear.
Also, the boy pattern fit perfectly for the 4 yr. old, but was too small and too short for the 8, almost 9, year old. (If you look at the pic again it looks like he's wearing a skinny 80's tie and the underneath part of the tie is only about 1 inch long. It BARELY got tied on.) So on the next one I will use the men's pattern and then shorten it only about 4 inches and it should be just about perfect--length and widthwise both.

Sunday, March 14, 2010

Quilt Alongs and Star Wars

Usually when I sign up for a Quilt Along I pitter out, or worse -- don't even start them. But I'm happy to report that I've changed by slacker ways...

Here are the first four blocks I made from the Pinwheel Sampler at p.s.i.quilt.


I'm feeling pretty confident that I can make it through to the end -- I'm half way there!

I think everyone else is using a layer cake or something like that to do this quilt, but I was feeling cheap and decided to use my scraps instead. I'm trying to ramp up the cool factor of my scraps by adding in this fabric to each of the blocks. I hope it works!

Another bunch of scraps, a totally different quilt along (From Moose on the Porch), and here is the result...

This one is a mystery quilt along, so I have NO IDEA what it will look like when it's finished. I'm sure it's going to be more traditonal looking. I was supposed to use a jelly roll, but again -- too cheap -- so I hope my scraps serve me well.


And, finally, I'm feeling pretty excited to have scored this flat sheet from ebay for my Star Wars obsessed 11 year old. I'm hoping it becomes the back of a totally sweet quilt for him.

Friday, March 12, 2010

Needles

We've talked before about different needles when sewing. I can tell you from experience that using a STRETCH needle when making swimsuits or t-shirts makes ALL the difference in the world. I can only assume that is why most people don't like to sew with knits because they are using the wrong needle. It will make you cranky if you try sewing knits with just a Universal.

So as I was stocking up on some notions this week, I happened to see Quilting Needles and wondered what the difference was between those and regular Universal needles.

According to the Schmetz Website it has this to say about Quilting Needles:

Feature:
Special taper to the slightly rounded point.

Fabric Use:
Made especially for piecing and machine quilting. The special tapered design allows easier fabric penetration and helps eliminate skipped stitches.

One of the ladies at my favorite fabric store says that she uses quilting needles when she quilts and thinks that it does make a difference. I bought a package and am going to try it out for myself. She also directed me to this needle guide and it seems quite helpful. If you want one for your own reference you can find it here: Free Schmetz Needle Guide w/ $10 order at Schmetz.


Or check out the notions section at your fabric store to see if there is one there to take for free. It is about the size of 3x5 card.

So I guess the point of this post is, for those you who quilt more than any of us have, does using a quilting needle really make a difference in your quilts?

Monday, March 8, 2010

Recycled Cake Stand

Last Fall I went to a craft show at one of our local high schools. It is an annual event that I have never attended in all the years that we've lived in this area. I was mostly going to scope out the competition and determine if I might want to get involved this year and try my hand at selling some items.

It was a HUGE event! And I'm glad to report that I didn't see any items like those I have been thinking about doing. One of the coolest things I did see however--and there was a line of people waiting to buy--was a booth of recycled cake stands. This woman was a genius. Minimal cost, minimal effort and apparently a great return on her investment judging by those waiting in line to buy.

What she had done was to buy some mismatched decorative plates at a thrift store of varying shapes and colors and then glued those to various bowls, candy dishes, etc. to make a "new" cake stand. And she was only selling them for $5 apiece.

Well, I decided to try my own hand at it. I went shopping at a local thrift shop and came up with this beauty.

I had actually found a matching candy bowl to go with the plate. (The lady at the craft show didn't have any that appeared to match per se, but those she had made sure looked great.)

So then the next step was to decide which way to attach the two together. ...like the above pic, or the one below.....
I chose this option.

You just need to make sure you use an Epoxy adhesive when putting one together. I used one from Super Glue®.

Now that "cake season" is starting at our house--the first birthdays of the year at our house are in April--we'll be ready in style.

Wednesday, March 3, 2010

Let's Talk Bindings...

I am having issues with bindings.
Well, not until I tried to do the bindings right.


Let me explain. When I was learning how to bind I found myself a nice little tutorial and went to town. But my first binding didn't turn out so well. I chalked it up to the learning curve. So I did a little modification and~Voila~a perfect binding. I was hooked! So, now that I'm feeling confident about my binding abilities I decided to try the right way again.


The trouble is, I'm still not exactly happy with the right way.

The right way:
2.5 inch strips folded in half
sew thru both thickness
fold over, pin, and stitch on the back side

My issue is that this way makes the corners WAYYY too bulky, the binding ultrasuper skinny, and the folded side doesn't always cover the seem on the back side. I know how to fix the super skinny-ness and the folded side not covering the seem, but the bulky corners are making me crazy!

My (modified) way:
2.5 inch strips
sew thru one thickness
fold up to the seam and iron
fold over, pin, and stitch on the back side


My way takes about thismuch longer to accomplish, the binding does come out a little wider, but the corners lay nice and flat.


Left: skinny right way Right: wider wrong way

I know the quilt police aren't going to come to my house if I'm doing it wrong, I'm just wondering what I'm not getting. So my question is: Am I the only one who finds the corners to be too bulky on the right way? Do you have any binding advice/tips? I'll take anything.

In the meantime...


In an effort to wait and show my quilts AFTER they are completely finished, here is my current stack of bindings that are waiting to be attached. I'm starting to feel like this only it's the quilting that's holding me up.


1. Baby Boy Quilt 2. Lap quilt in solids to be revealed later 3. Another lap quilt to be revealed later 4. Antique rose quilt for me 5. Niece's Baby Girl Quilt 6. For my ORB Quilt Along Quilt 7. Neutral Baby Quilt

Tuesday, March 2, 2010

Playdate dress {Oliver + S}


Detail views of sleeve:


Love this contrasting hem:


Pattern Pros:

It has pockets!
a million possibilities with that hem and yoke
Easy to follow instructions (no surprise there. you can count on that with Oliver and S)

Pattern Cons:

Yoke takes a little time, but not really a con.
I thought the length was a touch on the short side, even with my smaller than average child.


Great pattern, but I probably won't be making one in every size like I do with many of their patterns. I do want to attempt one more in a larger size. Making the yoke and the main body the same solid color. Then embellishing the yoke. Something like this:

Over the top for a toddler? Probably. But I still want to give it a go.

And here is the other bubble dress I completed for my baby. This is 12-18 month size to fit her later.

Monday, March 1, 2010

Behind-the-door Organization

This is the "entry" to my 1960's built home. It is a 40" x 40" little cubby area.
Front door on the left. Closet door on the right.

When we first bought his home we had 1 small kid. It was a "big" house for us then. Not so much now with 5 kids. At times it feels like we are bursting at the seams. However, we aren't moving anytime soon (that's a whole 'nother pain in the rear). So instead we've had to adjust with the limited storage space that we do have available.

I'm not sure where I got this idea--I think our sister Shauna recommended this--or maybe we got it from Family Fun, but either way, I've been doing this for years and it has helped control the disaster/madness that usually occurs during Winter in our "entry". Enough time has gone by that a good portion of these pockets were ripped and unusable, after having been safety pinned for a time, too. I've needed a new one for at least a year now. Planned on sewing one (had a pattern in the stash) and adding another row of pockets. Never got around to it. Found a shoe organizer on clearance for $6 at Wal-Mart last week while looking for something else. Bought it. Now behind my door looks like this:

An additional 4 pockets help outs immensely!

Now after all that organization, and not counting the Winter accessories that are currently already on my children, I just need to find matches for these babies....

Yep, 13 gloves or mittens without a partner....
And those 2 center bottom that look like they are a pair....both righties.
Ugh!! Drives me nuts!

LinkWithin

Related Posts Plugin for WordPress, Blogger...